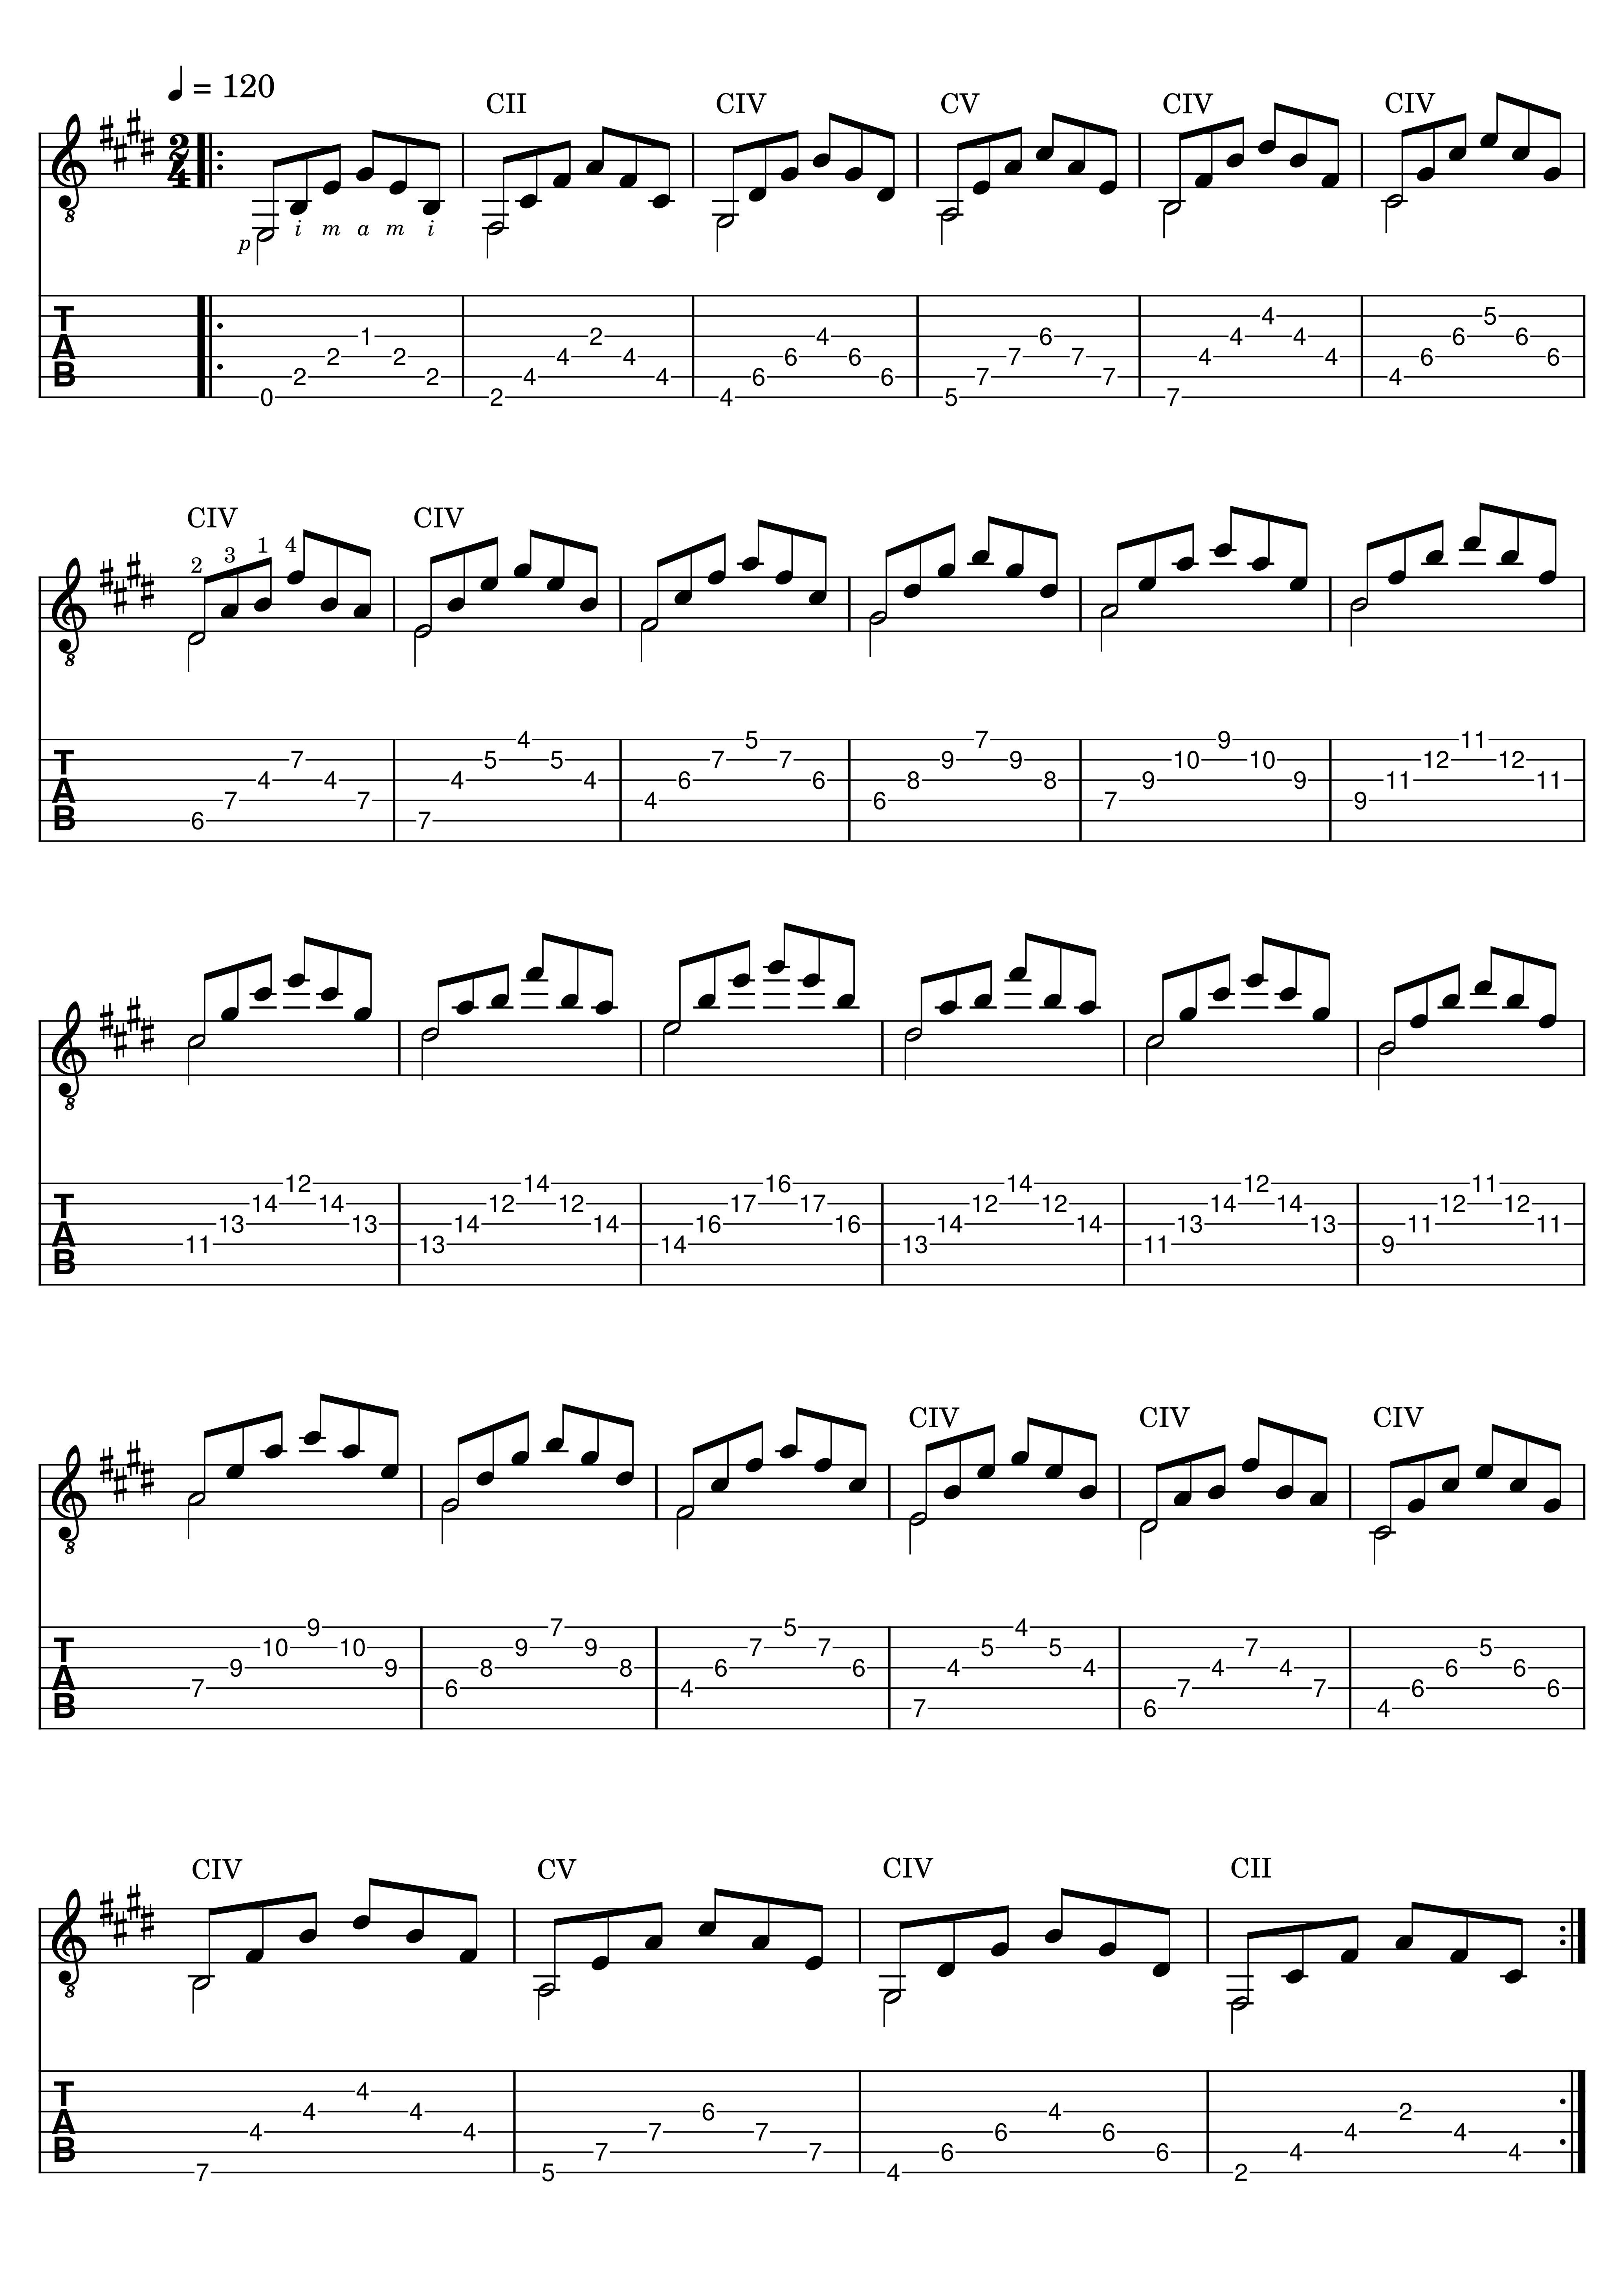
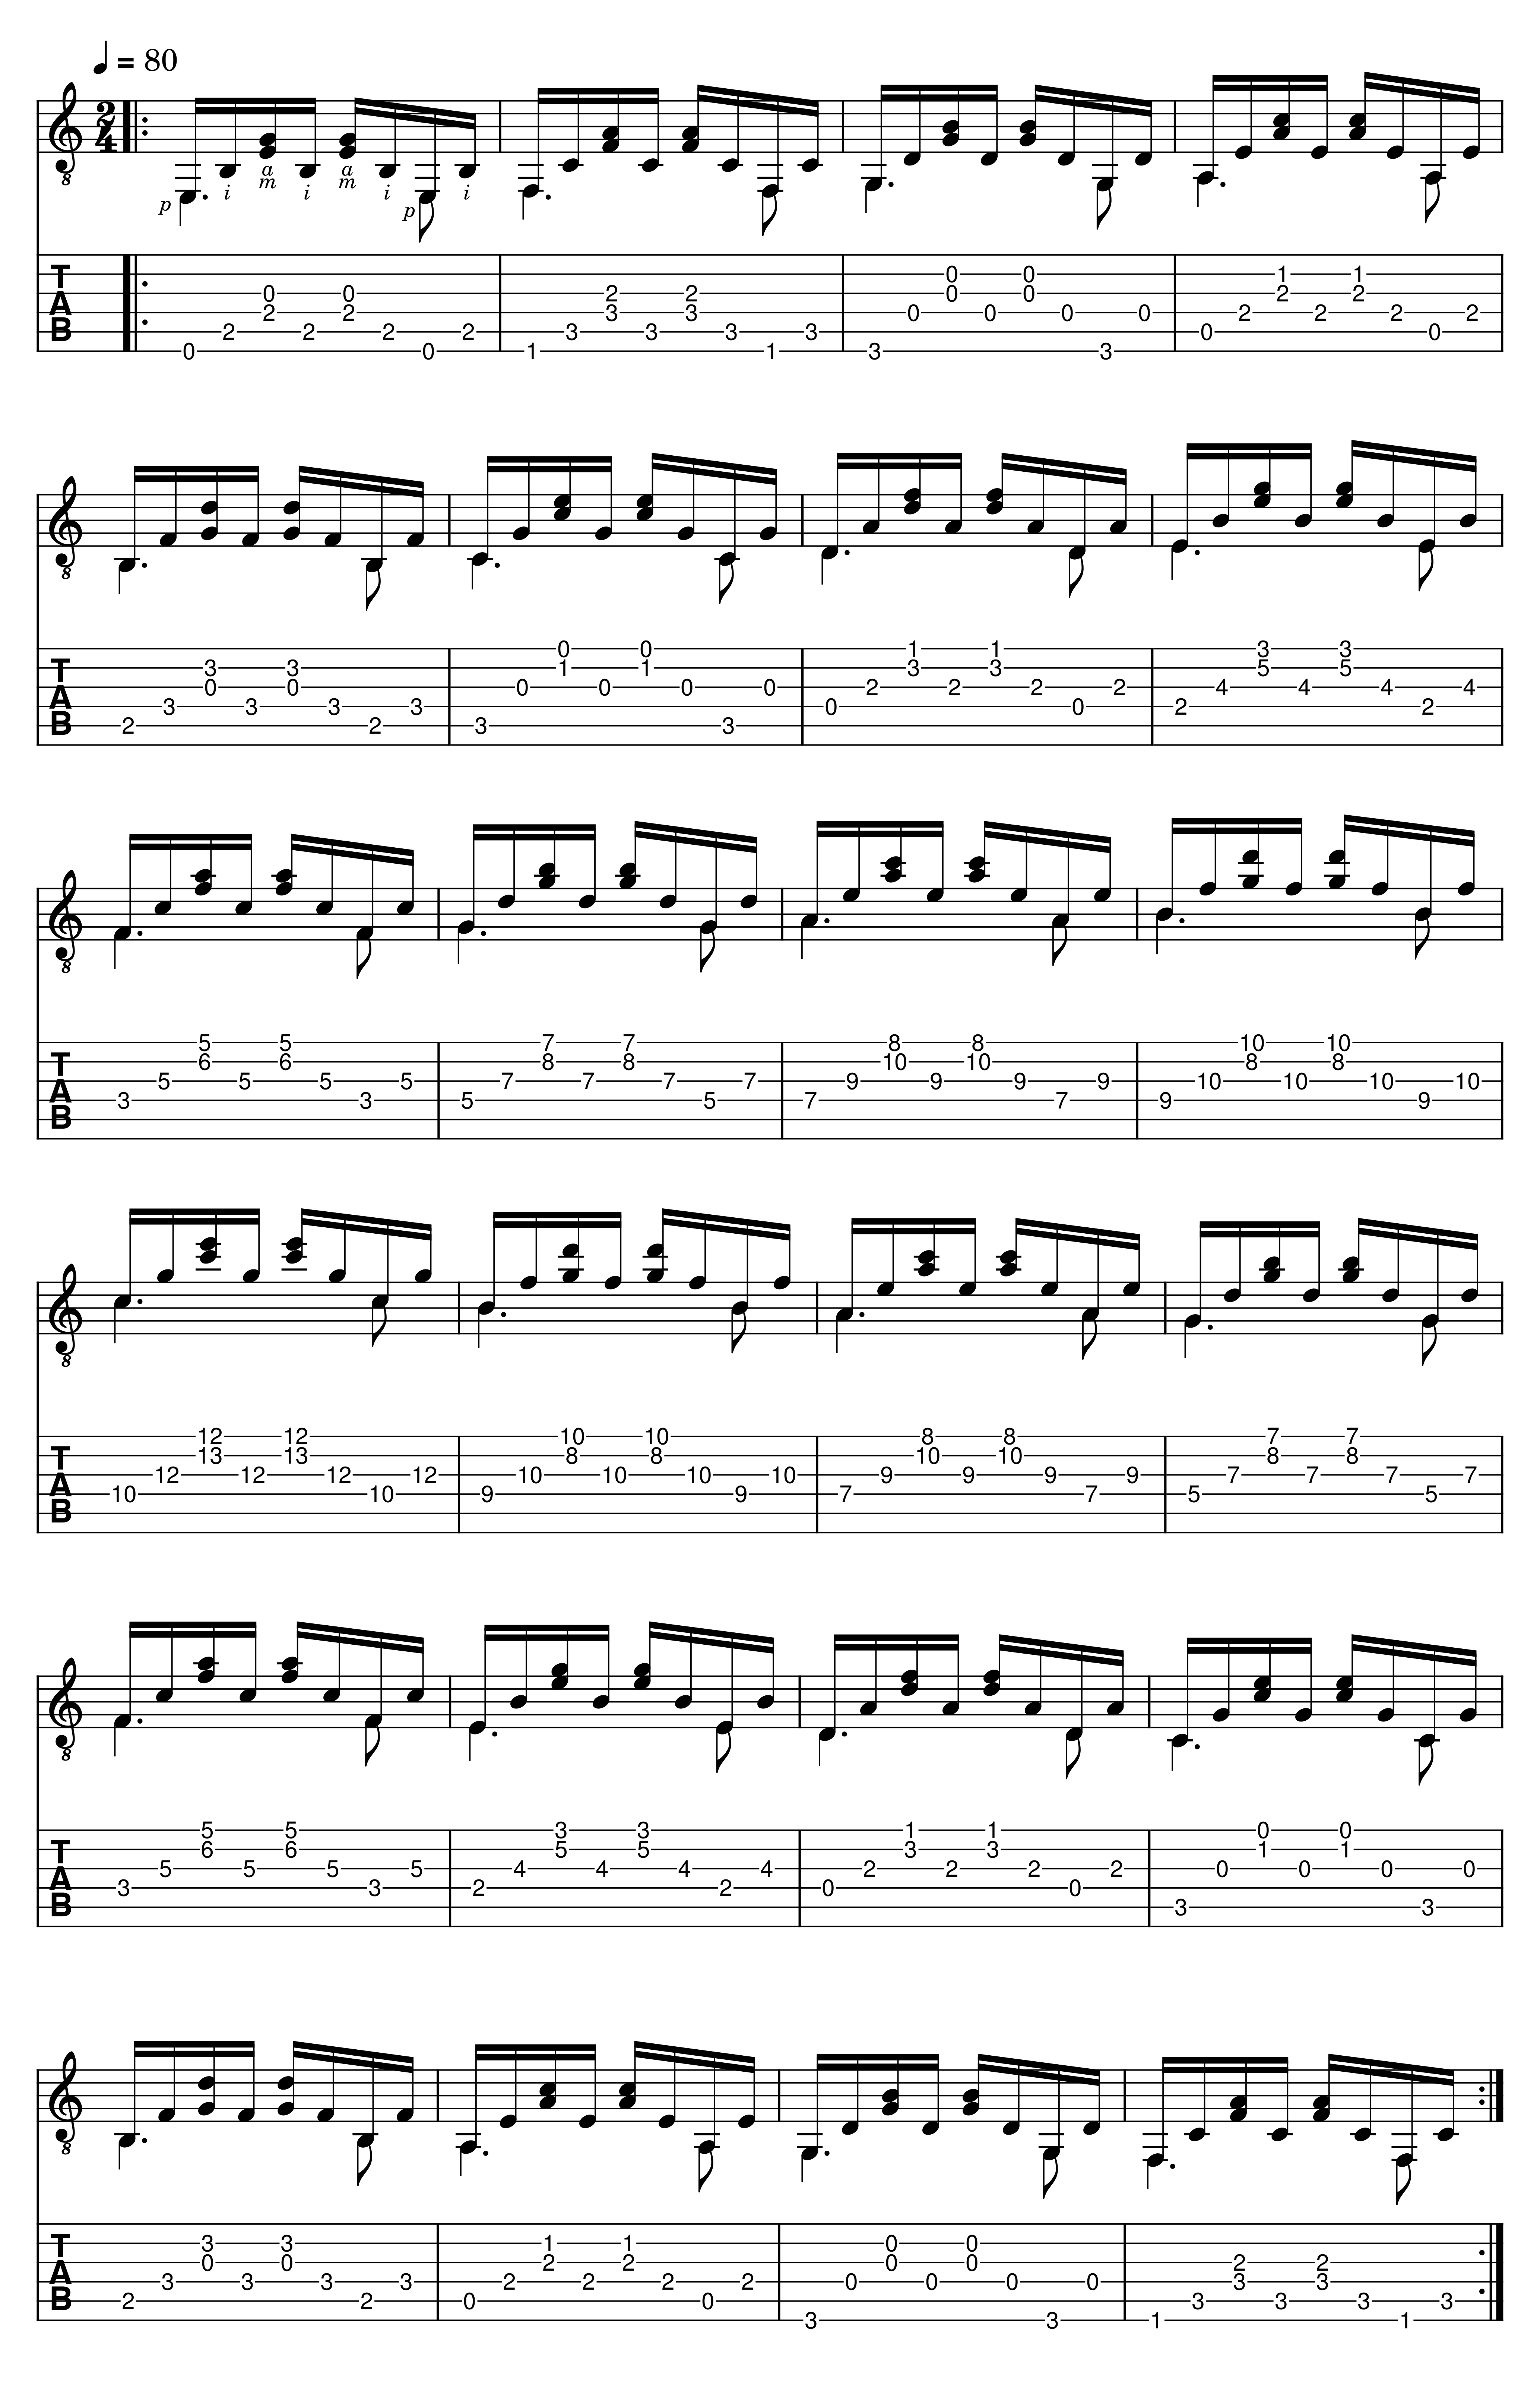
This exercise combines a few techniques to warm up both hands. It starts with the chords D, A, G and F sharp in arpeggios and picado and ends with a variation on this idea, using the chords B minor, A, G and F sharp. In the last four measures, I play a soleá falseta of Niño Ricardo transposed from E to F sharp. Notice that all the slurs are on the first two notes of the triplet, and be sure to play the A sharp on the third string at the end of the third staff. Keep the notes ringing as much as possible when changing from one position to another, and make sure your left-hand thumb stays behind the guitar's neck and behind your middle finger.
This exercise strengthens thumb, index and middle. Play everything in rest strokes, letting thumb and fingers come to rest on the following string, and alternate your index and middle fingers at all times. Keep your fingertips very close to the strings. This includes the thumb, because it is the base for all the other fingerstrokes and should not be subordinate to them. In this sense, the exercise can be simplified by playing a single bass note in each measure. The number 2 at the end of the first measure of the second staff indicates that you should fret with your middle finger. Keep your left-hand thumb behind the guitar's neck and behind your middle finger without moving it from the same spot throughout the exercise.
The same pattern in sixteenths:
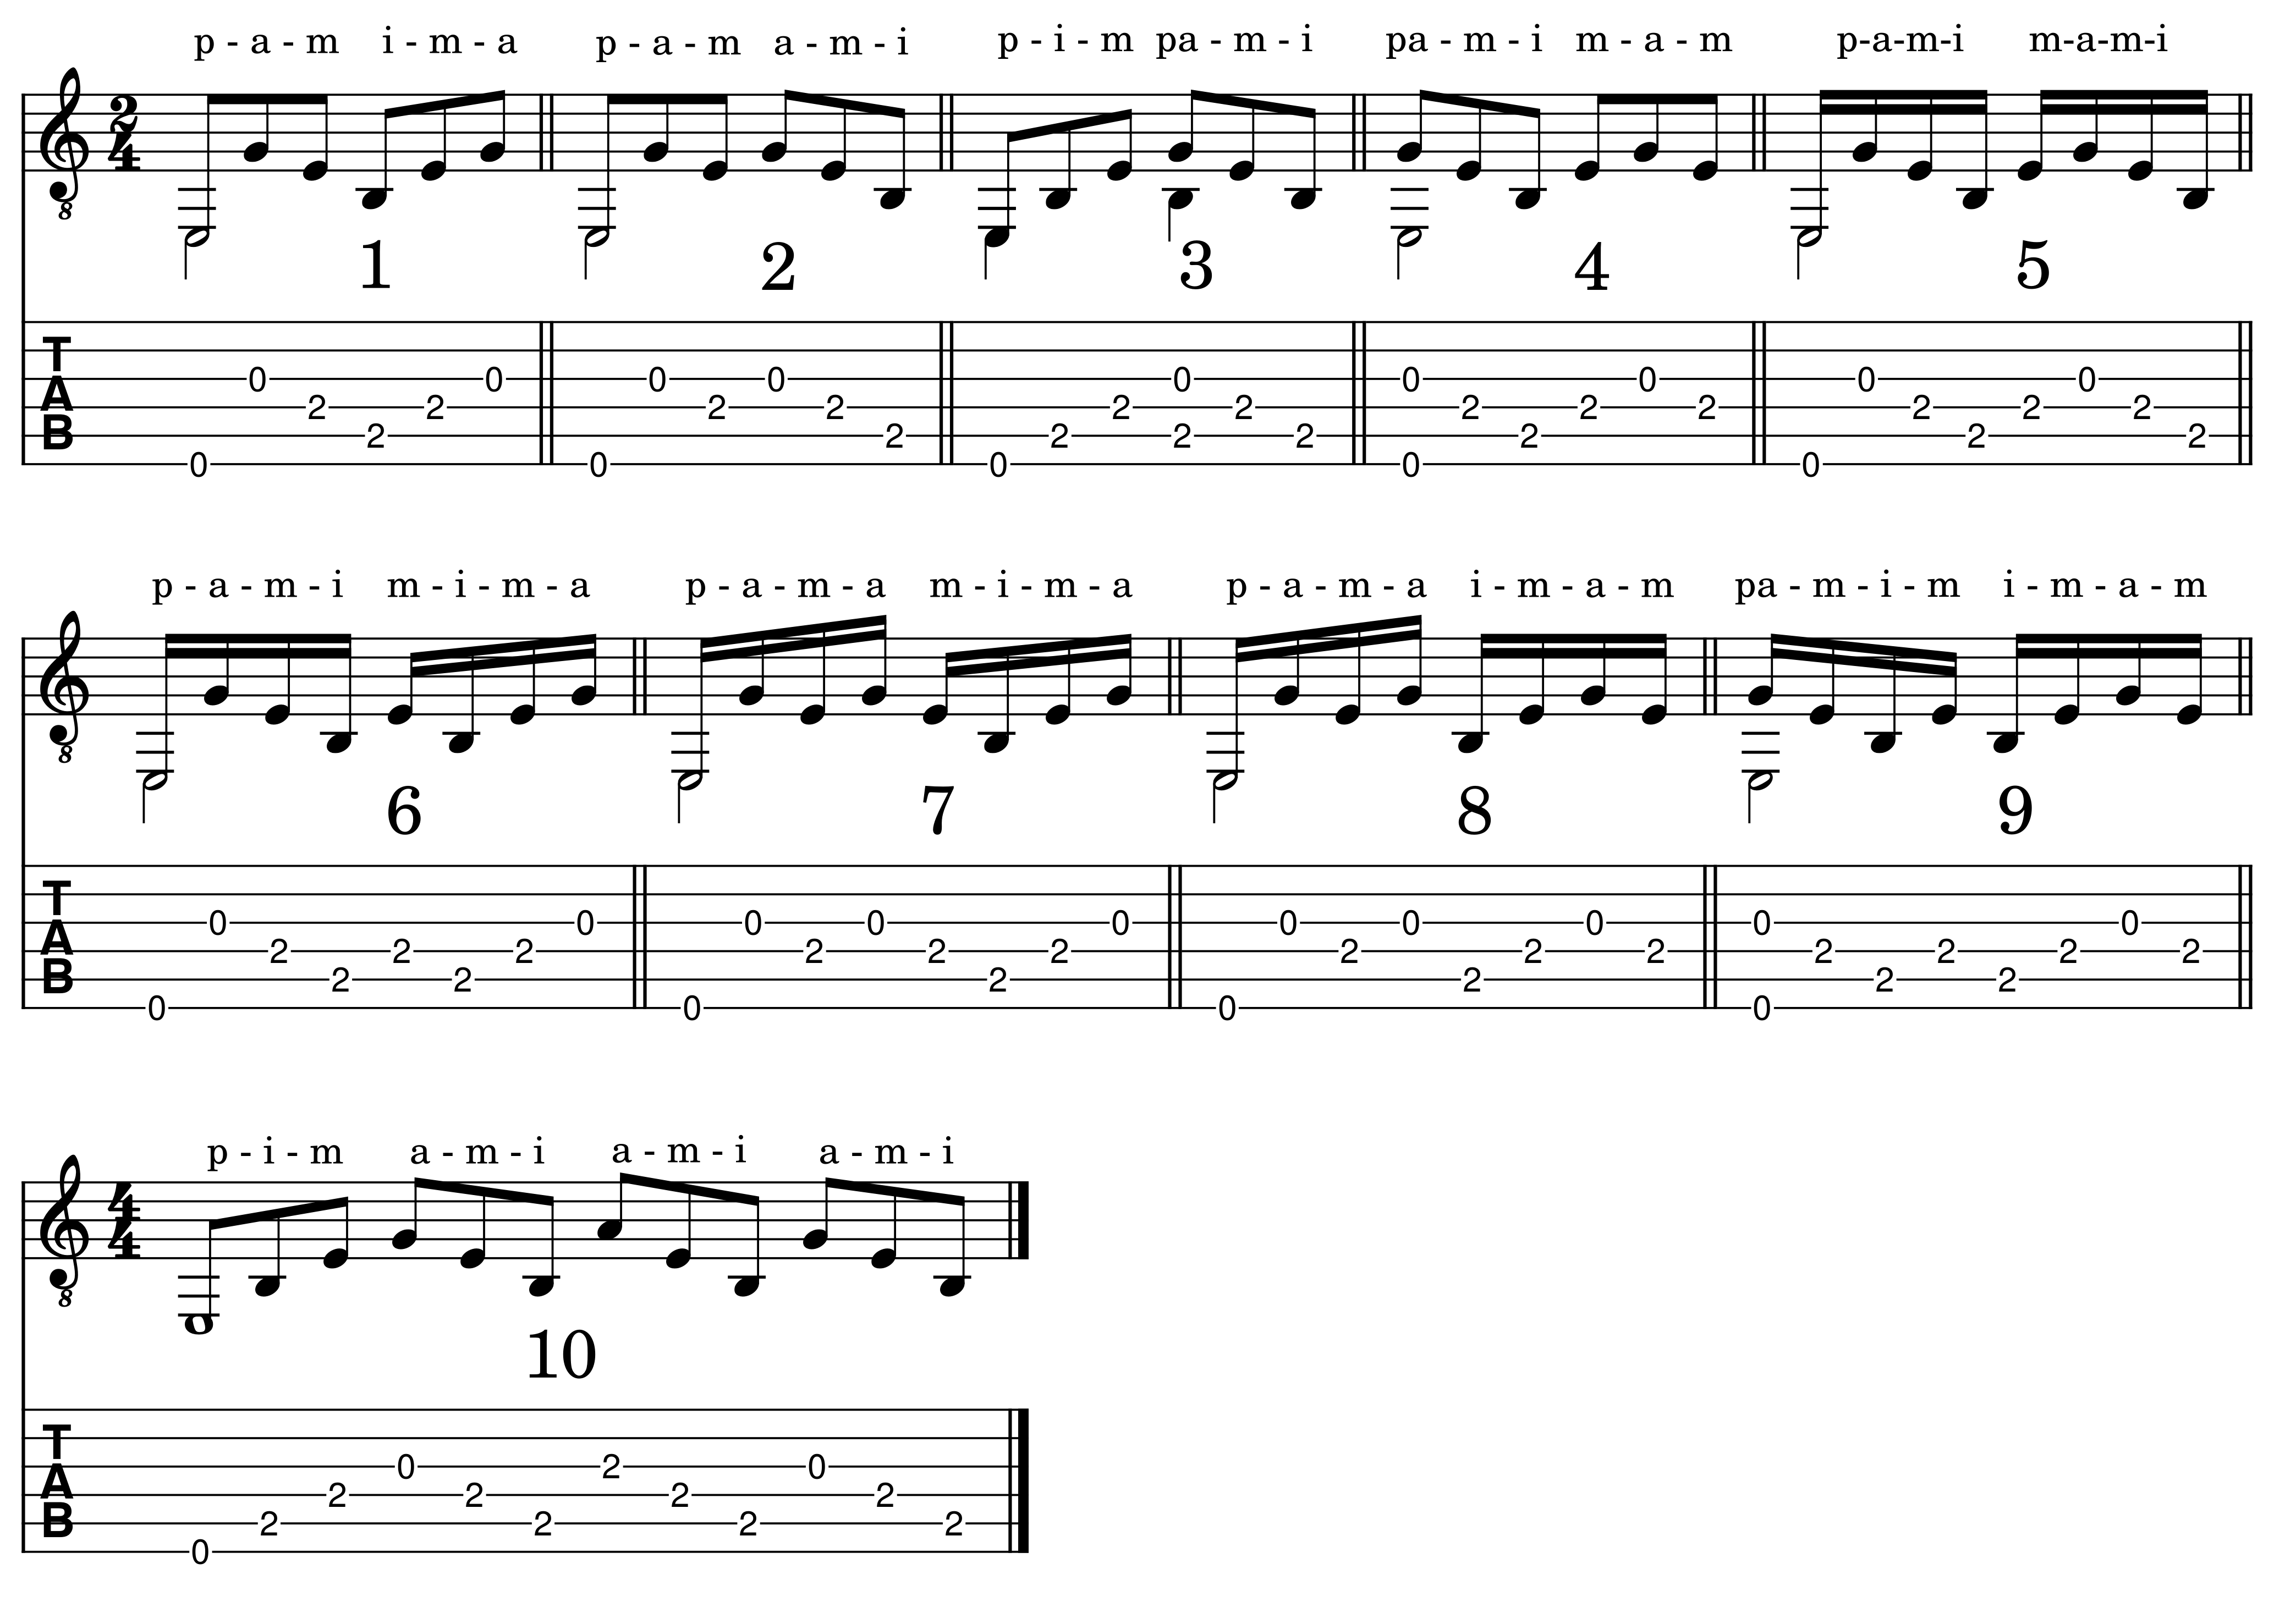
These exercices are designed to strengthen your picado technique, especially the movement of the fingers to a new string.
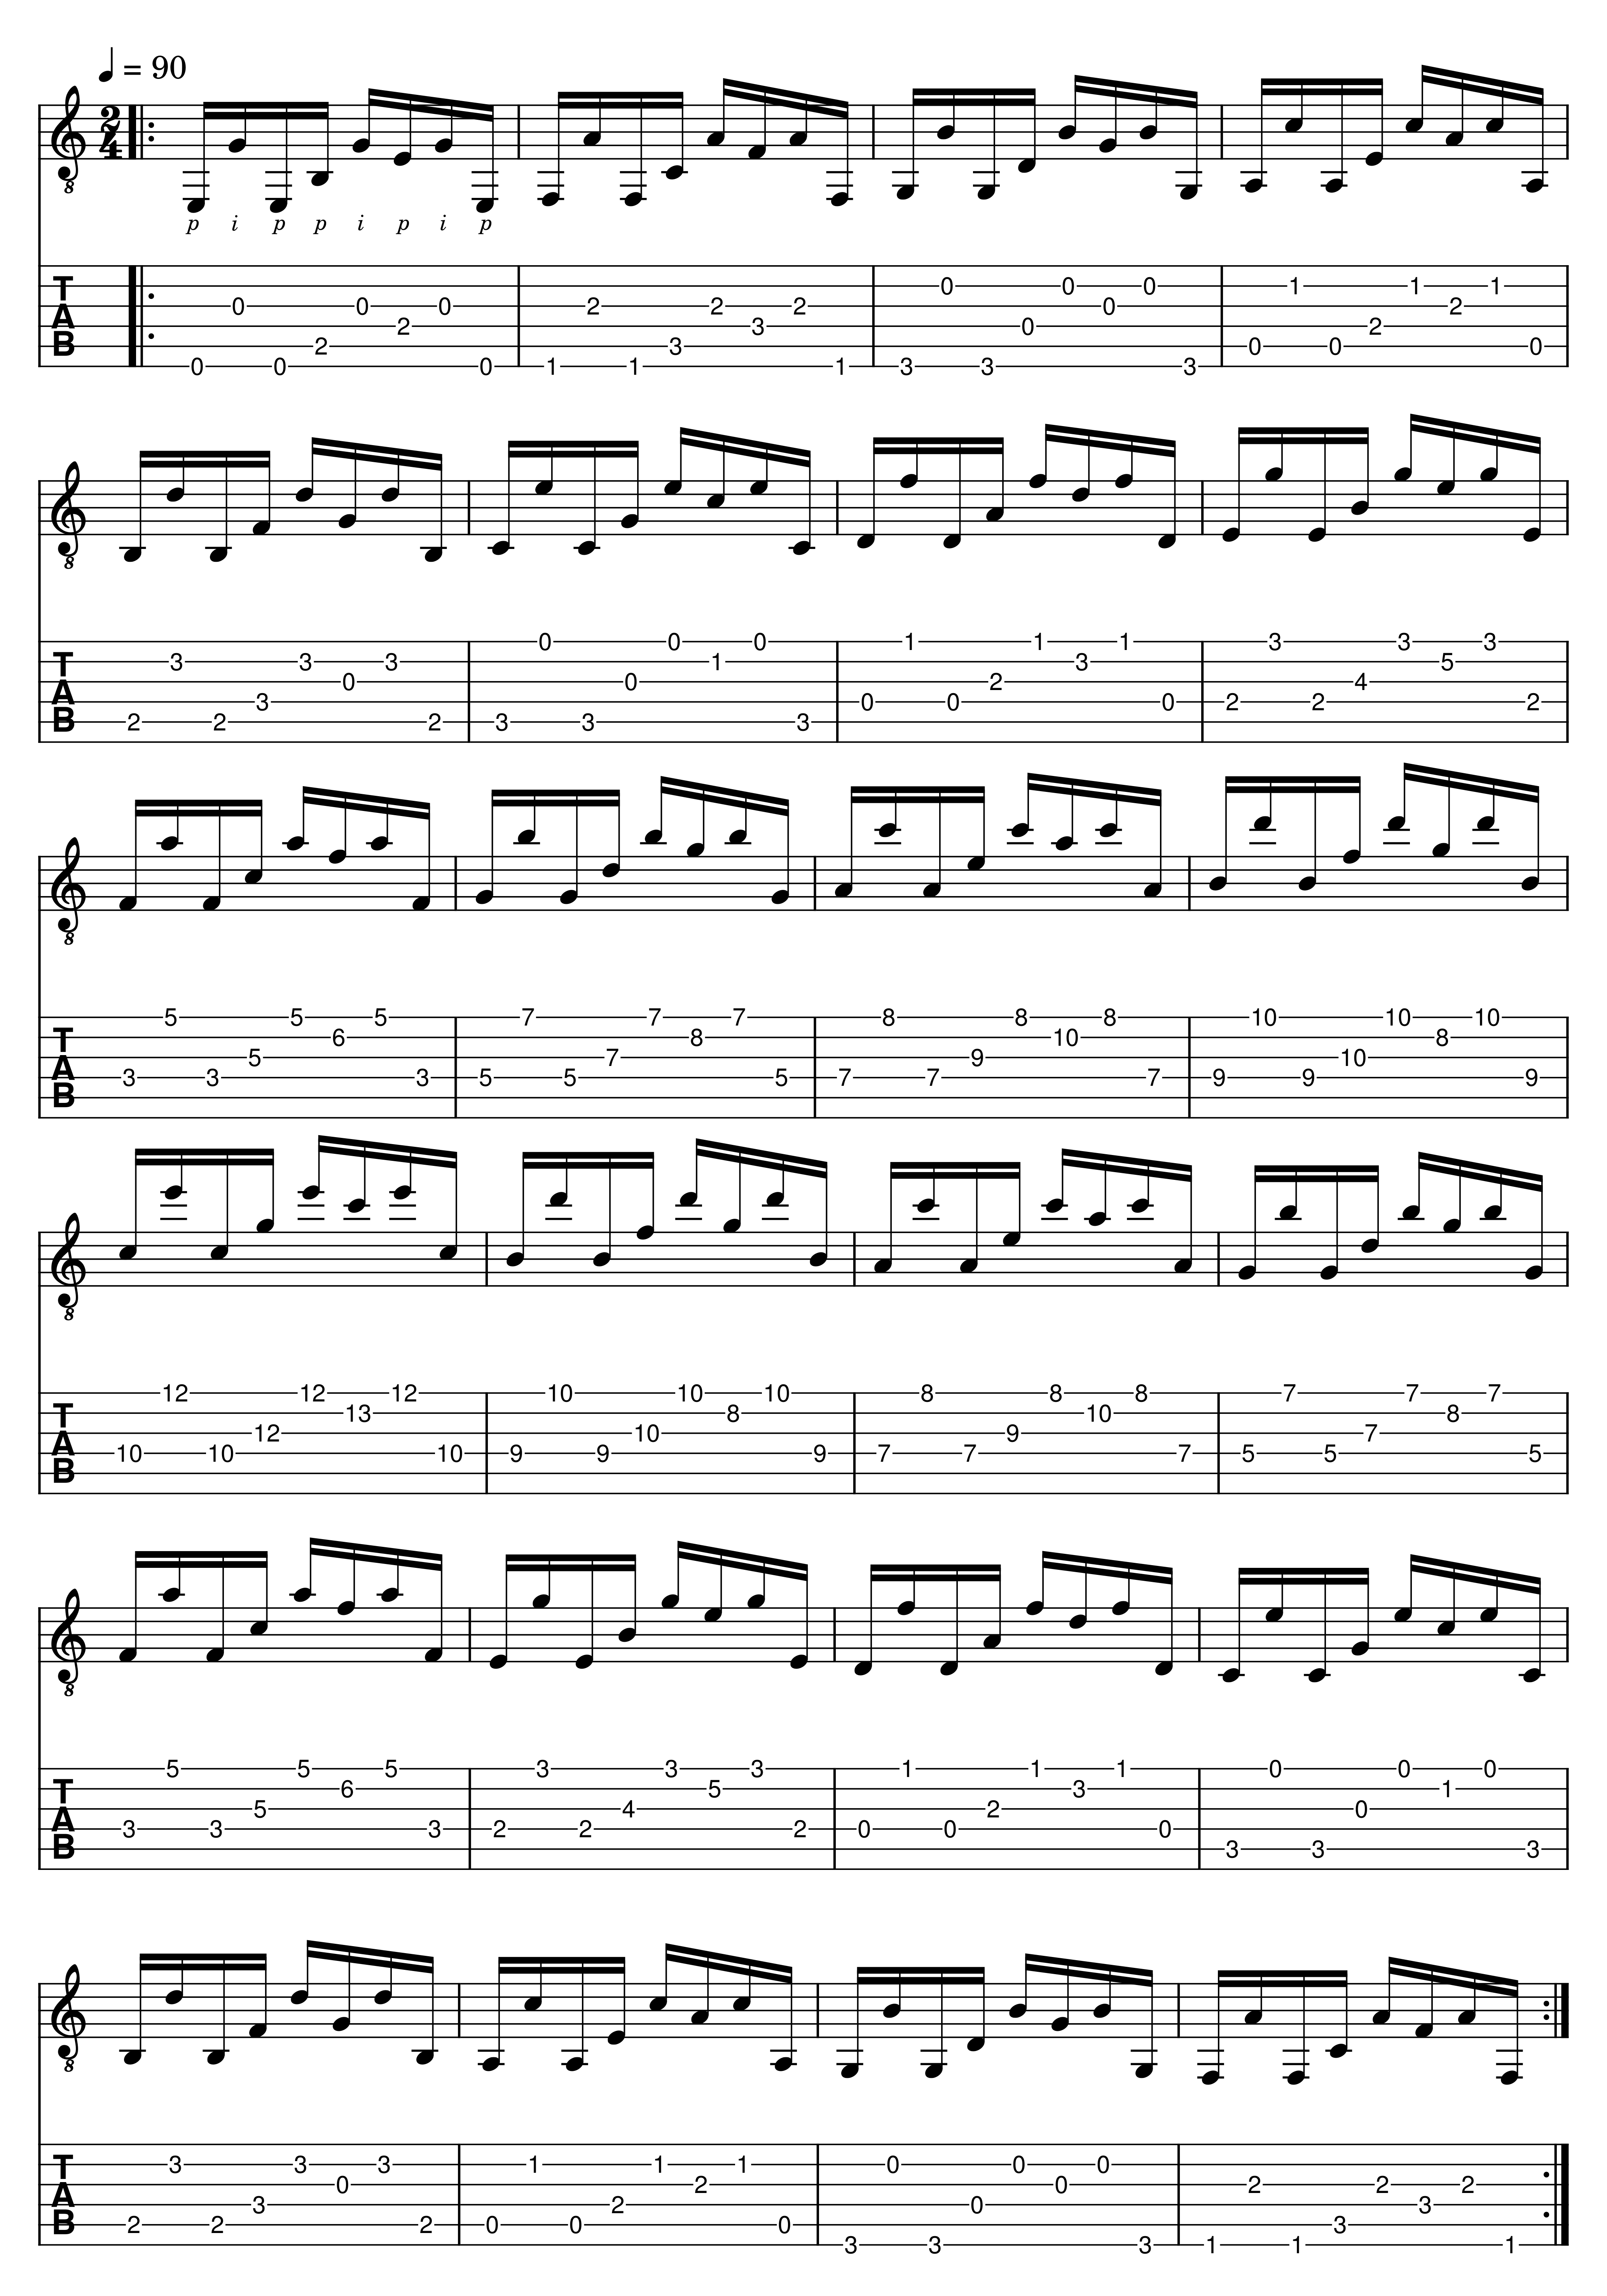
I recommend starting with Exercises 1 and 2 when you want to work on picado because the muted strings focus your attention on precise striking-hand technique. For Exercise 1, play eighth notes on each muted string, alternating your index and middle fingers and repeating the pattern in a loop. Make sure that you always alternate index and middle, use rest strokes and keep your thumb on one of the bass strings. Notice the difference between starting the pattern i-m and m-i and that it's awkward to move to a lower-pitched string with the middle finger (use rest strokes). When you can play the pattern quickly and starting with either finger, do the same with triplets, as seen in Exercise 2. If Exercise 3 is too difficult, you need to go back to Exercises 1 and 2 and look at the rest strokes.

For Exercise 3, start the looped pattern with your index finger and notice that the new string always falls on the middle finger in the ascent and on the index in the descent. Now play the same pattern again, but start with your middle finger. It's probably going to feel very awkward, particularly in the descent, where it's very important to make use of rest strokes. Although we normally avoid the awkward fingering, there are parts of certain falsetas in which there is no other alternative. The rest of these exercises are meant to be played with the two fingerings (i-m, m-i) in order to concentrate on the way that the fingers "lie" on different sets of strings. Remember to keep your thumb on one of the bass strings.

The descent is particularly difficult when using the awkward fingering. Exercise 4 loops the pattern in a way that repeats the same fingering for each new cycle, and Exercise 5 alternates the two fingerings.


Exercise 6 places the preceding pattern on different sets of strings. Each measure can be looped for practice on a particular set of strings.

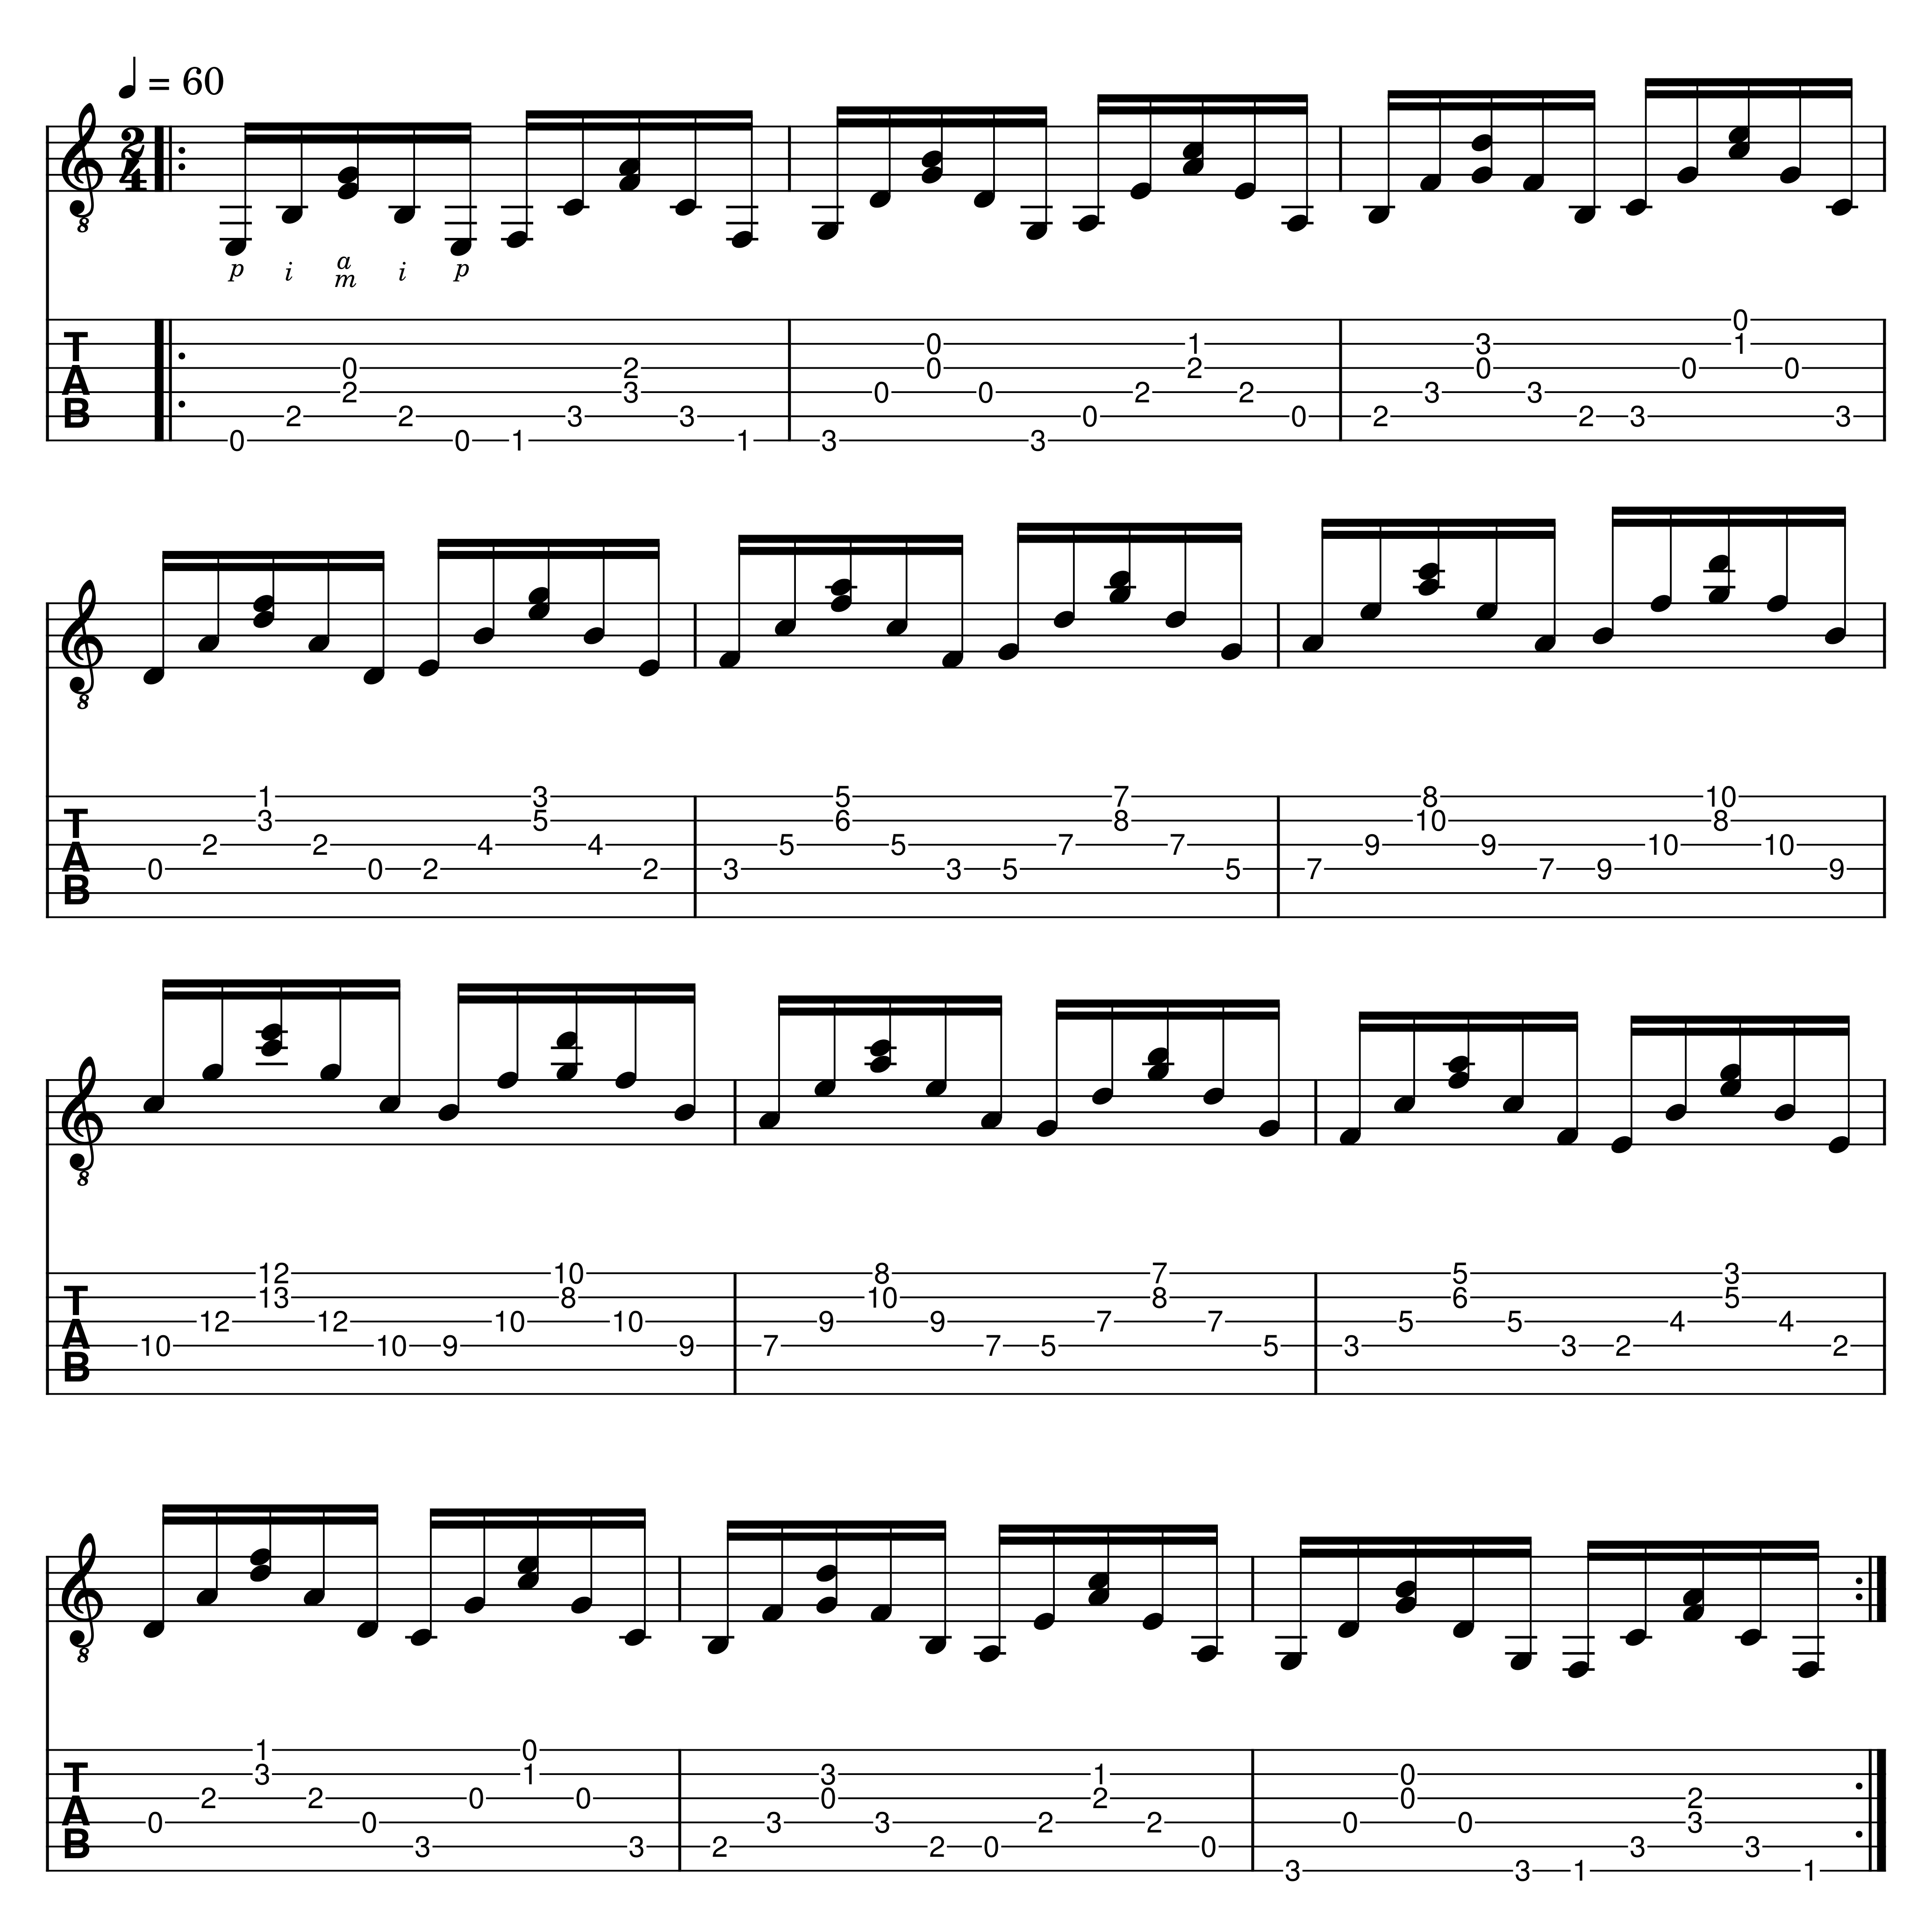
Exercise 7 distributes the same 12-note pattern in sixteenths (4x3=12, 3x4=12).

Exercise 8 is a variation that is offset in such a way that every other beat is one note lower in the scale (beats 1, 3, 5, etc.) Of these exercises, this one is the best for working on the awkward fingering.

You don't have to limit these patterns to the C major scale: with F sharp, it would be G major (granaínas); with B flat, it would be F major (por medio), etc.
The following exercises apply different striking-hand patterns to a progression of diatonic chords in the key of C major. Diatonic progressions sound very natural because the chords consist of every other note of a major (diatonic) scale. The C major scale is C-D-E-F-G-A-B-C. Starting at the tonic and building a chord with each note yields the following chords: C-E-G, D-F-A, E-G-B, F-A-C, G-B-D, A-C-E and B-D-F. These three-note chords are called triads, the last of which appears in these exercises as the four-note chord G7 (G-B-D-F). It will help you to keep your place while playing if you remember that the chords, starting at the tonic and in ascending order, are one major, two minors, two majors, one minor and one seventh. Keep your left-hand thumb behind the guitar's neck and behind your middle finger without moving it from the same spot in the first seven chords (up to and including the D minor).
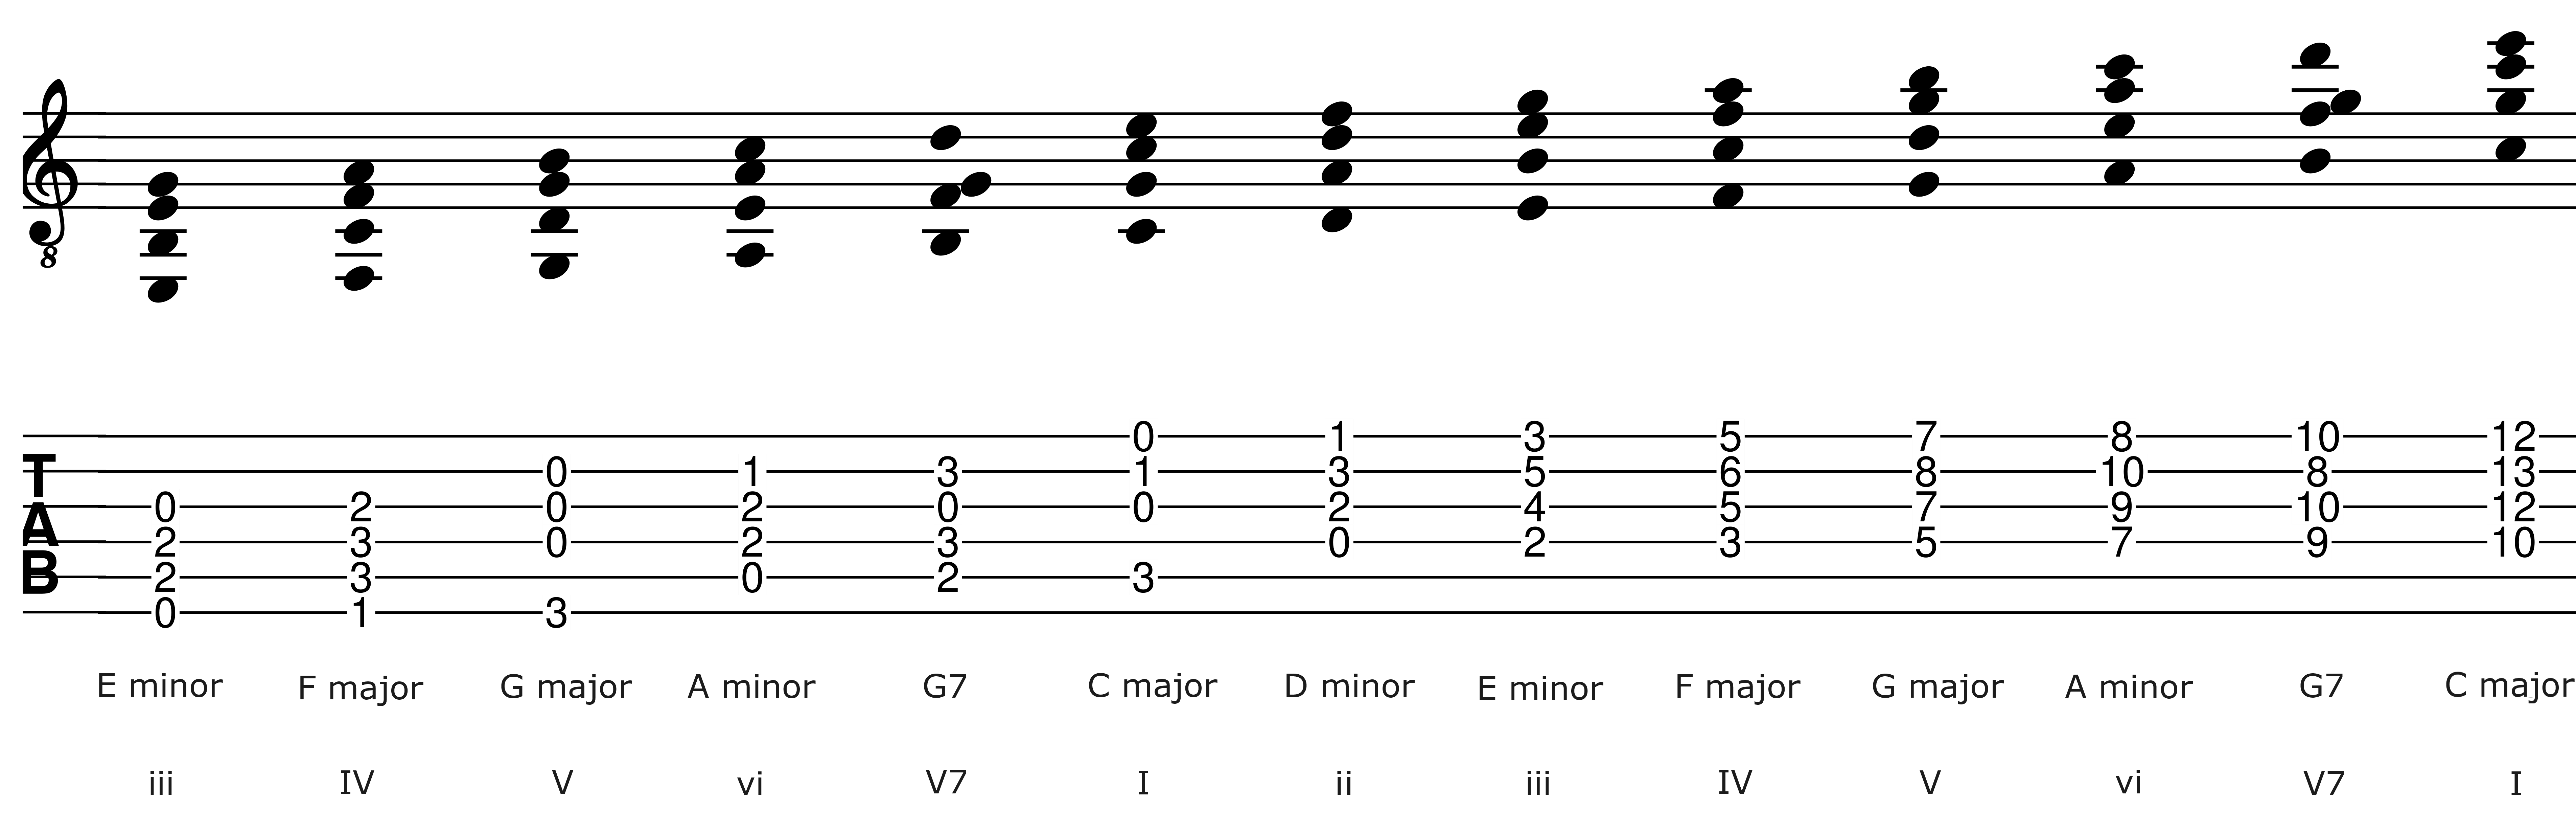
The above diagram shows how these chords lie on the accessible parts of the fretboard, starting with an E minor in the lowest position and ending with a C major in the highest. The Roman numerals in the diagram represent scale degrees, which are a generic way of referring to the chords. Major chords are in upper case and minor chords are in lower case. Because all the exercises start and end on E minor, you could think of the progression as being in the key of E Phrygian rather than C major, in which case, the E minor would be i, the F major would be II, etc.
All the exercises start with E minor in first position and move up the fretboard to C major at the 10th fret, at which point the chords reverse order, returning to E minor and forming a loop in which the second half of the exercise mirrors the first (12 chords up and 12 chords down). The exercises make use of this chord progression to apply different patterns, time values and techniques. I've grouped the exercises by technique and the patterns by difficulty.
The diatonic progression flows very naturally and your ear should easily guide you. The scores indicate fingerings and the use of barres where necessary; the rest should be clear enough. Nonetheless, have a look at the following observations before you start playing:
With regard to the chords in the upper register:
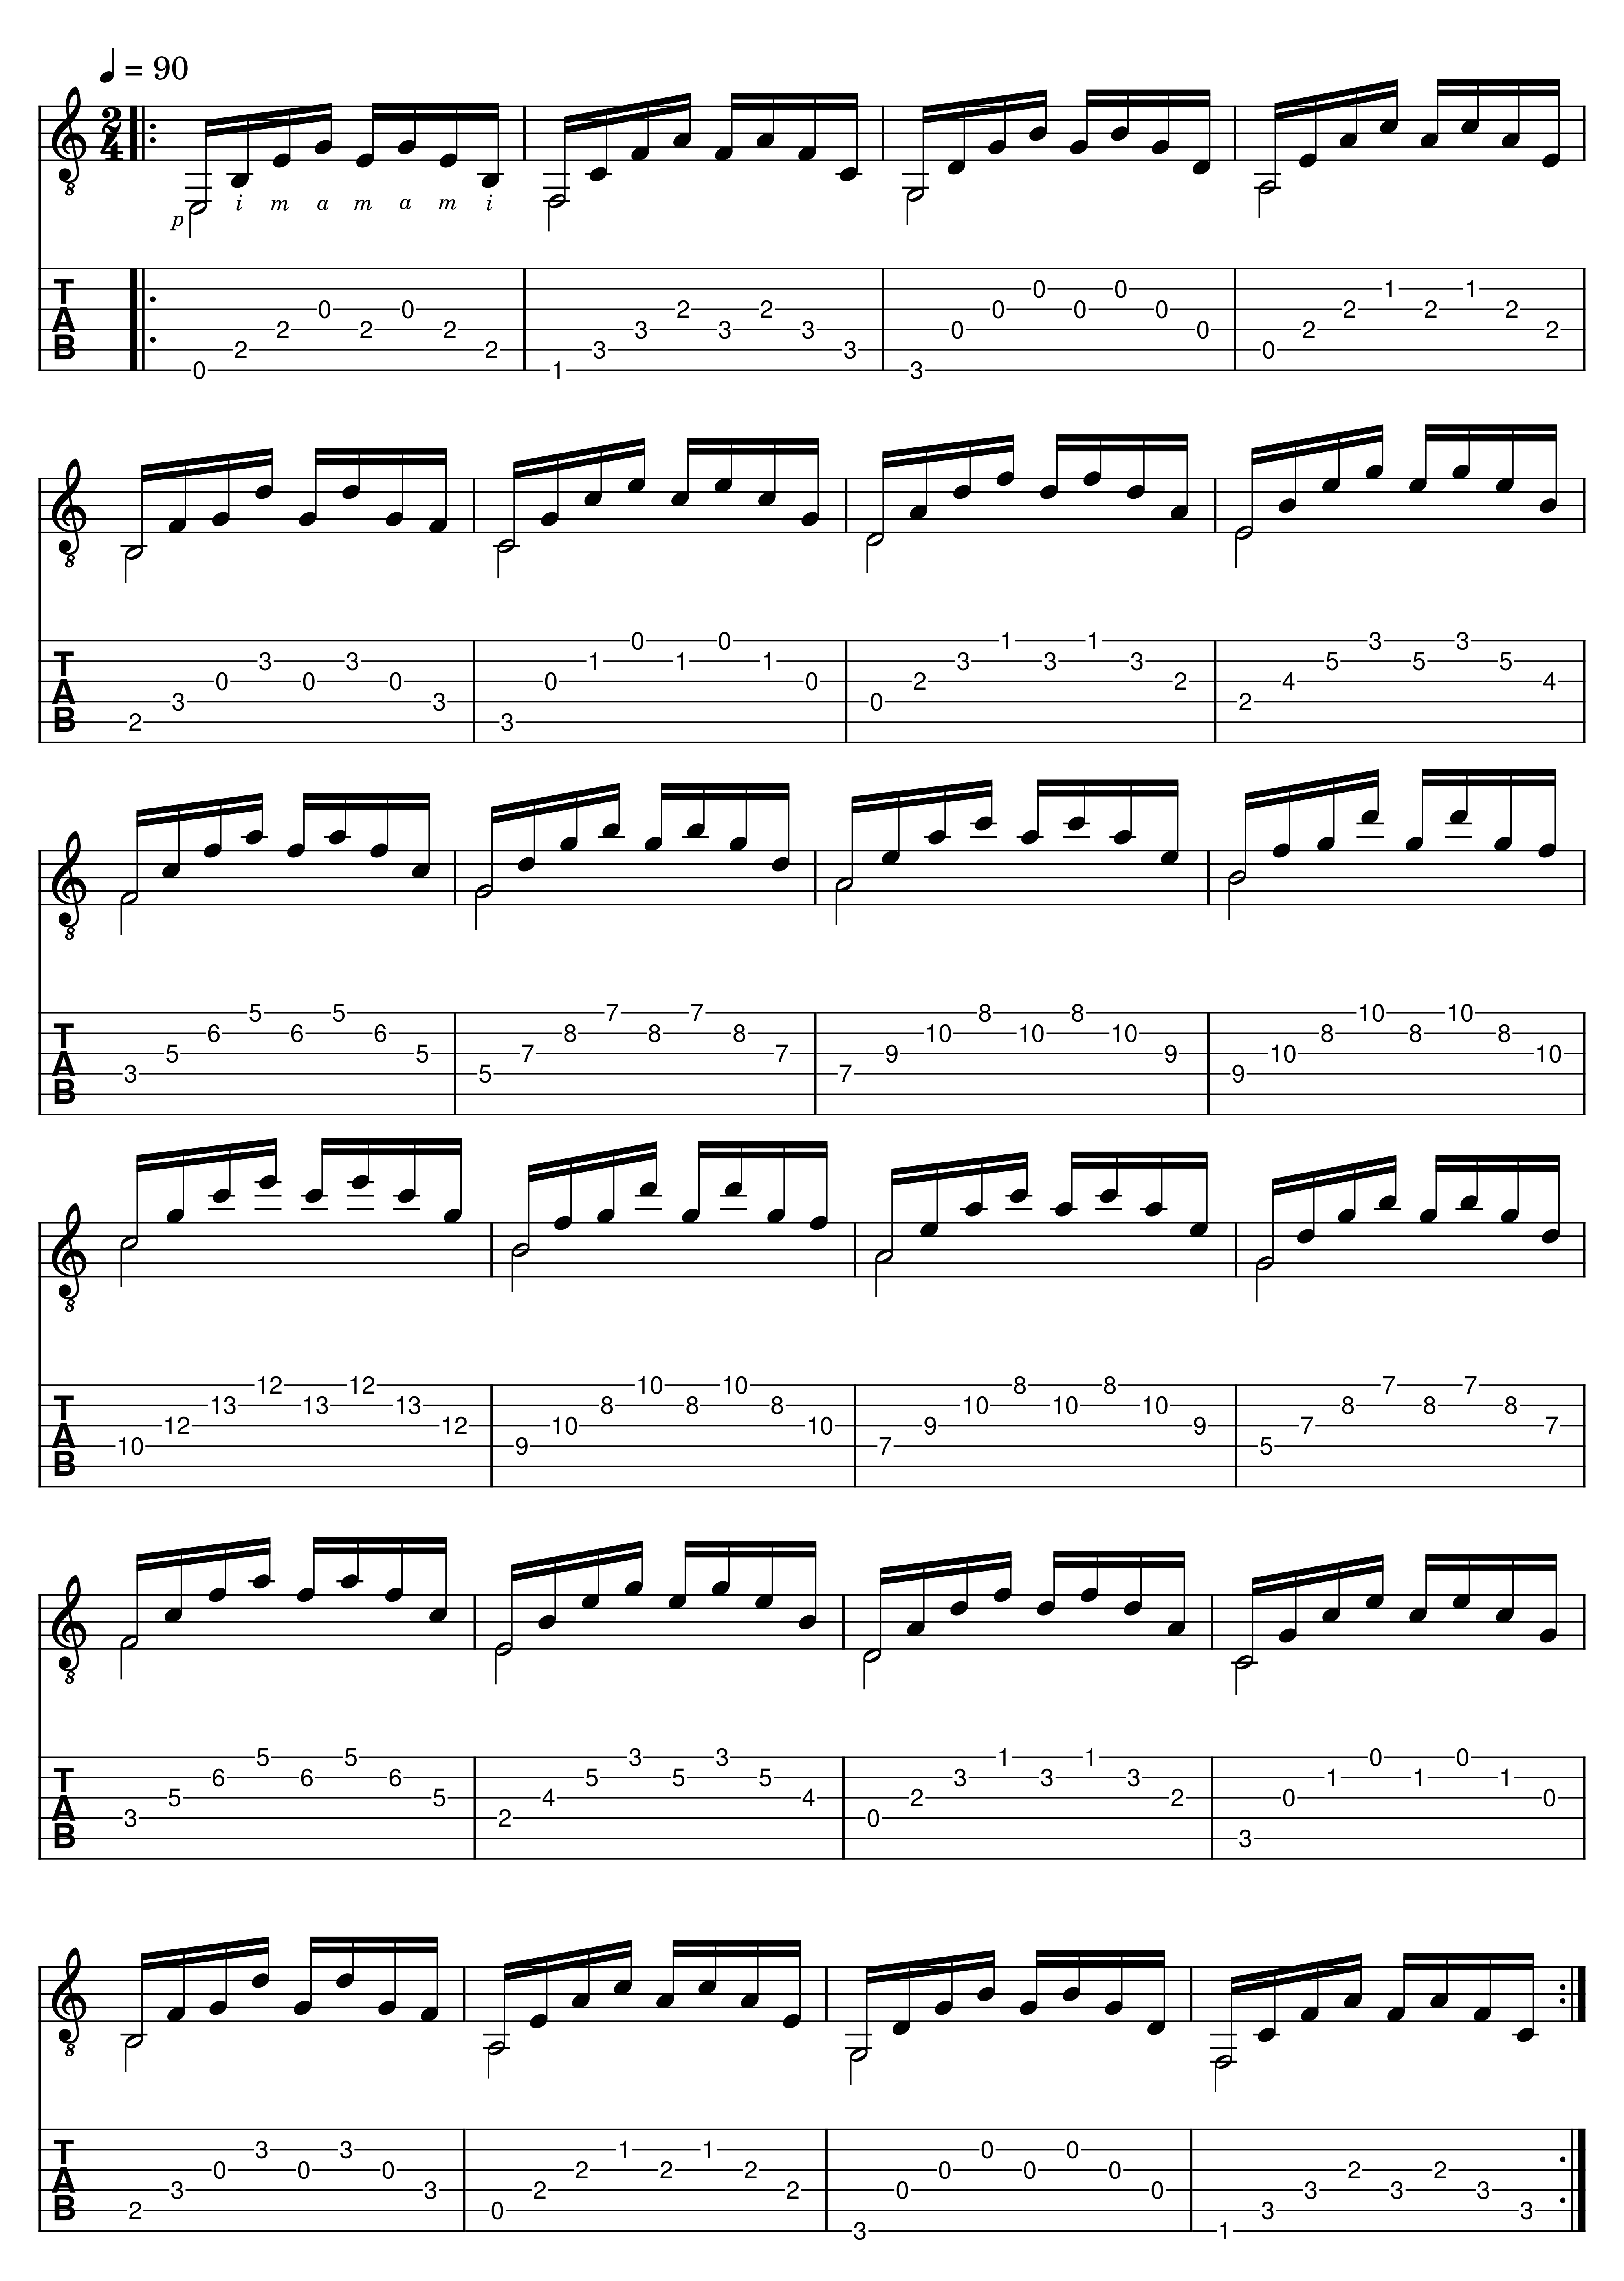
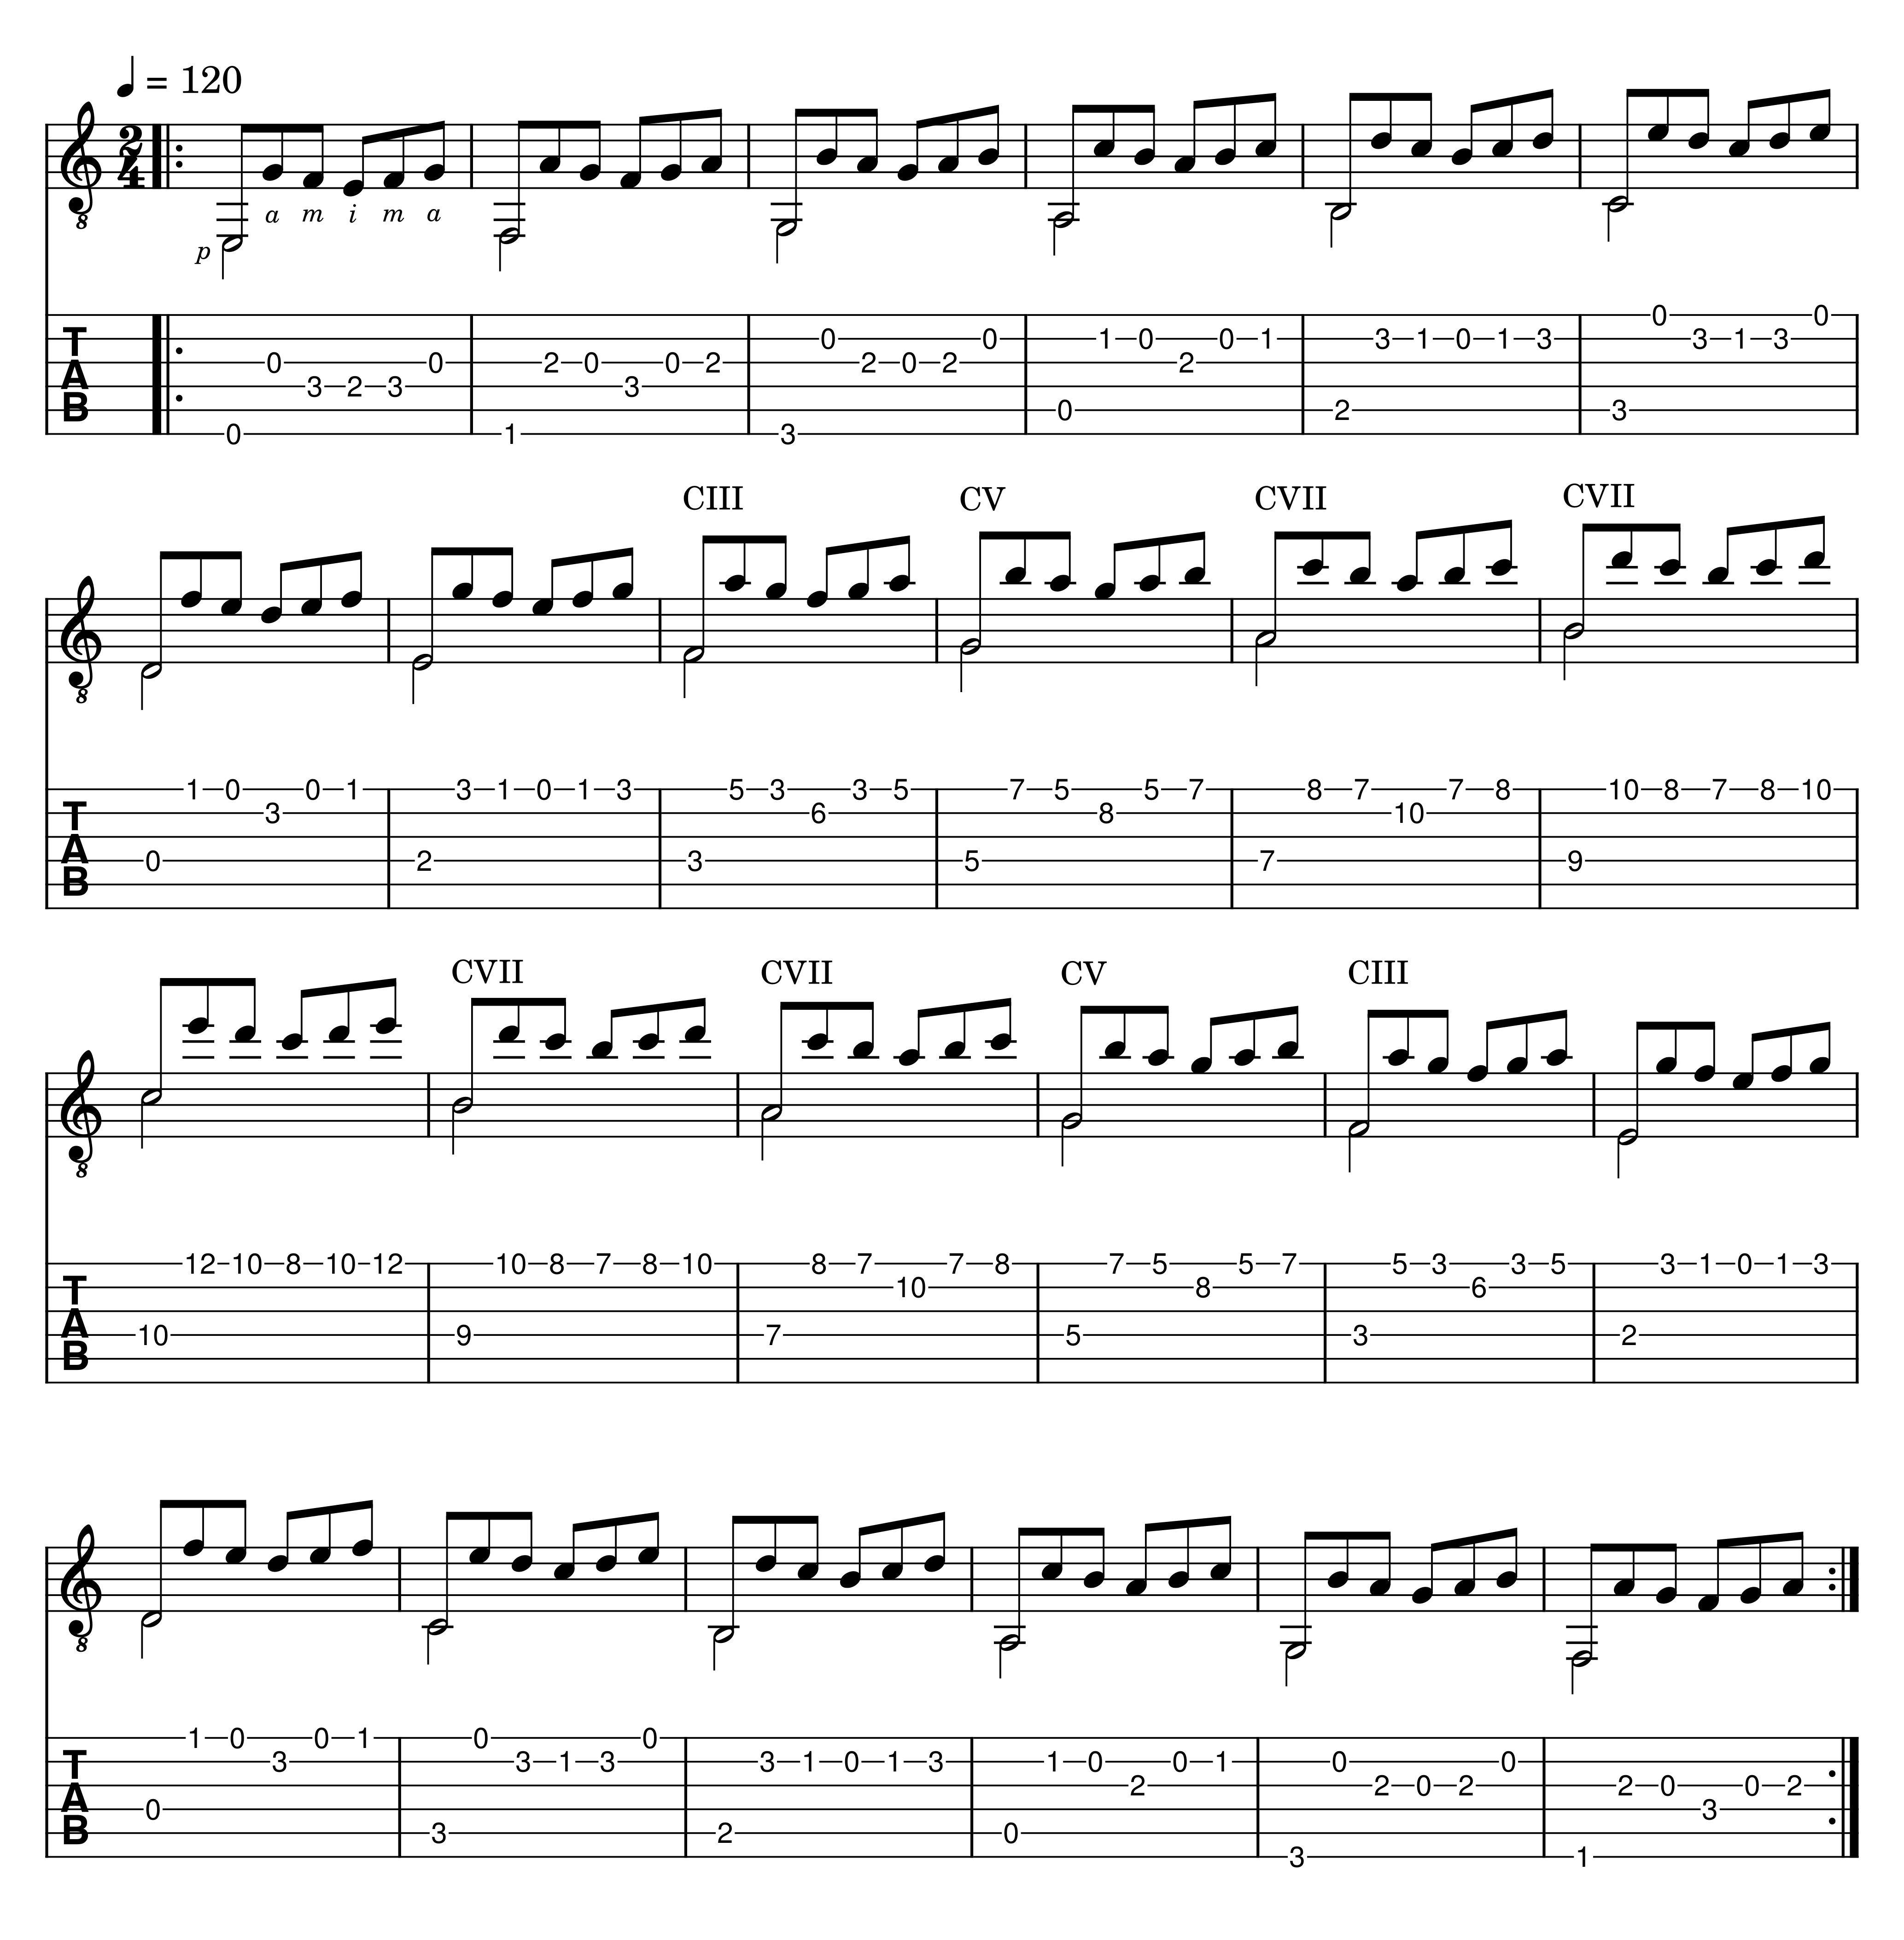
p-a-m i-m-a (pattern 1). The first two patterns are the easiest of all these exercises. Let the strings ring as much as possible.
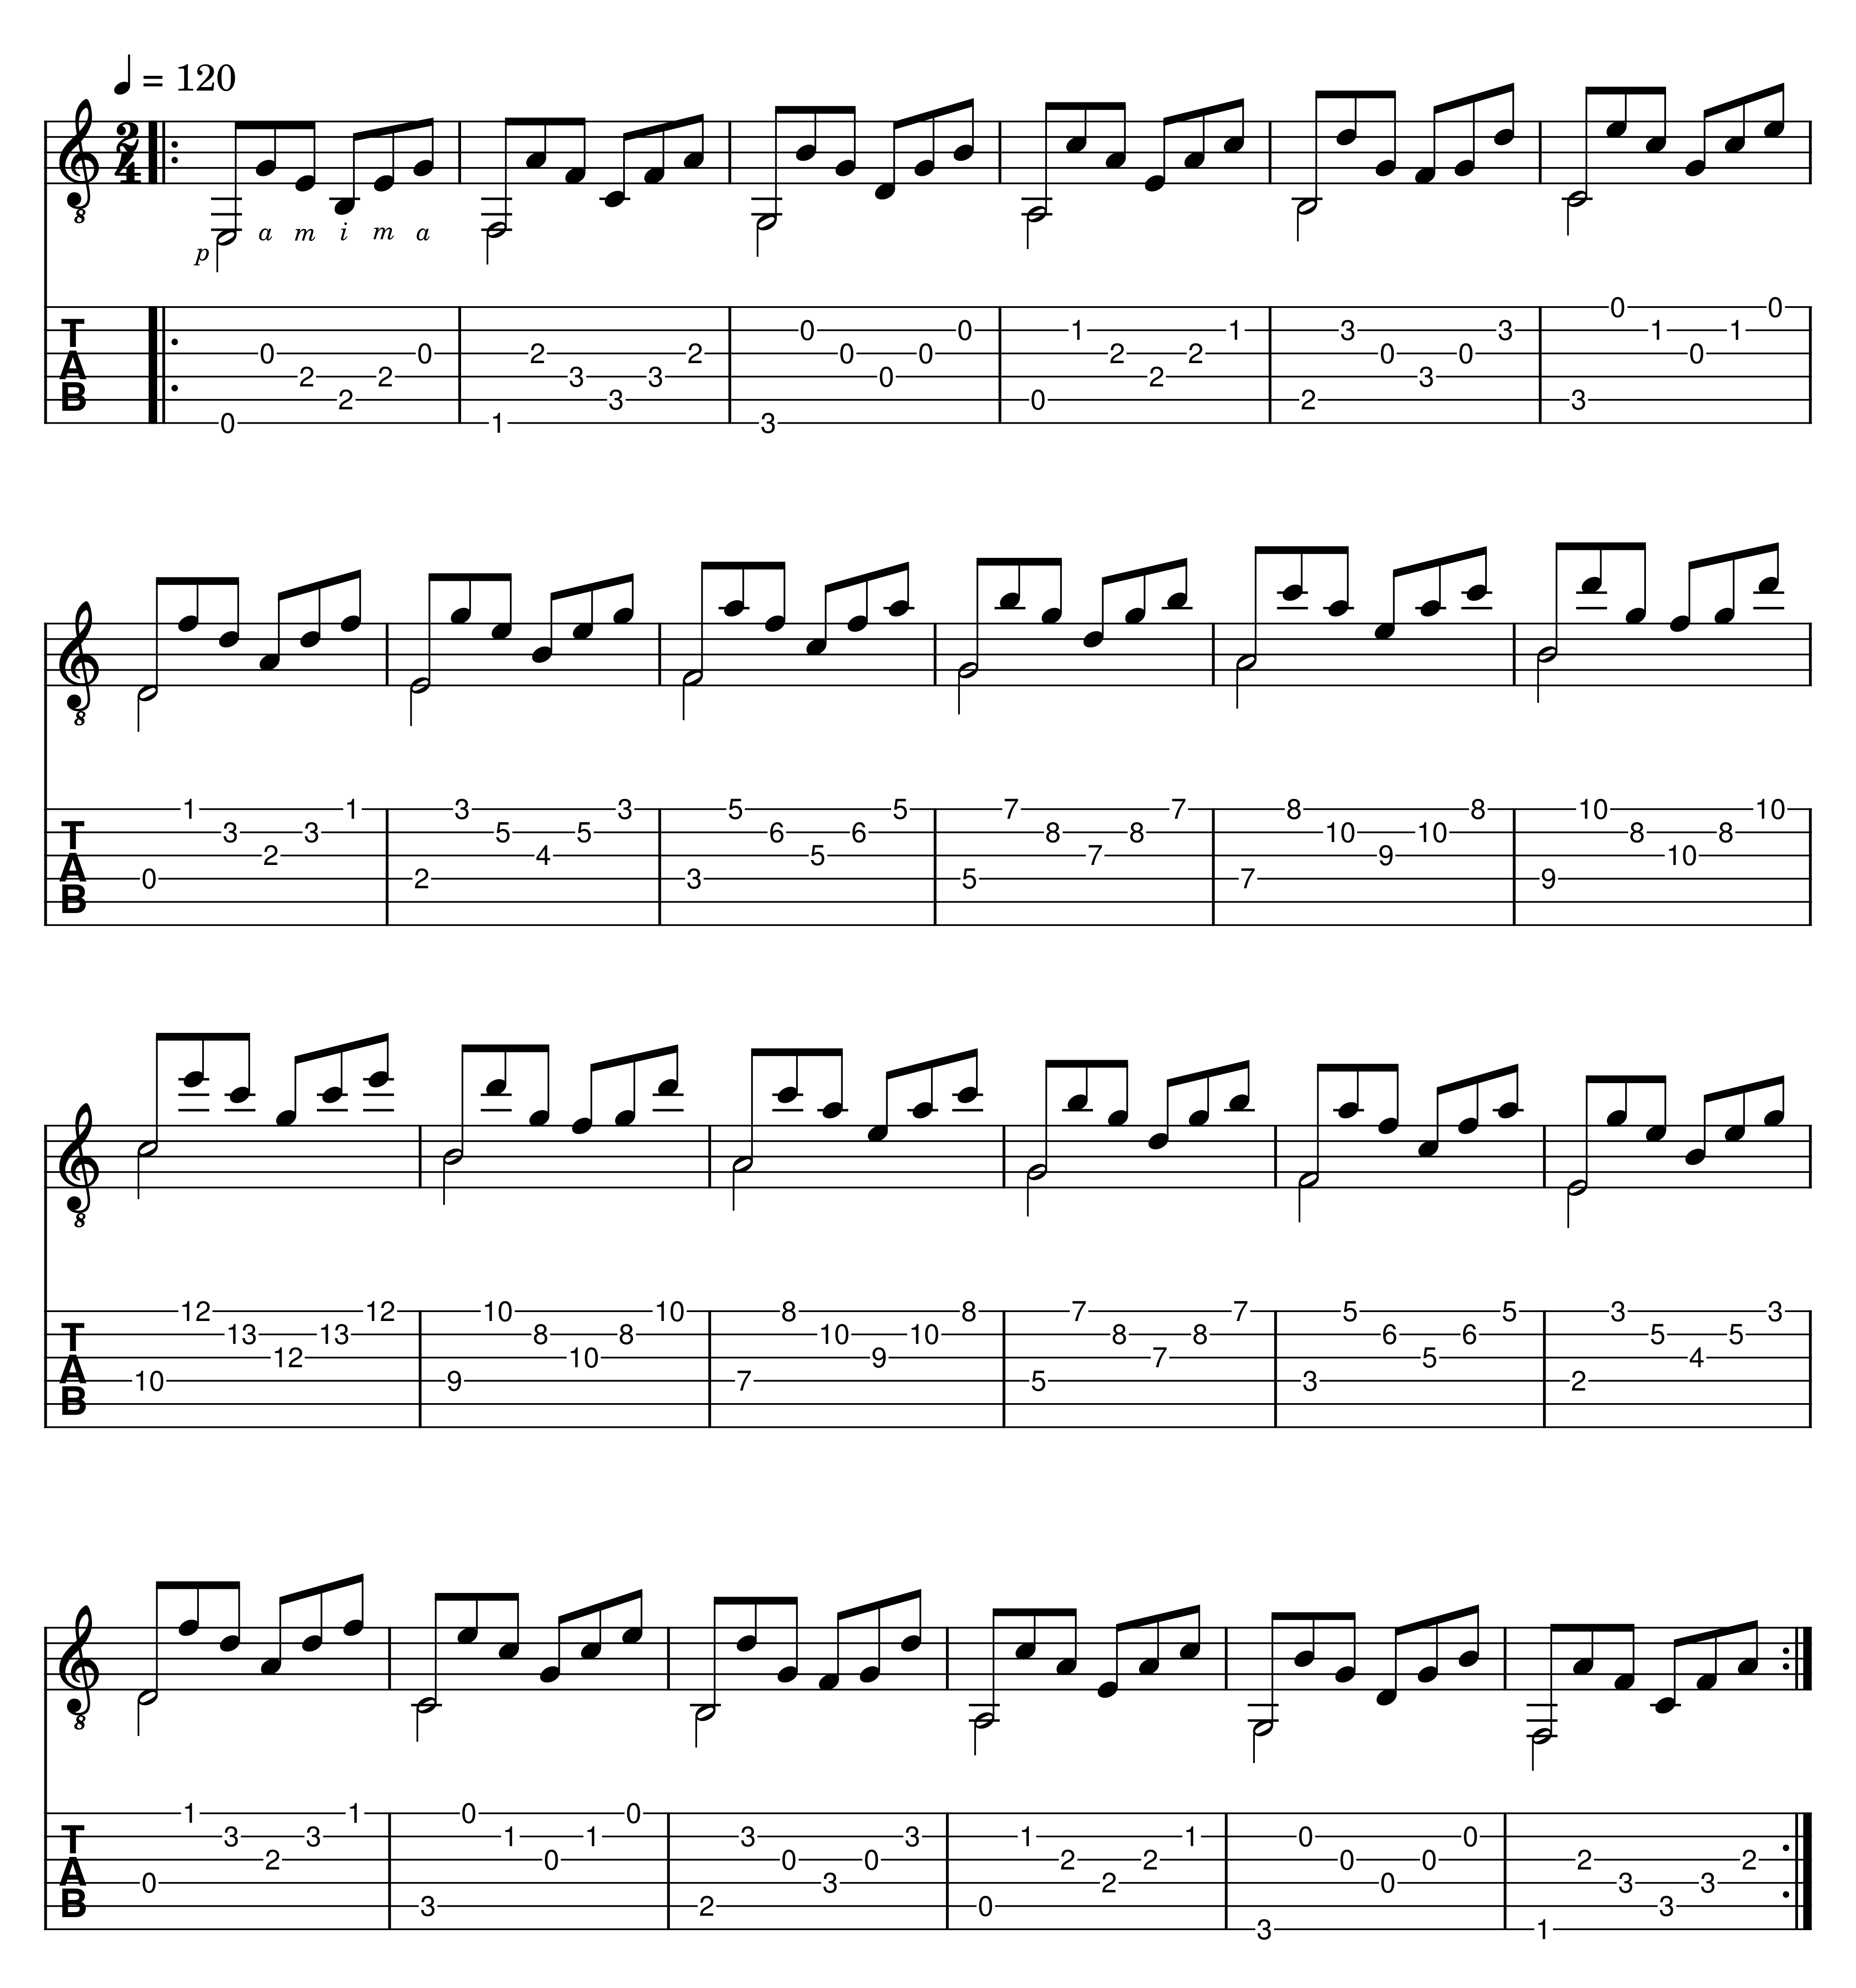
p-i-m a-m-i (reverse of pattern 1).
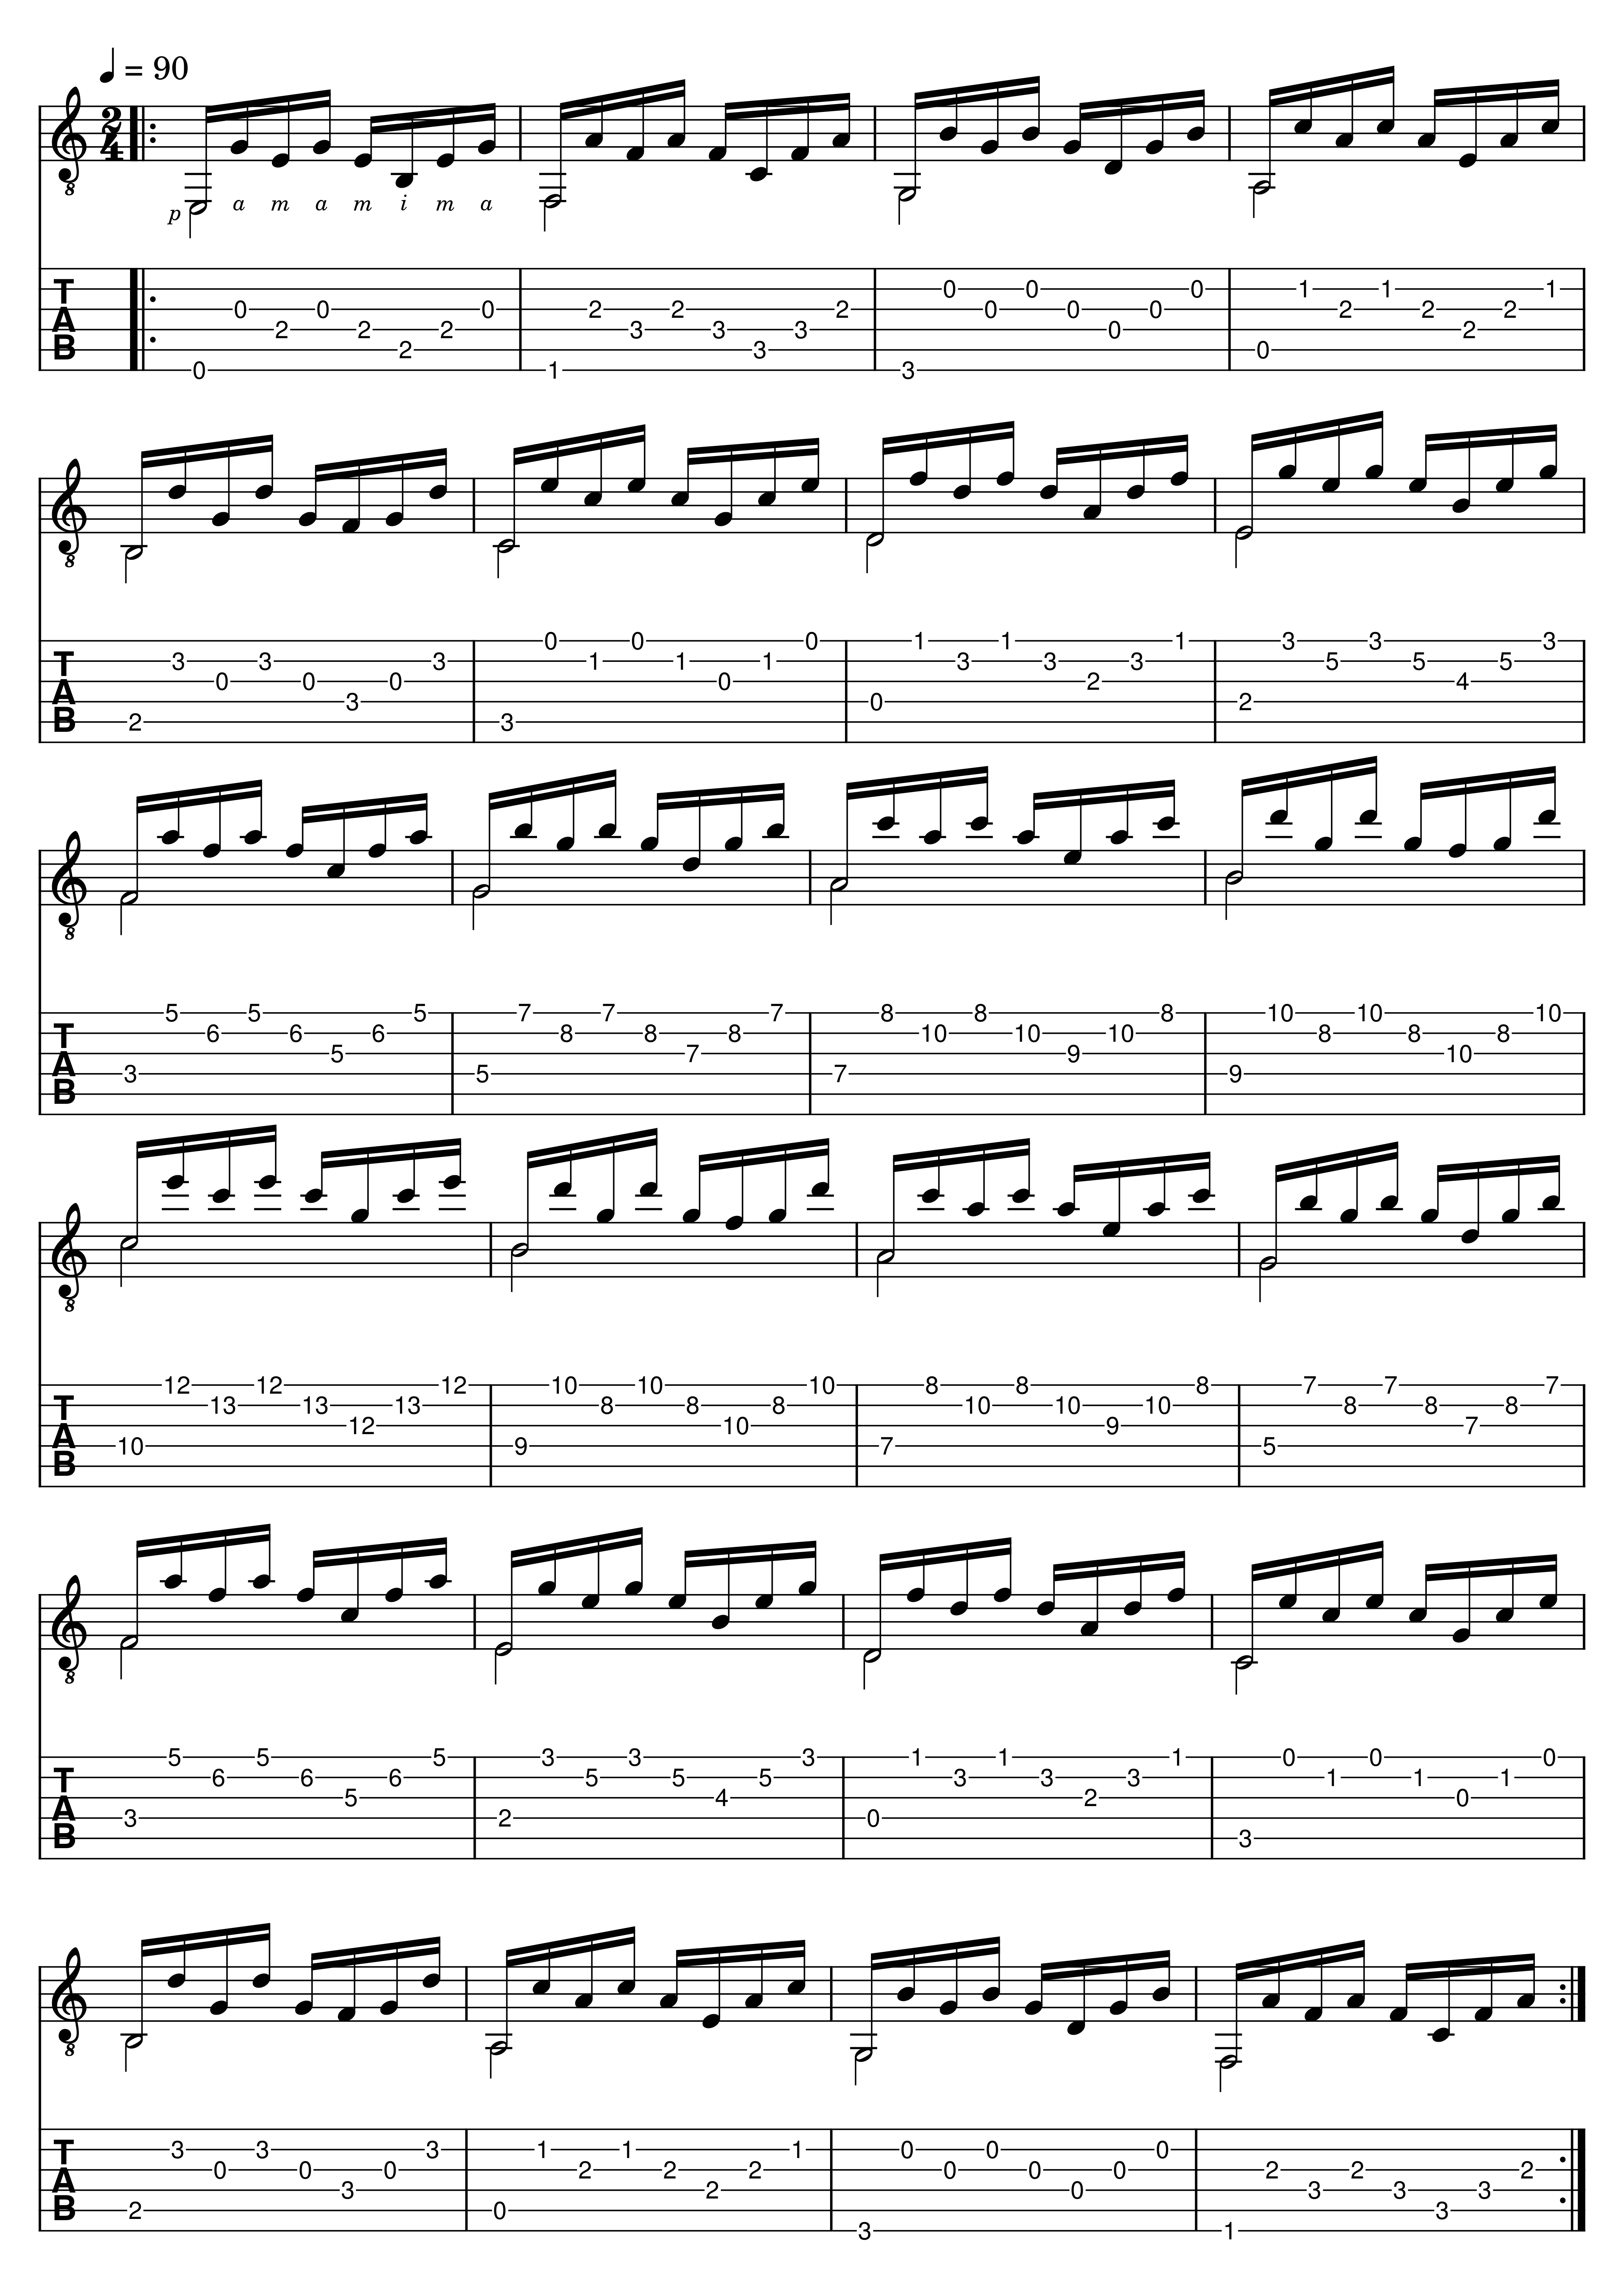
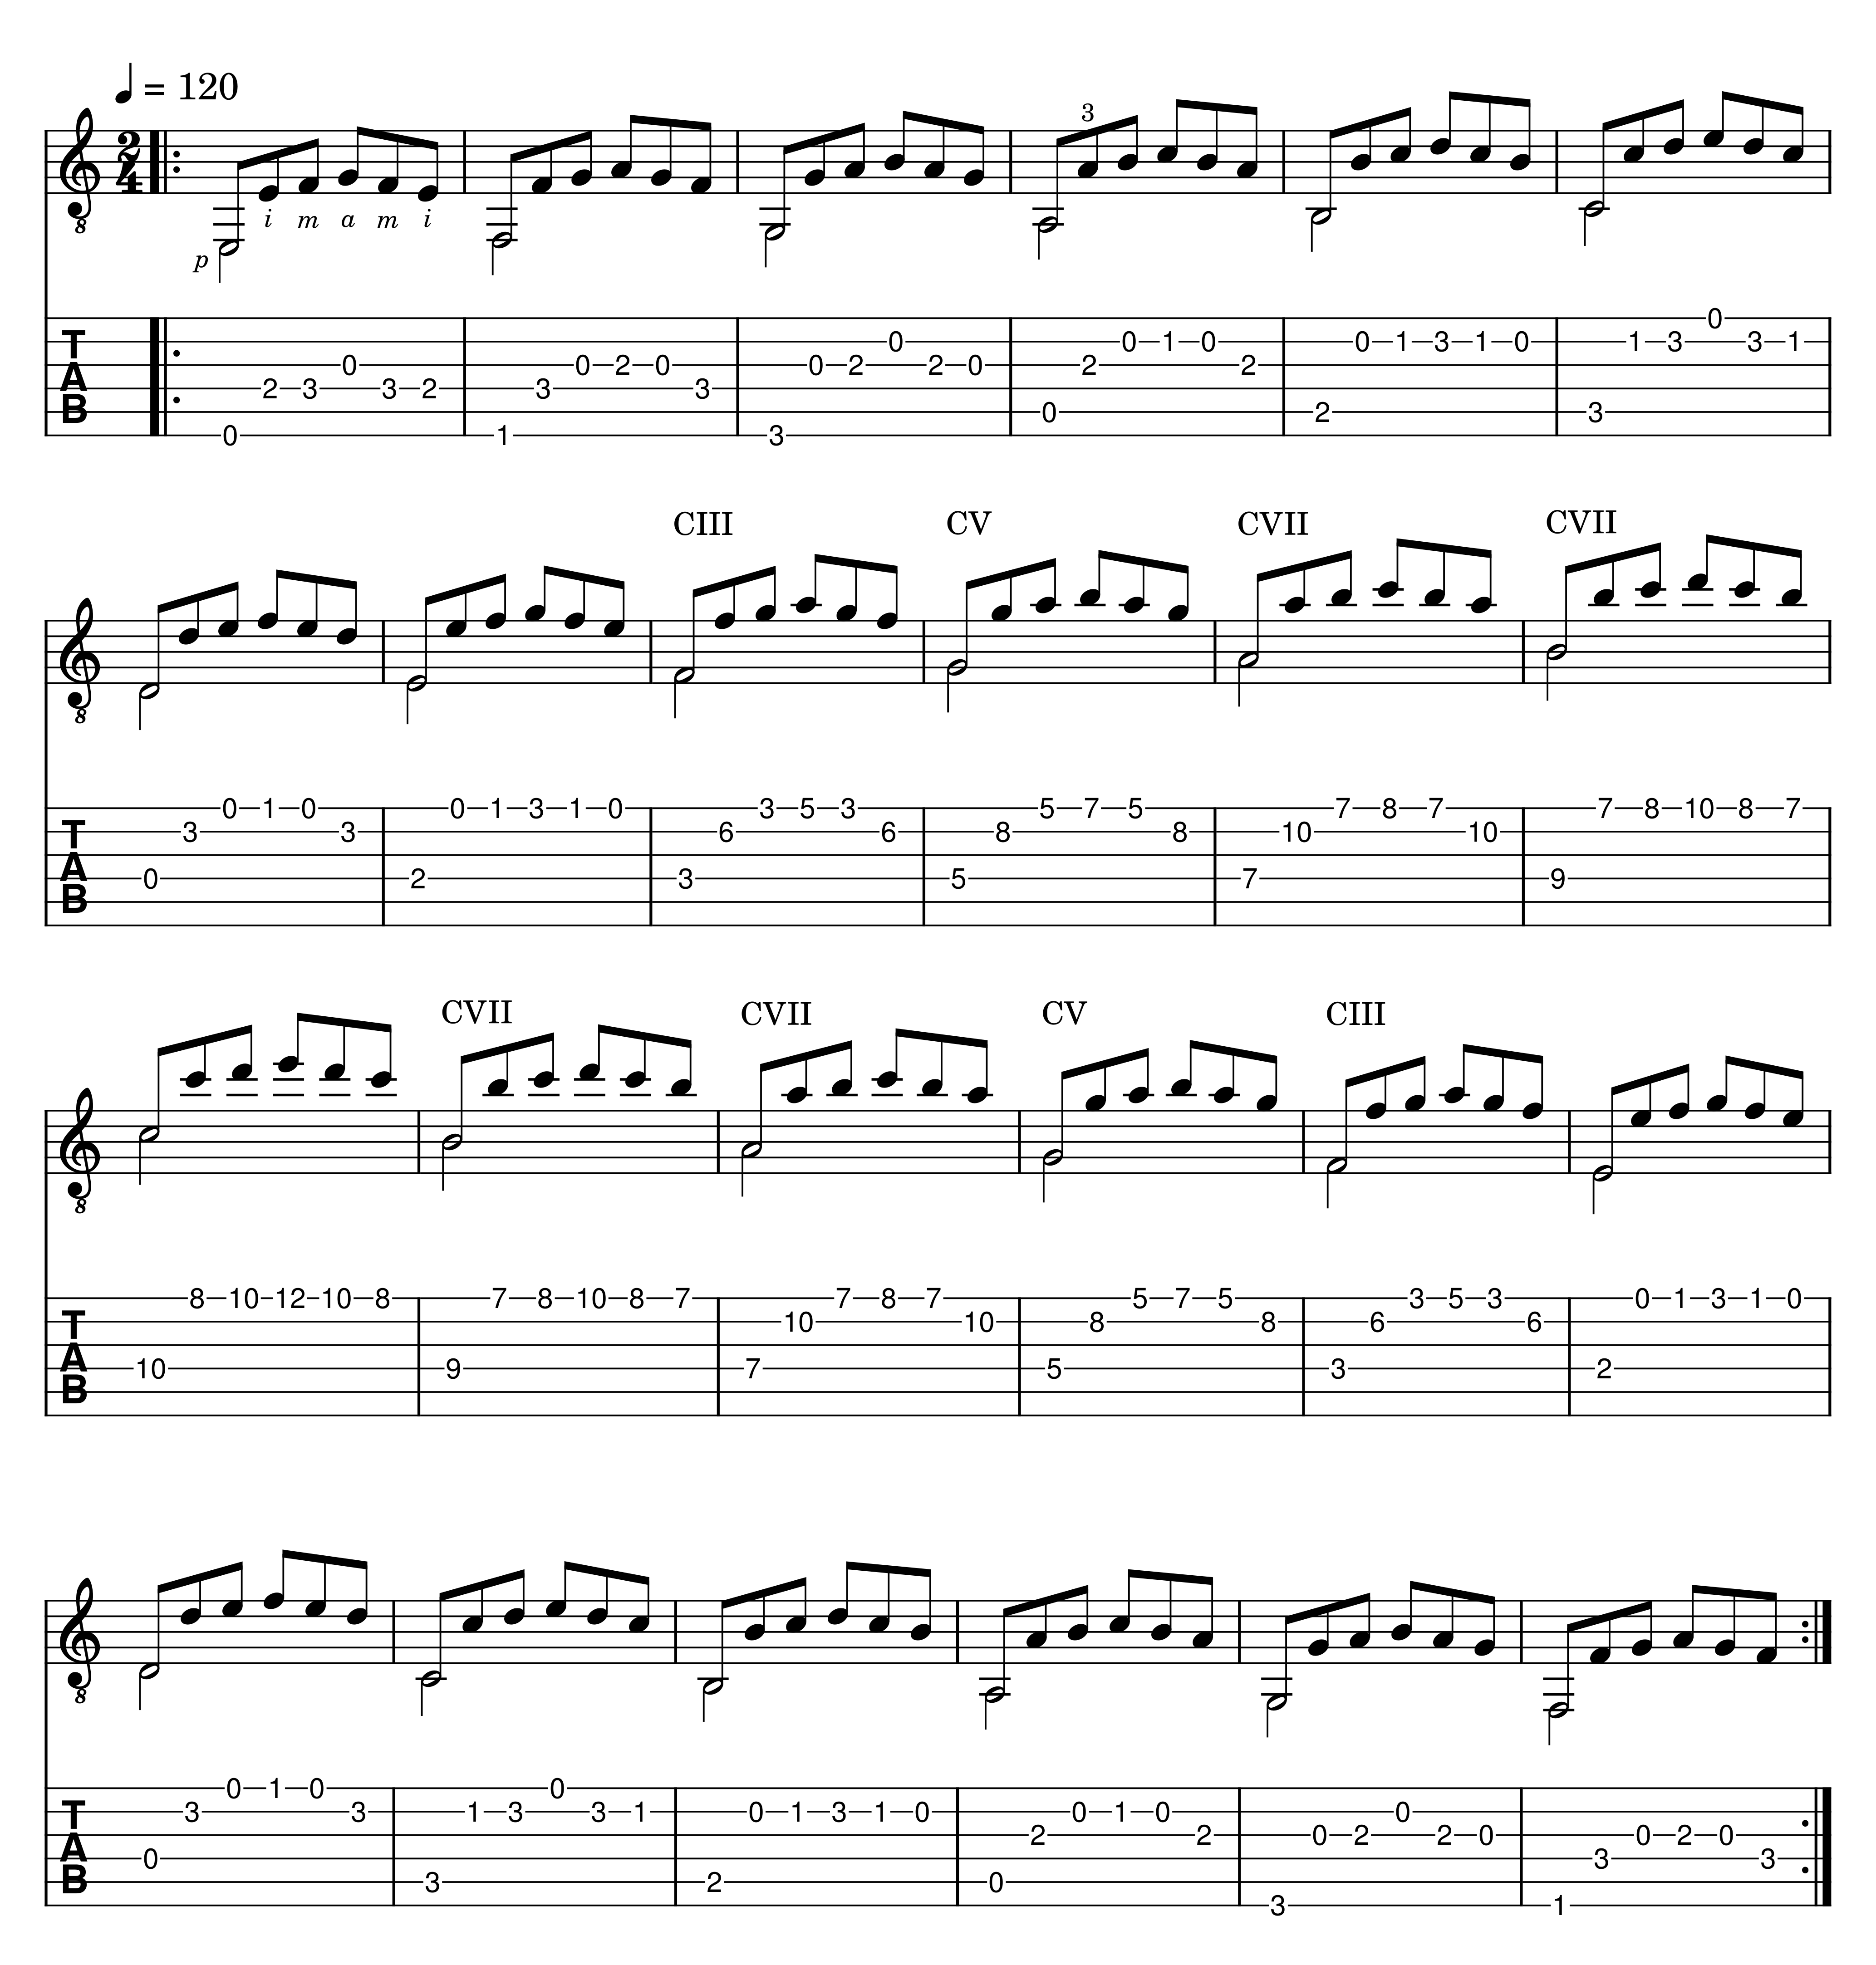
p-a-m a-m-i (pattern 2). Ring and middle fingers are repeated.
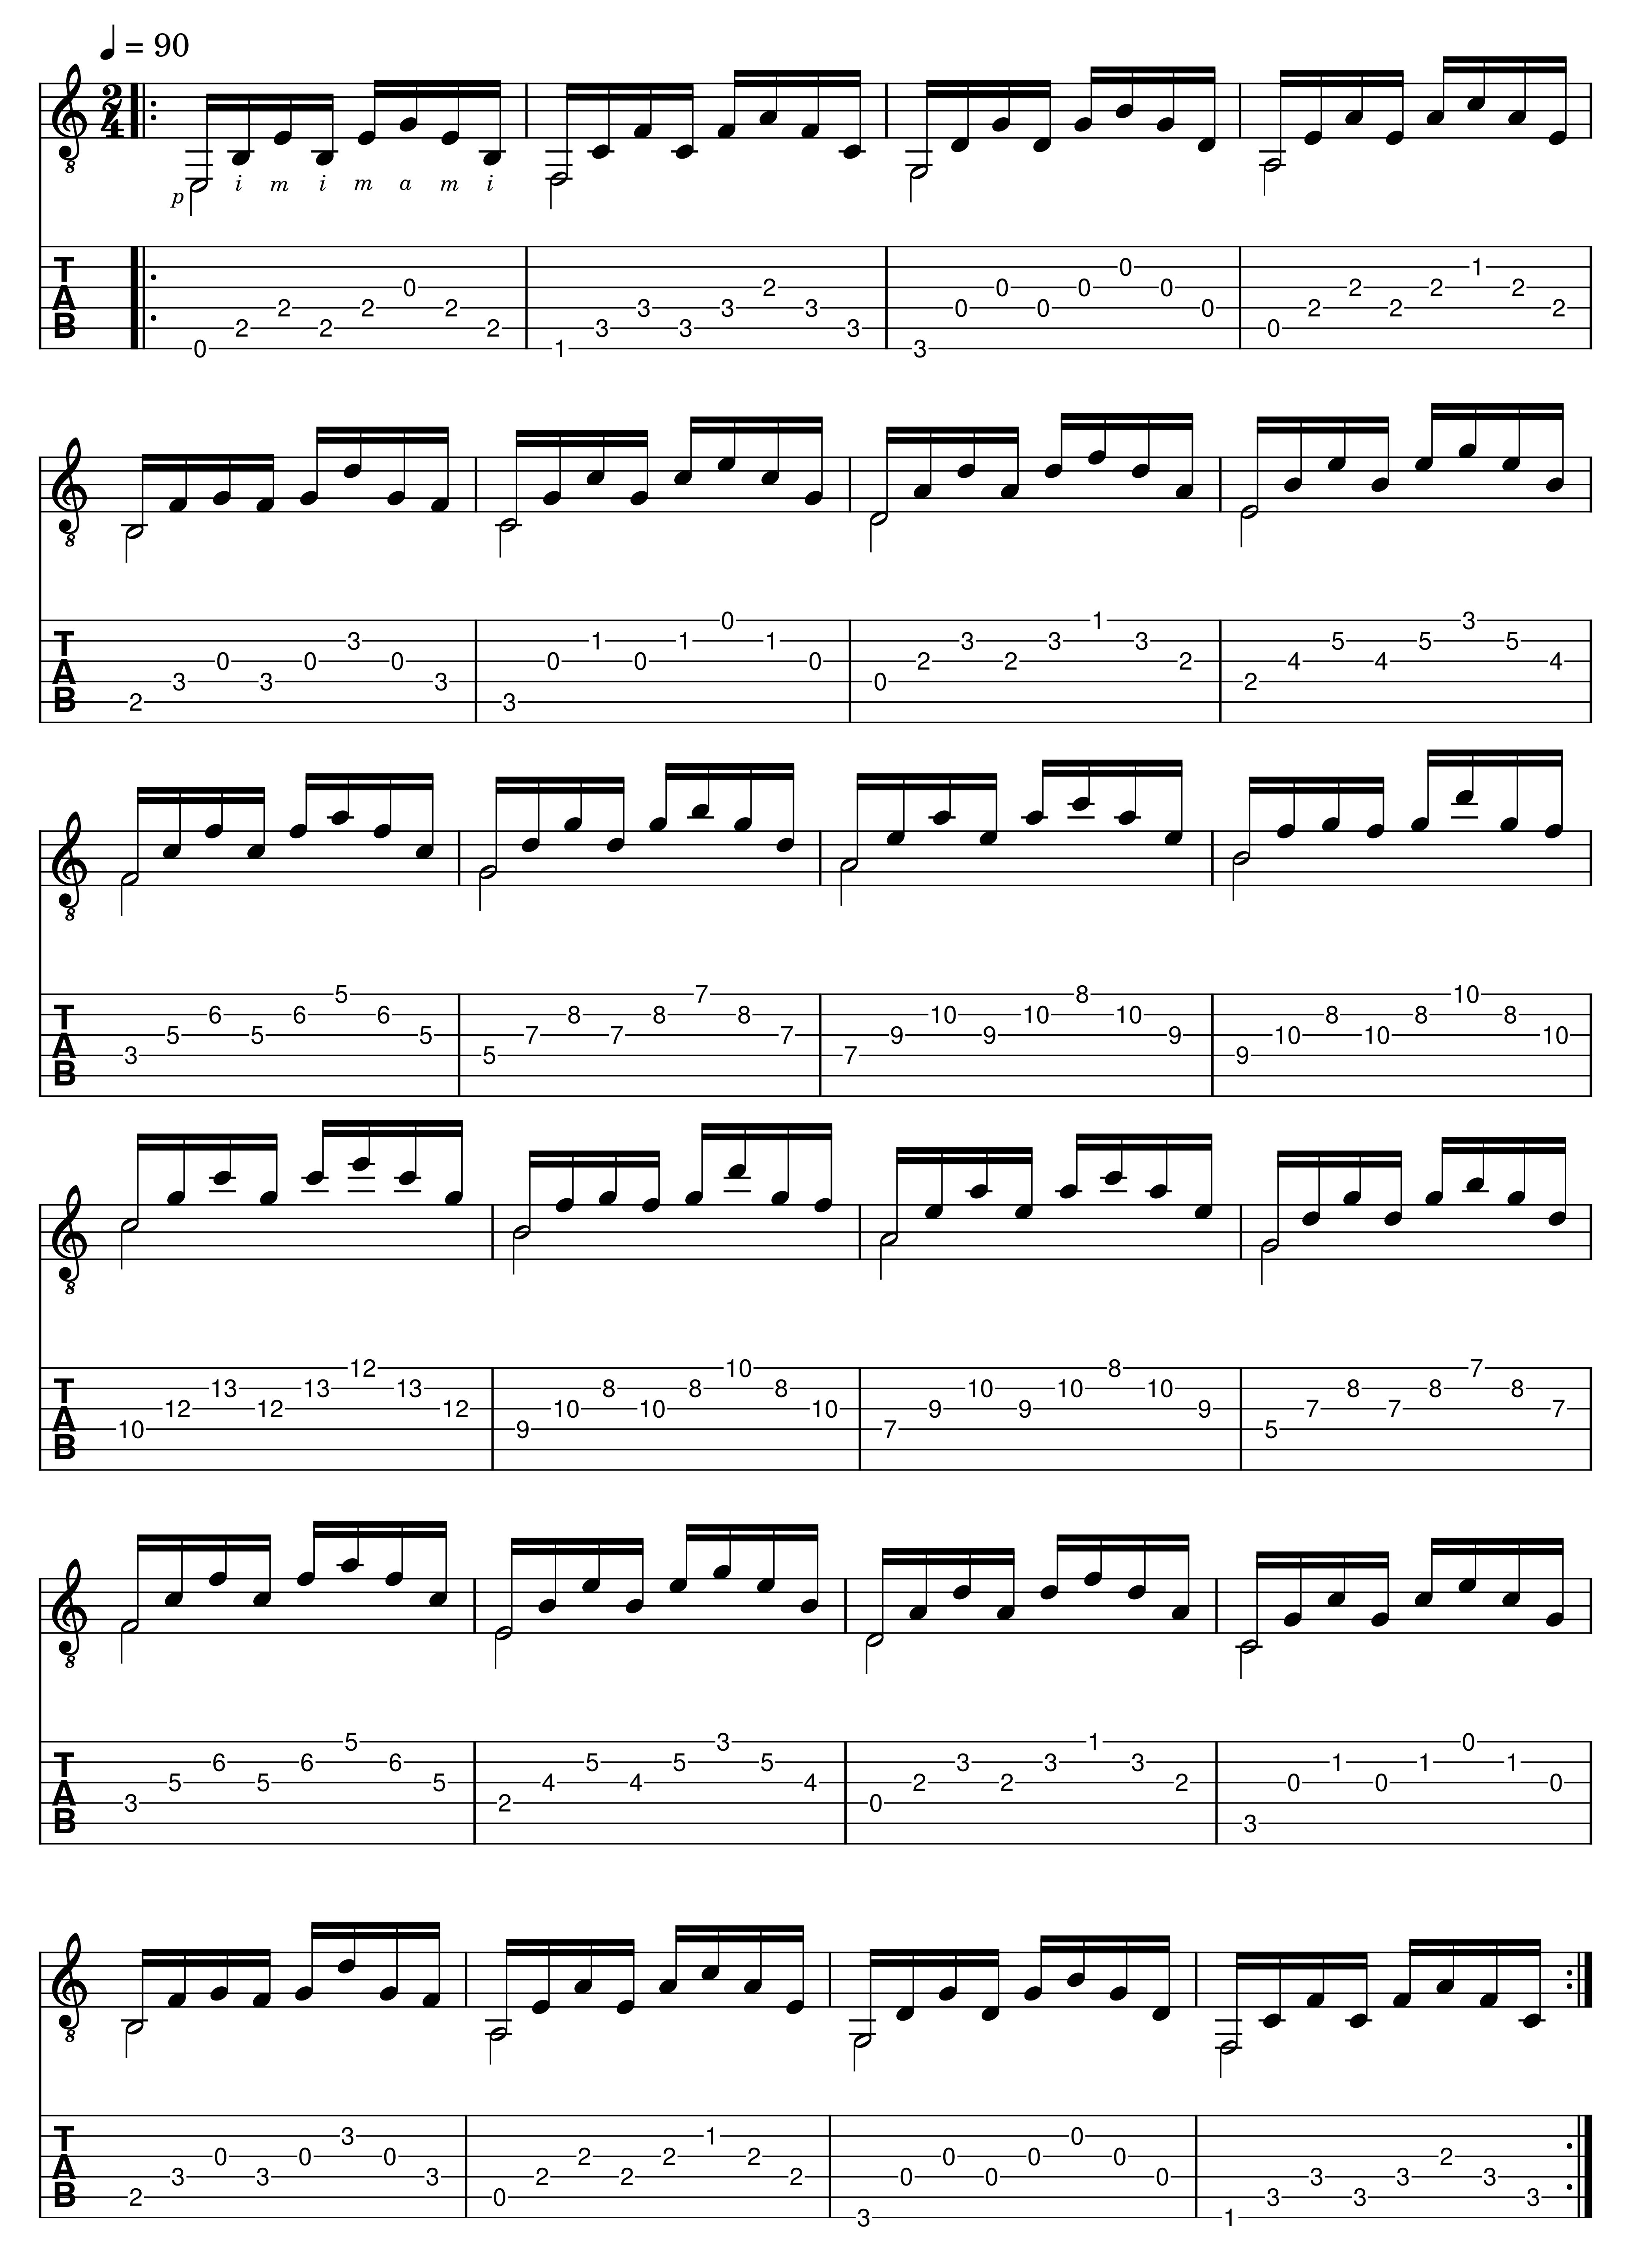
p-i-m i-m-a (reverse of pattern 2, repeats i-m)
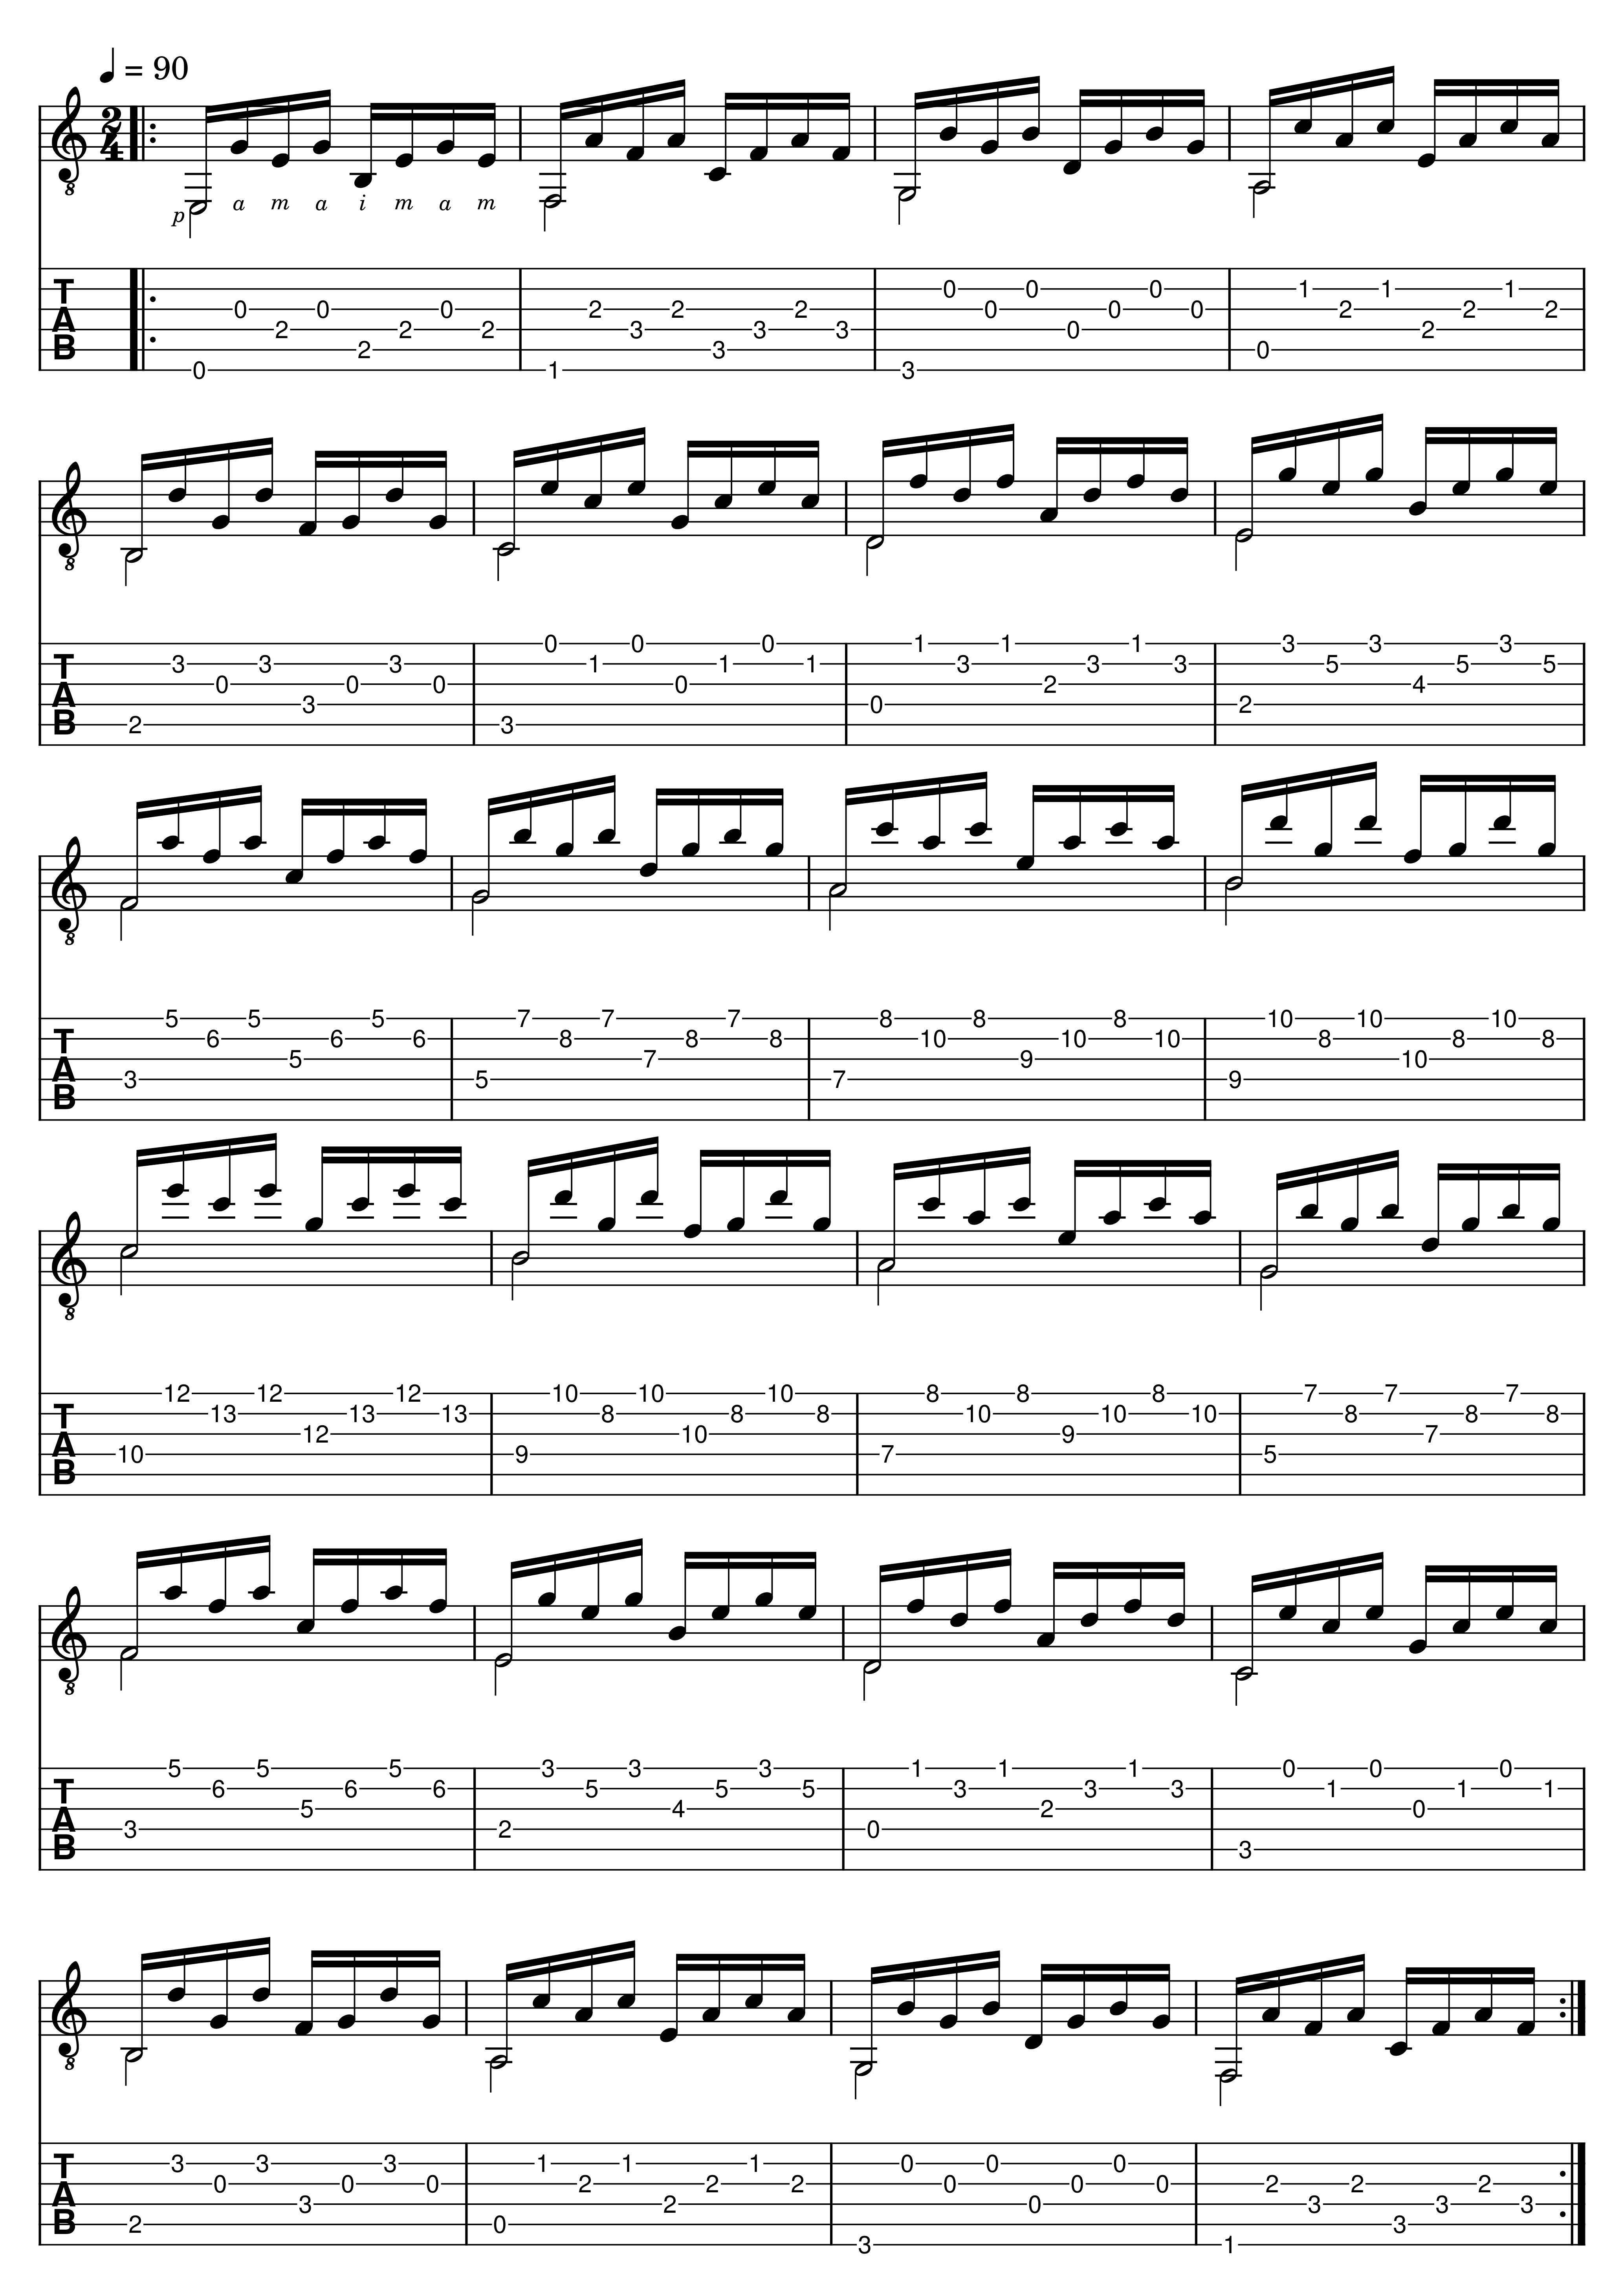
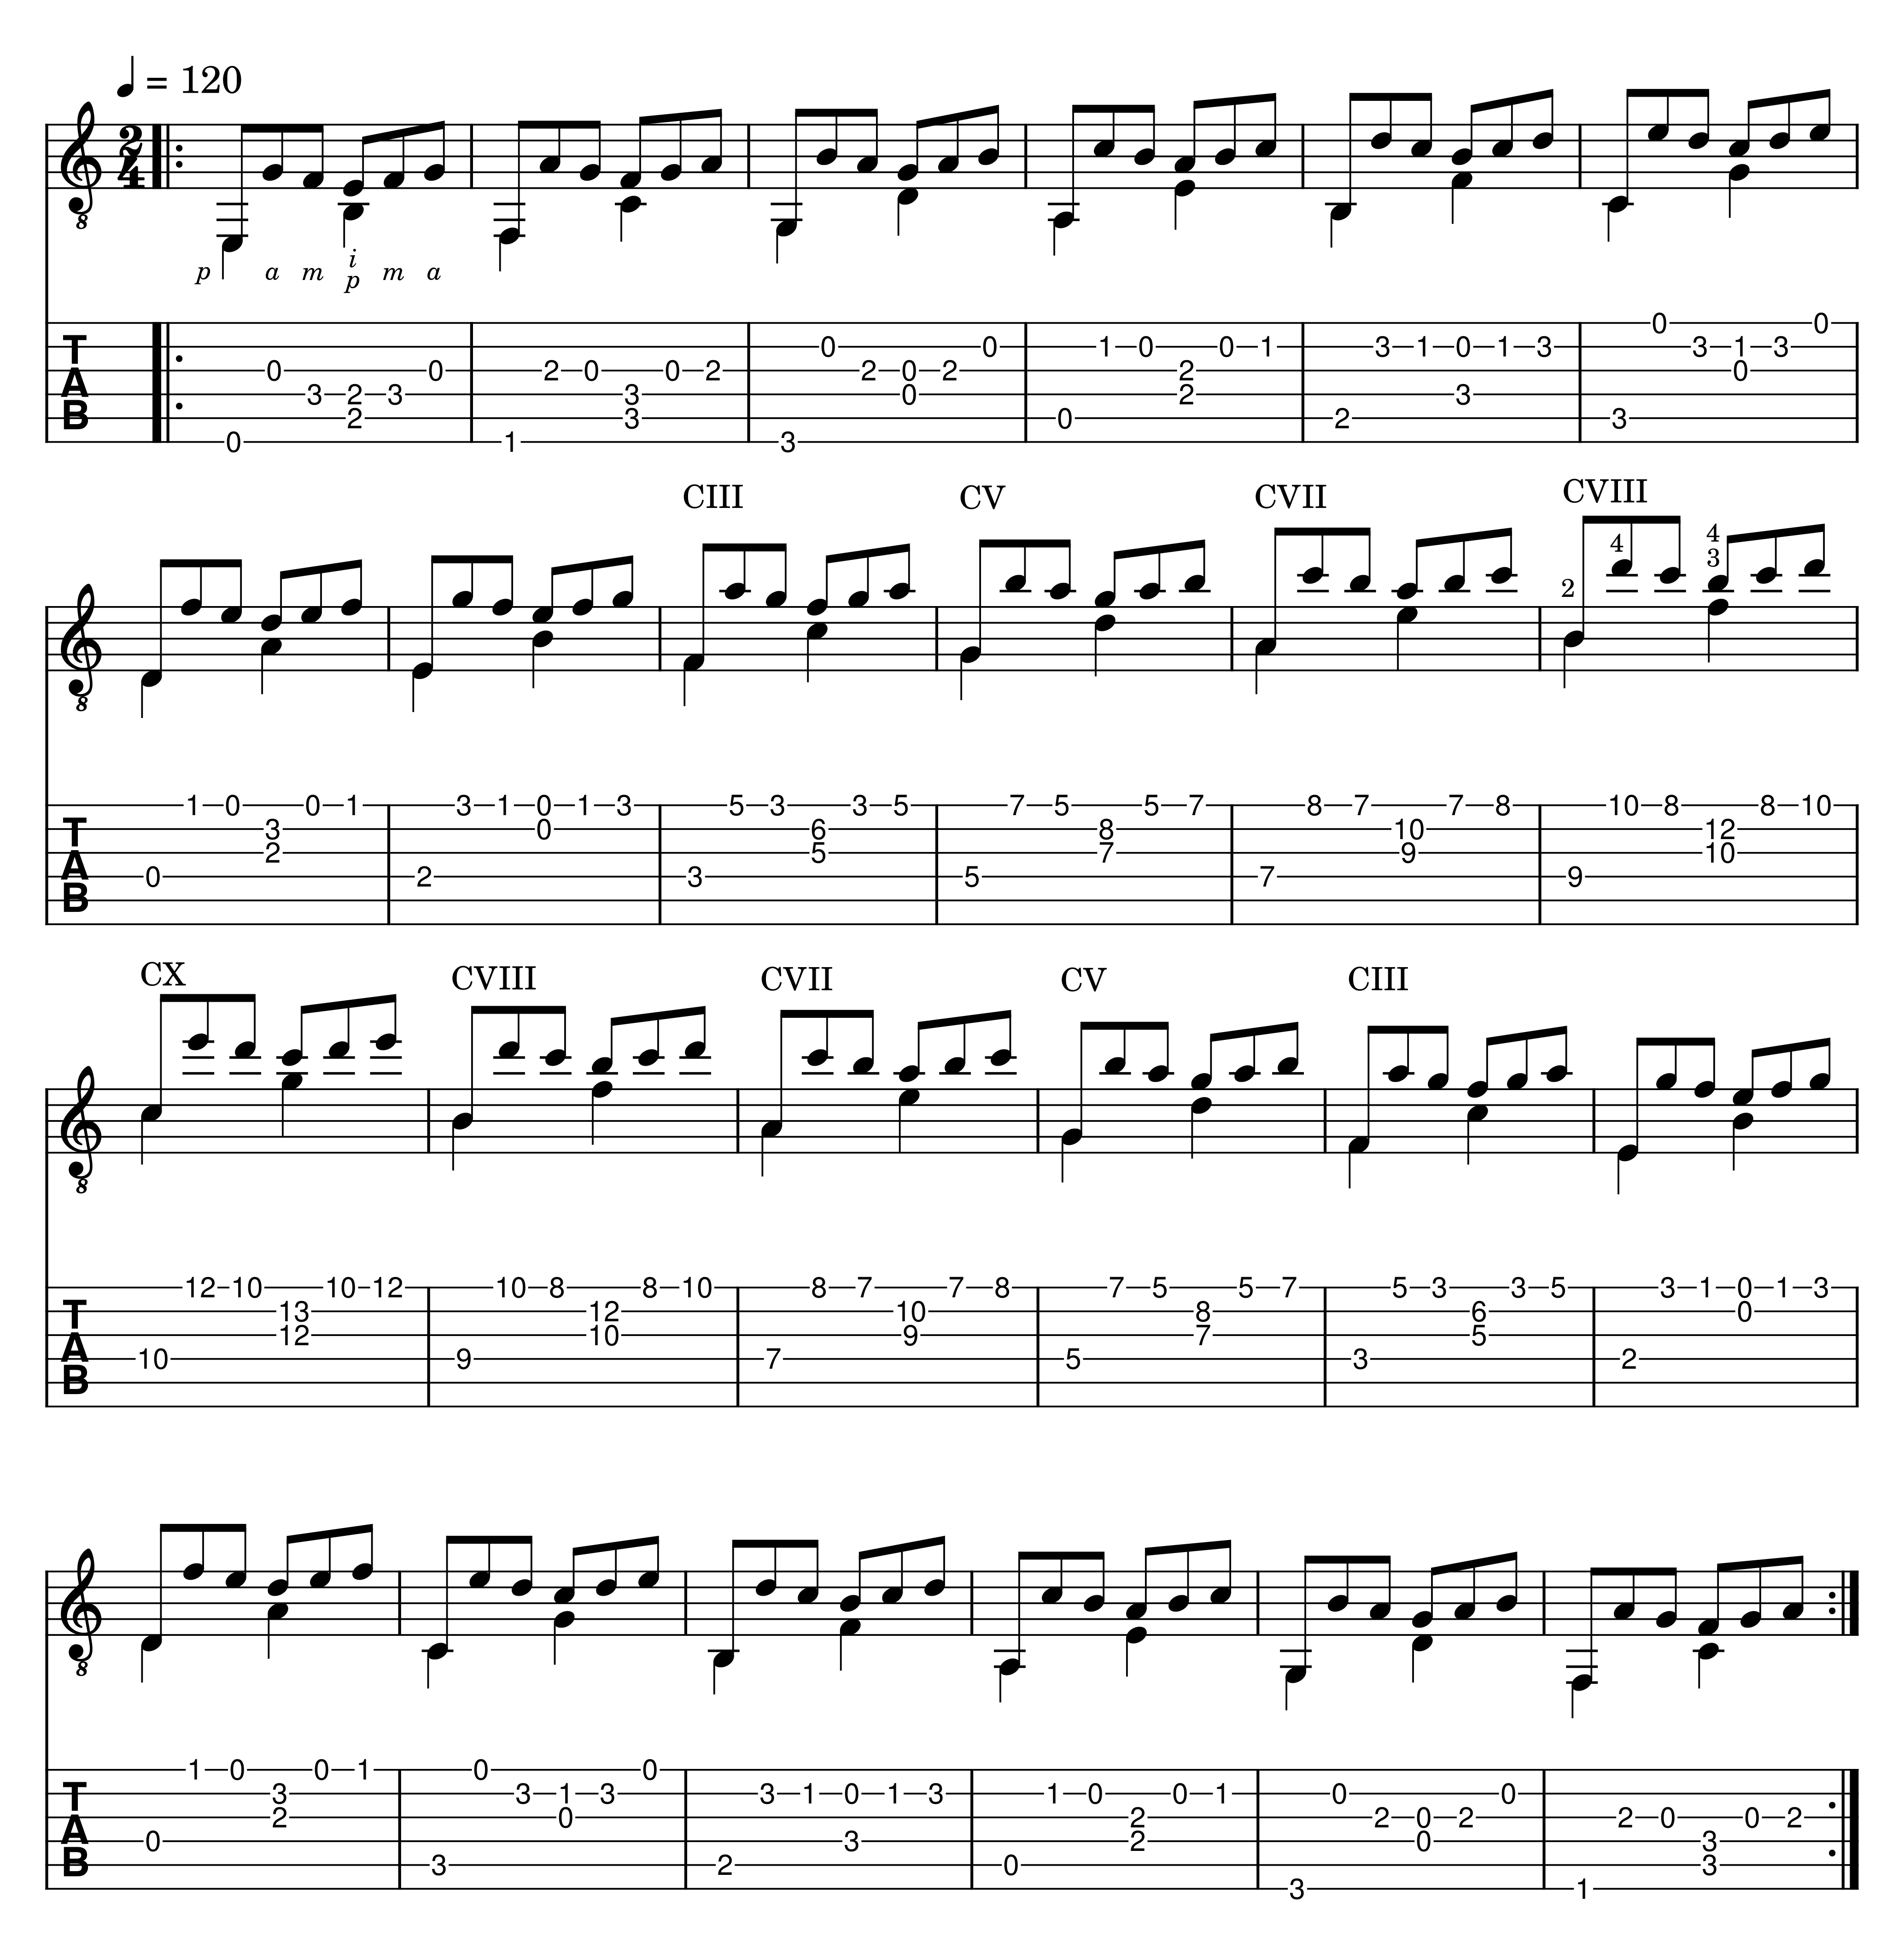
p-i-m pa-m-i (pattern 3). This is the reverse of pattern 1 with another bass note at beat 2.
pa-m-i m-a-m (pattern 4). The thumb and ring finger coincide.
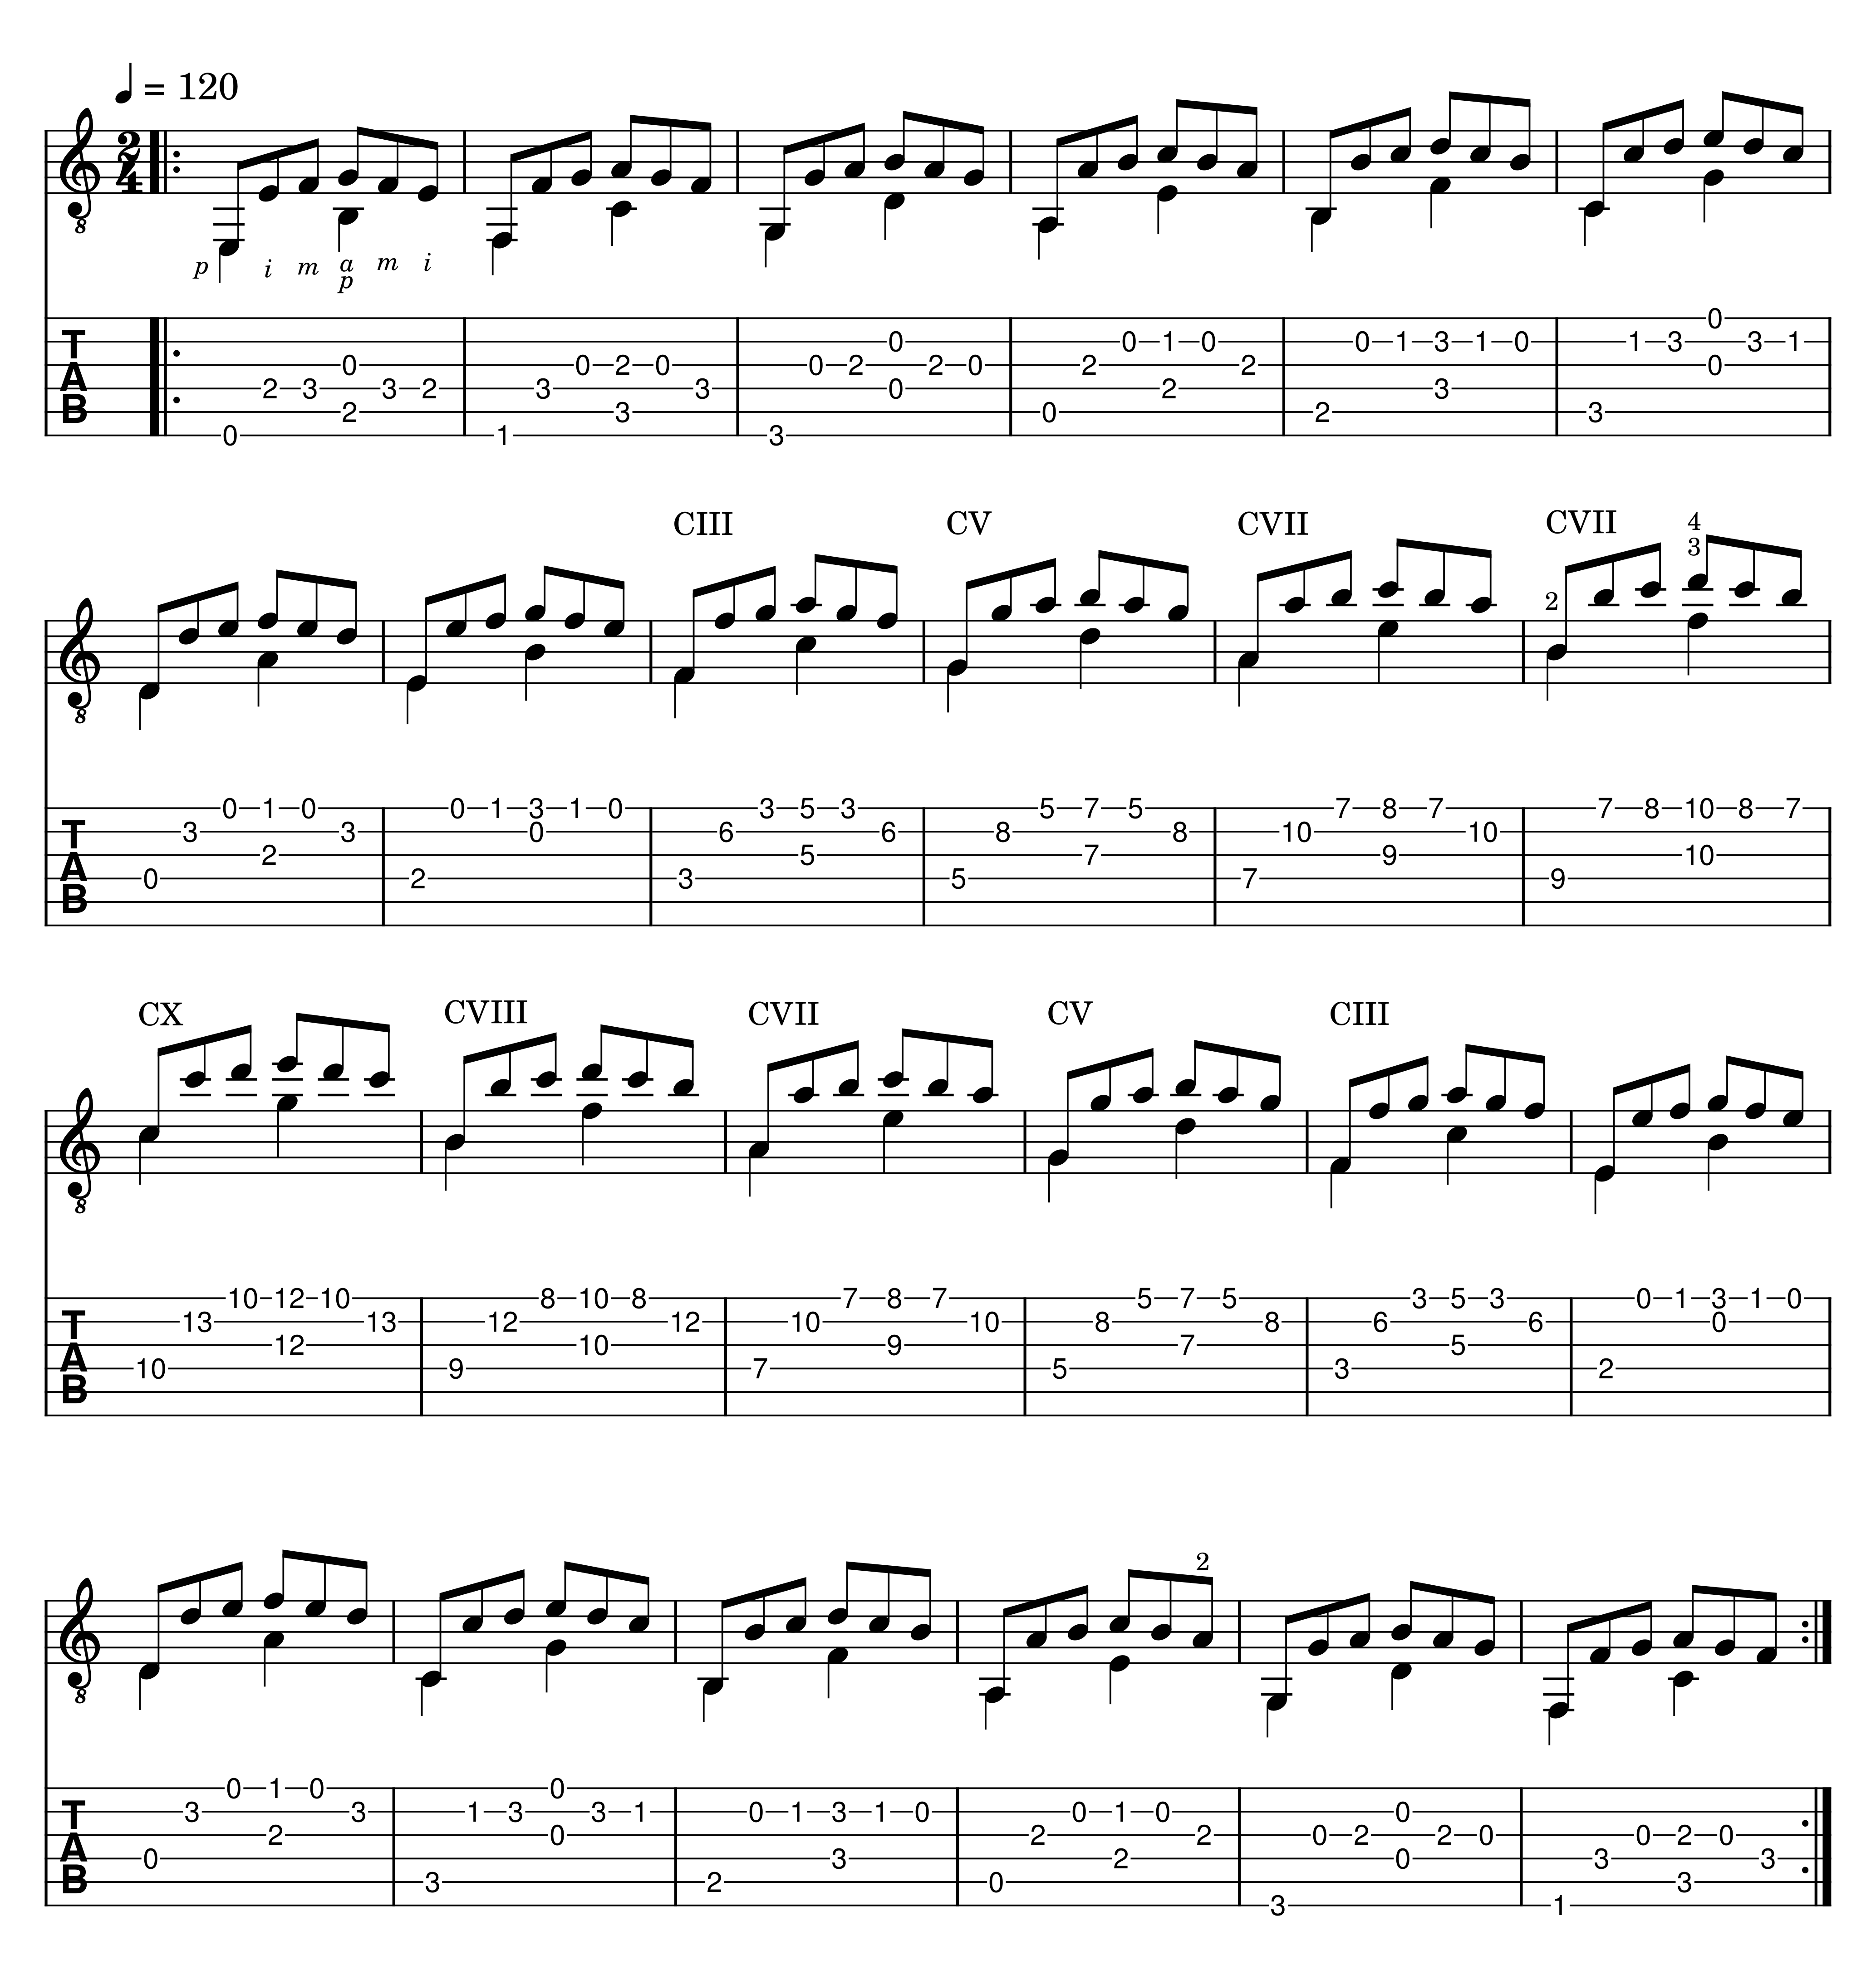
pi-m-a m-i-m (reverse of pattern 4, thumb and index coincide)

p-a-m-i m-a-m-i (pattern 5). A simple sixteenth-note pattern.

p-i-m-a m-i-m-a (reverse of pattern 5)
p-a-m-i m-i-m-a (pattern 6). Middle and index fingers are repeated.

p-i-m-a m-a-m-i (reverse of pattern 6, repeats m-a)
p-a-m-a m-i-m-a (pattern 7). The ring and middle fingers are repeated.
p-i-m-i m-a-m-i (reverse of pattern 7, repeats i-m)
p-a-m-a i-m-a-m (pattern 8). This is the only exercise with non-consecutive fingering (the jump from ring finger to index), and I've included it just because it sounds nice. For an interesting variation on this pattern, make the last note in each measure the same as the first and play it with your thumb. The fingering would then be "p-i-m-i a-m-i-p" and, for example, the last note in the first measure would be an E on the sixth string instead of the fourth string. This produces a lurching melodic line played with the thumb and gives you a different point of focus.
p-i-m-i a-m-i-m (reverse of pattern 8)
pa-m-i-m i-m-a-m (pattern 9). The thumb and ring finger coincide.
pi-m-a-m a-m-i-m (reverse of pattern 9). The thumb and index coincide.
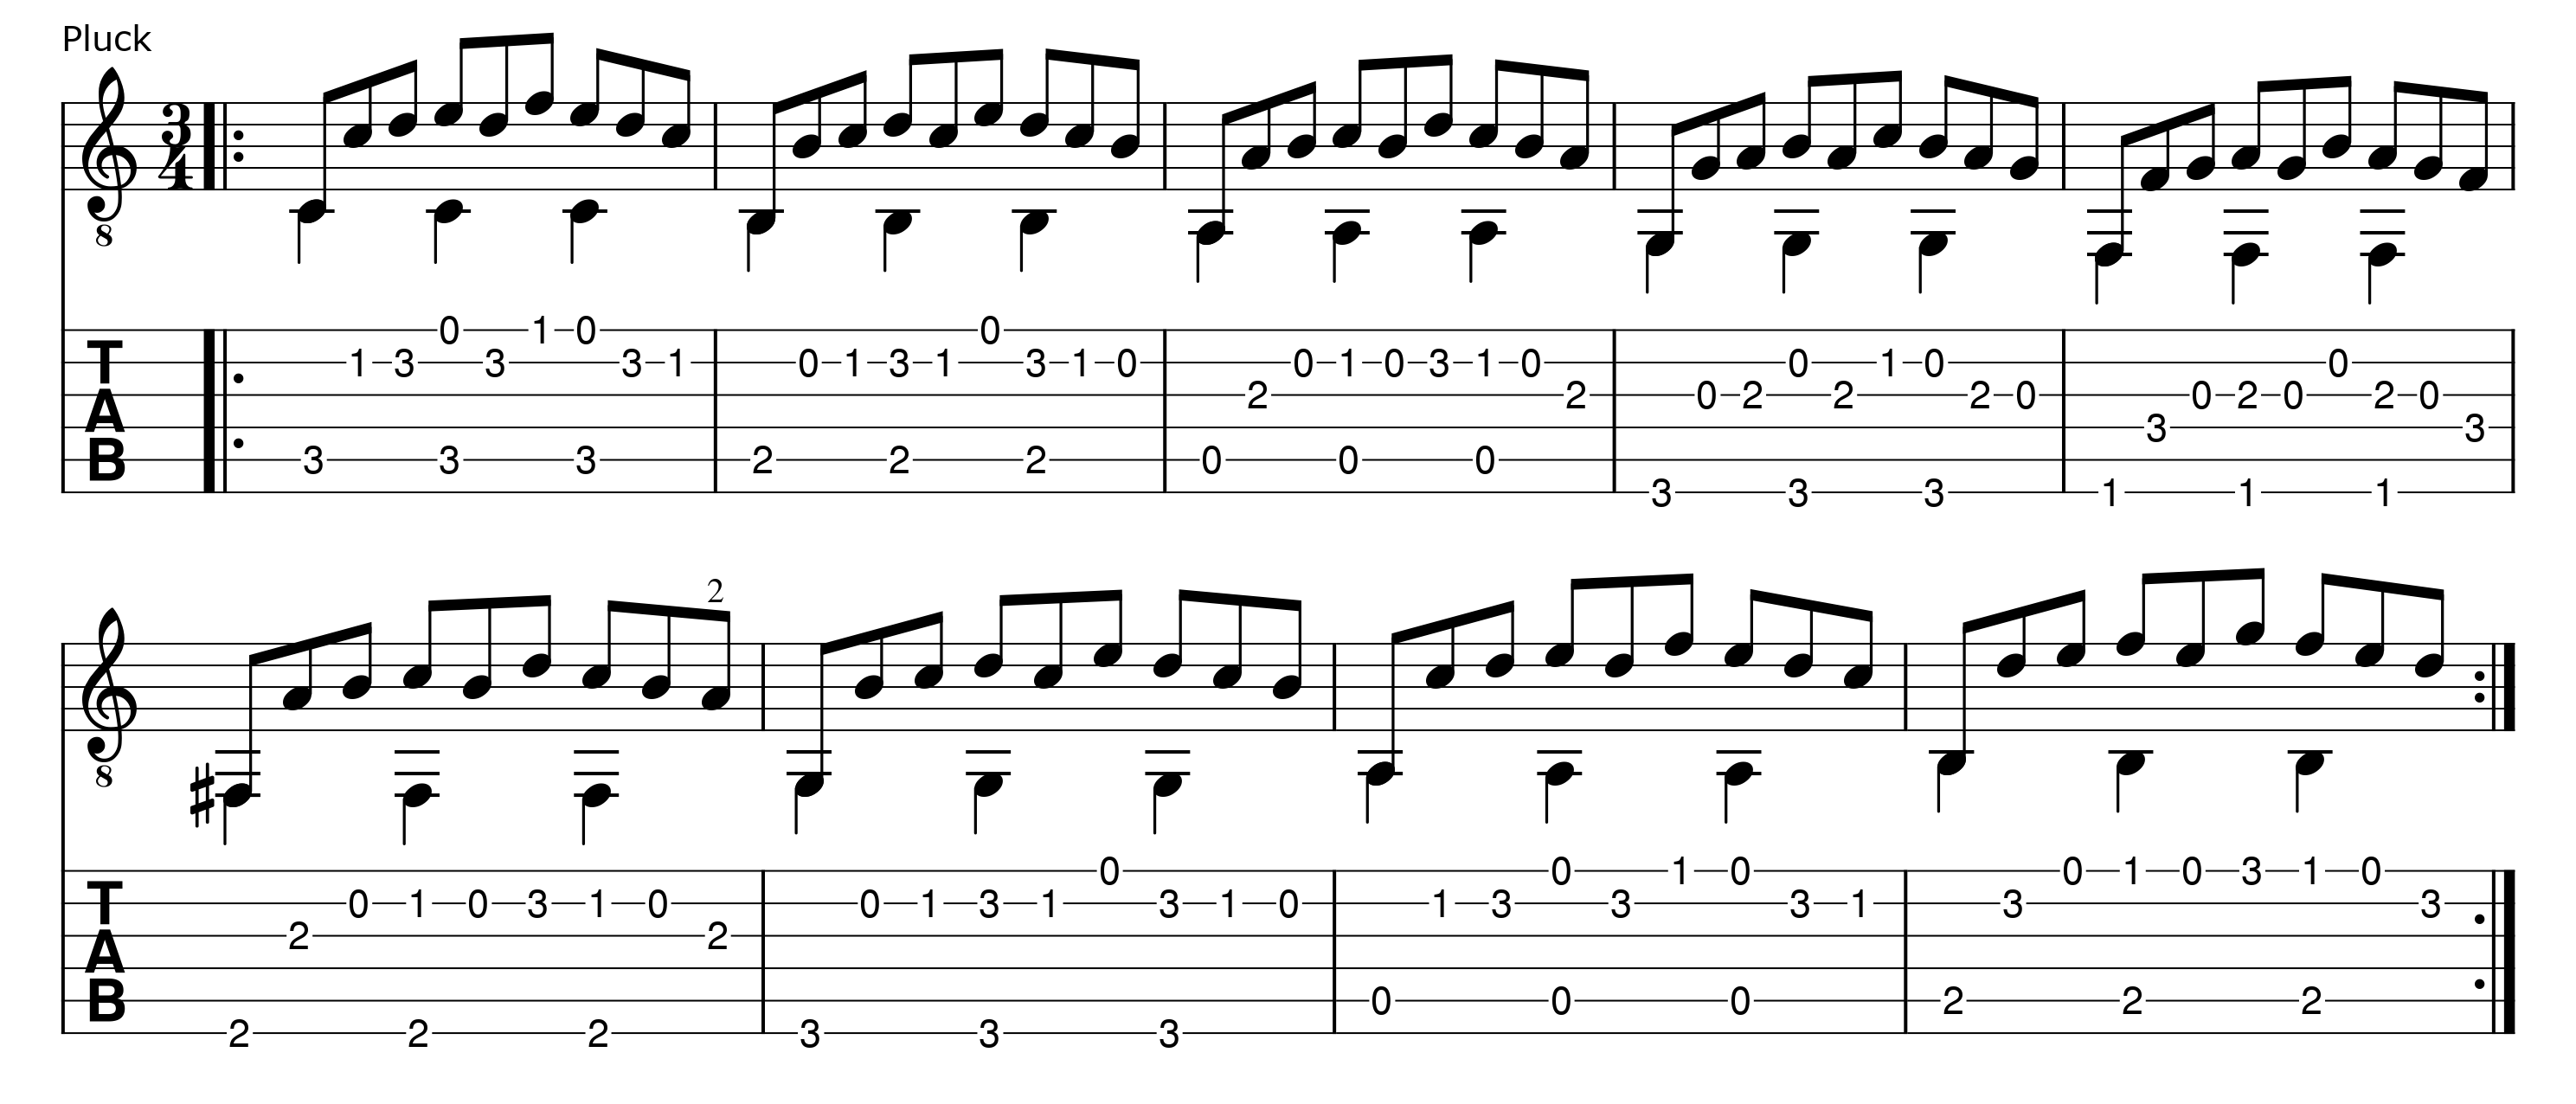
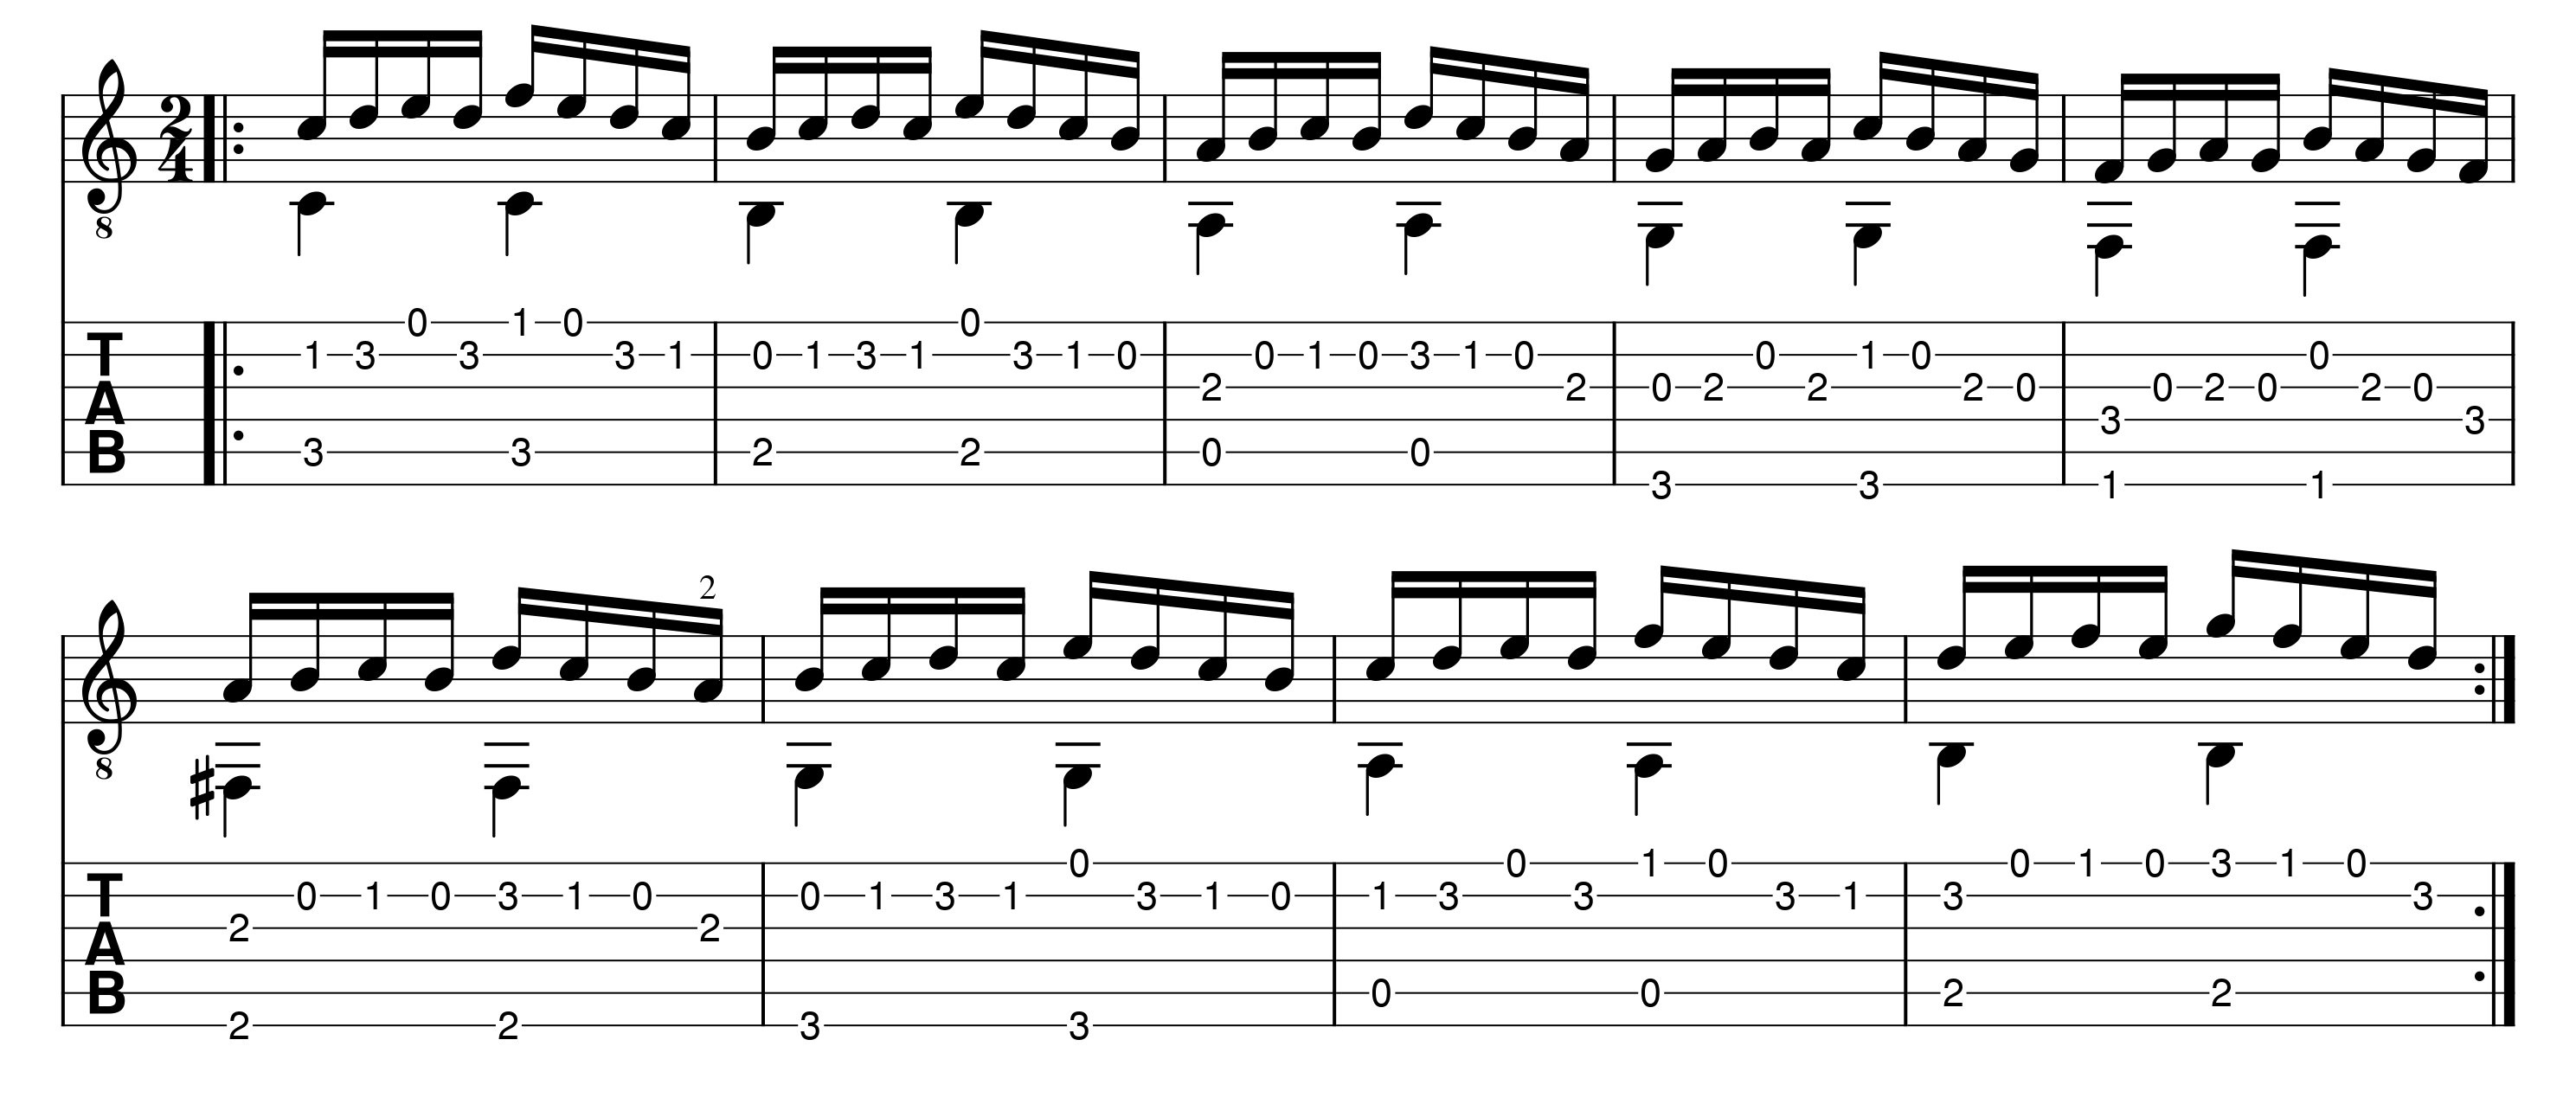
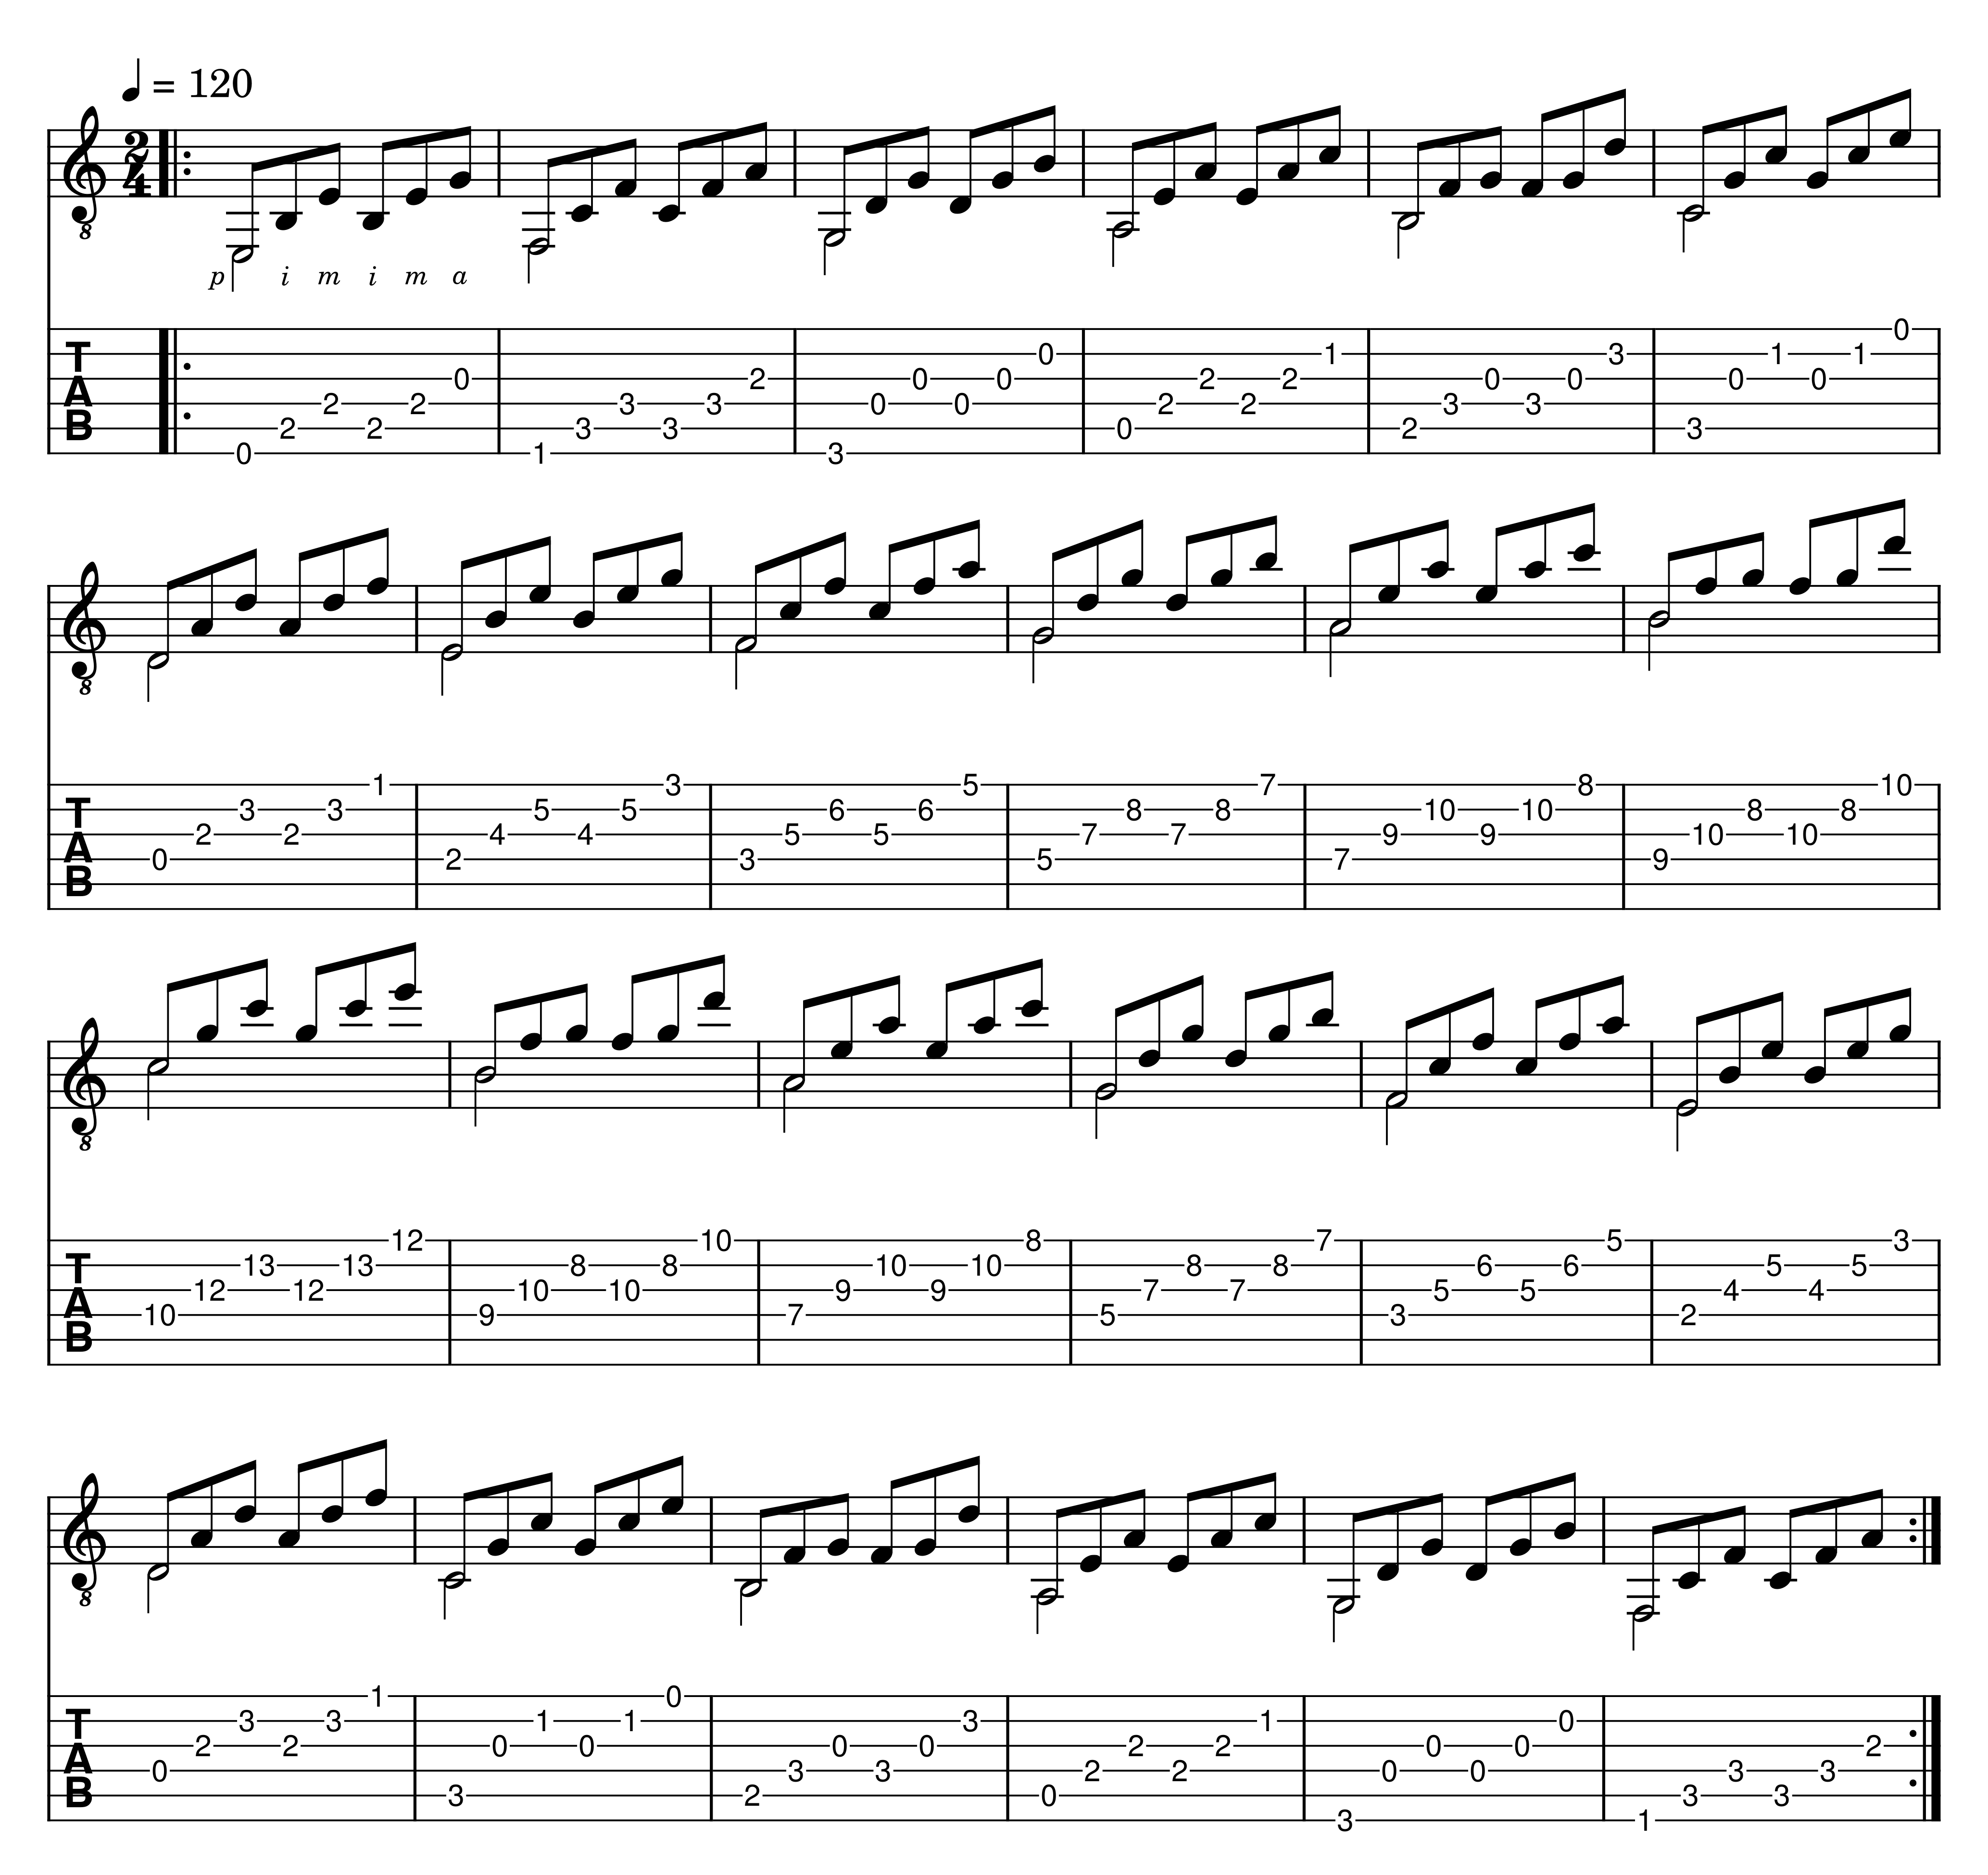
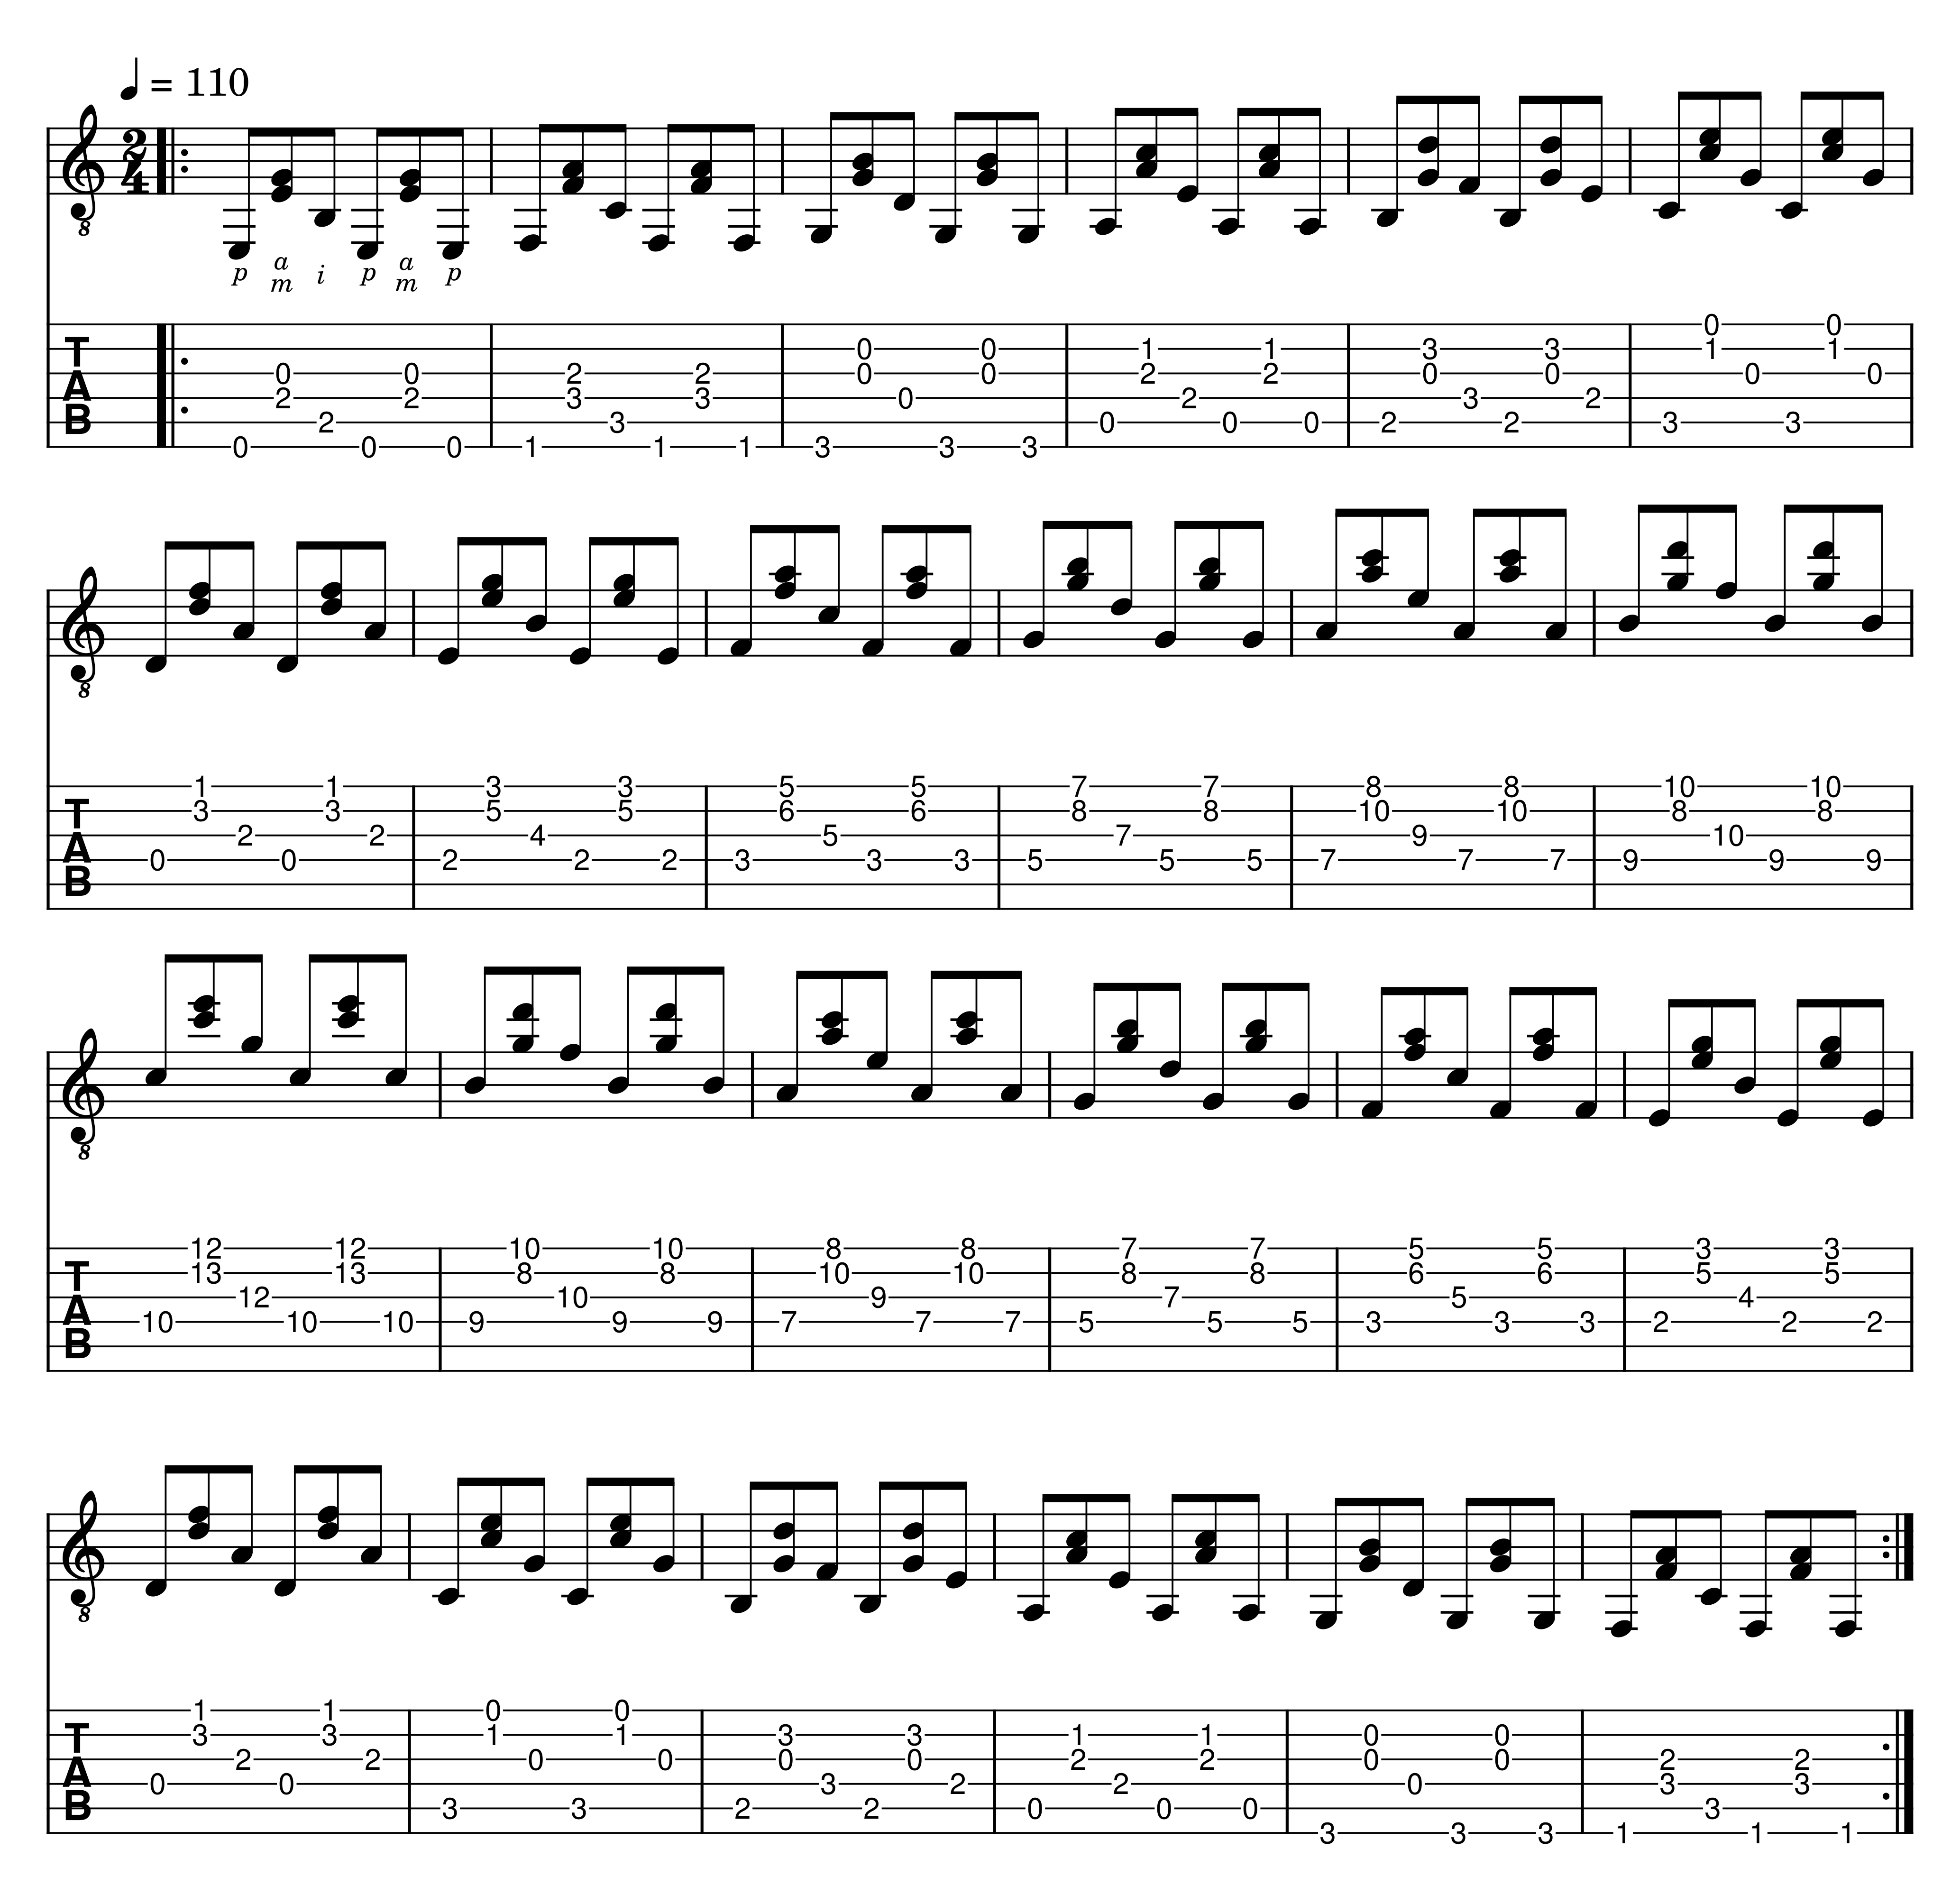
p-i-m a-m-i a-m-i a-m-i (pattern 10). This interesting pattern has a few special details that are worth noting. First and foremost is the 4/4 time signature. Although it consists entirely of arpeggios, you'll have to use a partial barre for the F chord in the ninth measure. The reason for this is that the exercise adds a note to the simple pattern of arpeggios in triplets. In the first measure, the added note is the A at the second fret of the third string at the beginning of beat 3. Sometimes the extra note is played on an open string, and, when it isn't, you'll have to fret it with a finger that may be in use on another string. For example, in the first five measures, it's all very simple and straightforward. But in the sixth measure, the first-string F is fretted with the index finger, which is momentarily flattened to fret the second string and the first string. The same technique is required in the eighth measure, where the first-string A is fretted with the flattened little finger. The chord in the ninth measure is a variation that allows the extra note to be played. I like this exercise a lot because it isn't hard on the hands, it has some details that make it different from the other exercises seen here and it sounds very nice. A good one for warming up your hands.

p-am-i p-am-p (pattern 1). The first two patterns are the easiest. Let the strings ring as much as possible.
p-am-i p-i-am (pattern 2)
p-i-am i-am-i (pattern 3). The next two exercises are a little harder. The indicated tempo is a recommended upper limit. I suggest you play them slowly and lovingly.
p-am-i am-i-am (reverse of pattern 3)
p-i-am-i am-i-p-i (pattern 4). Let the strings ring as much as possible.
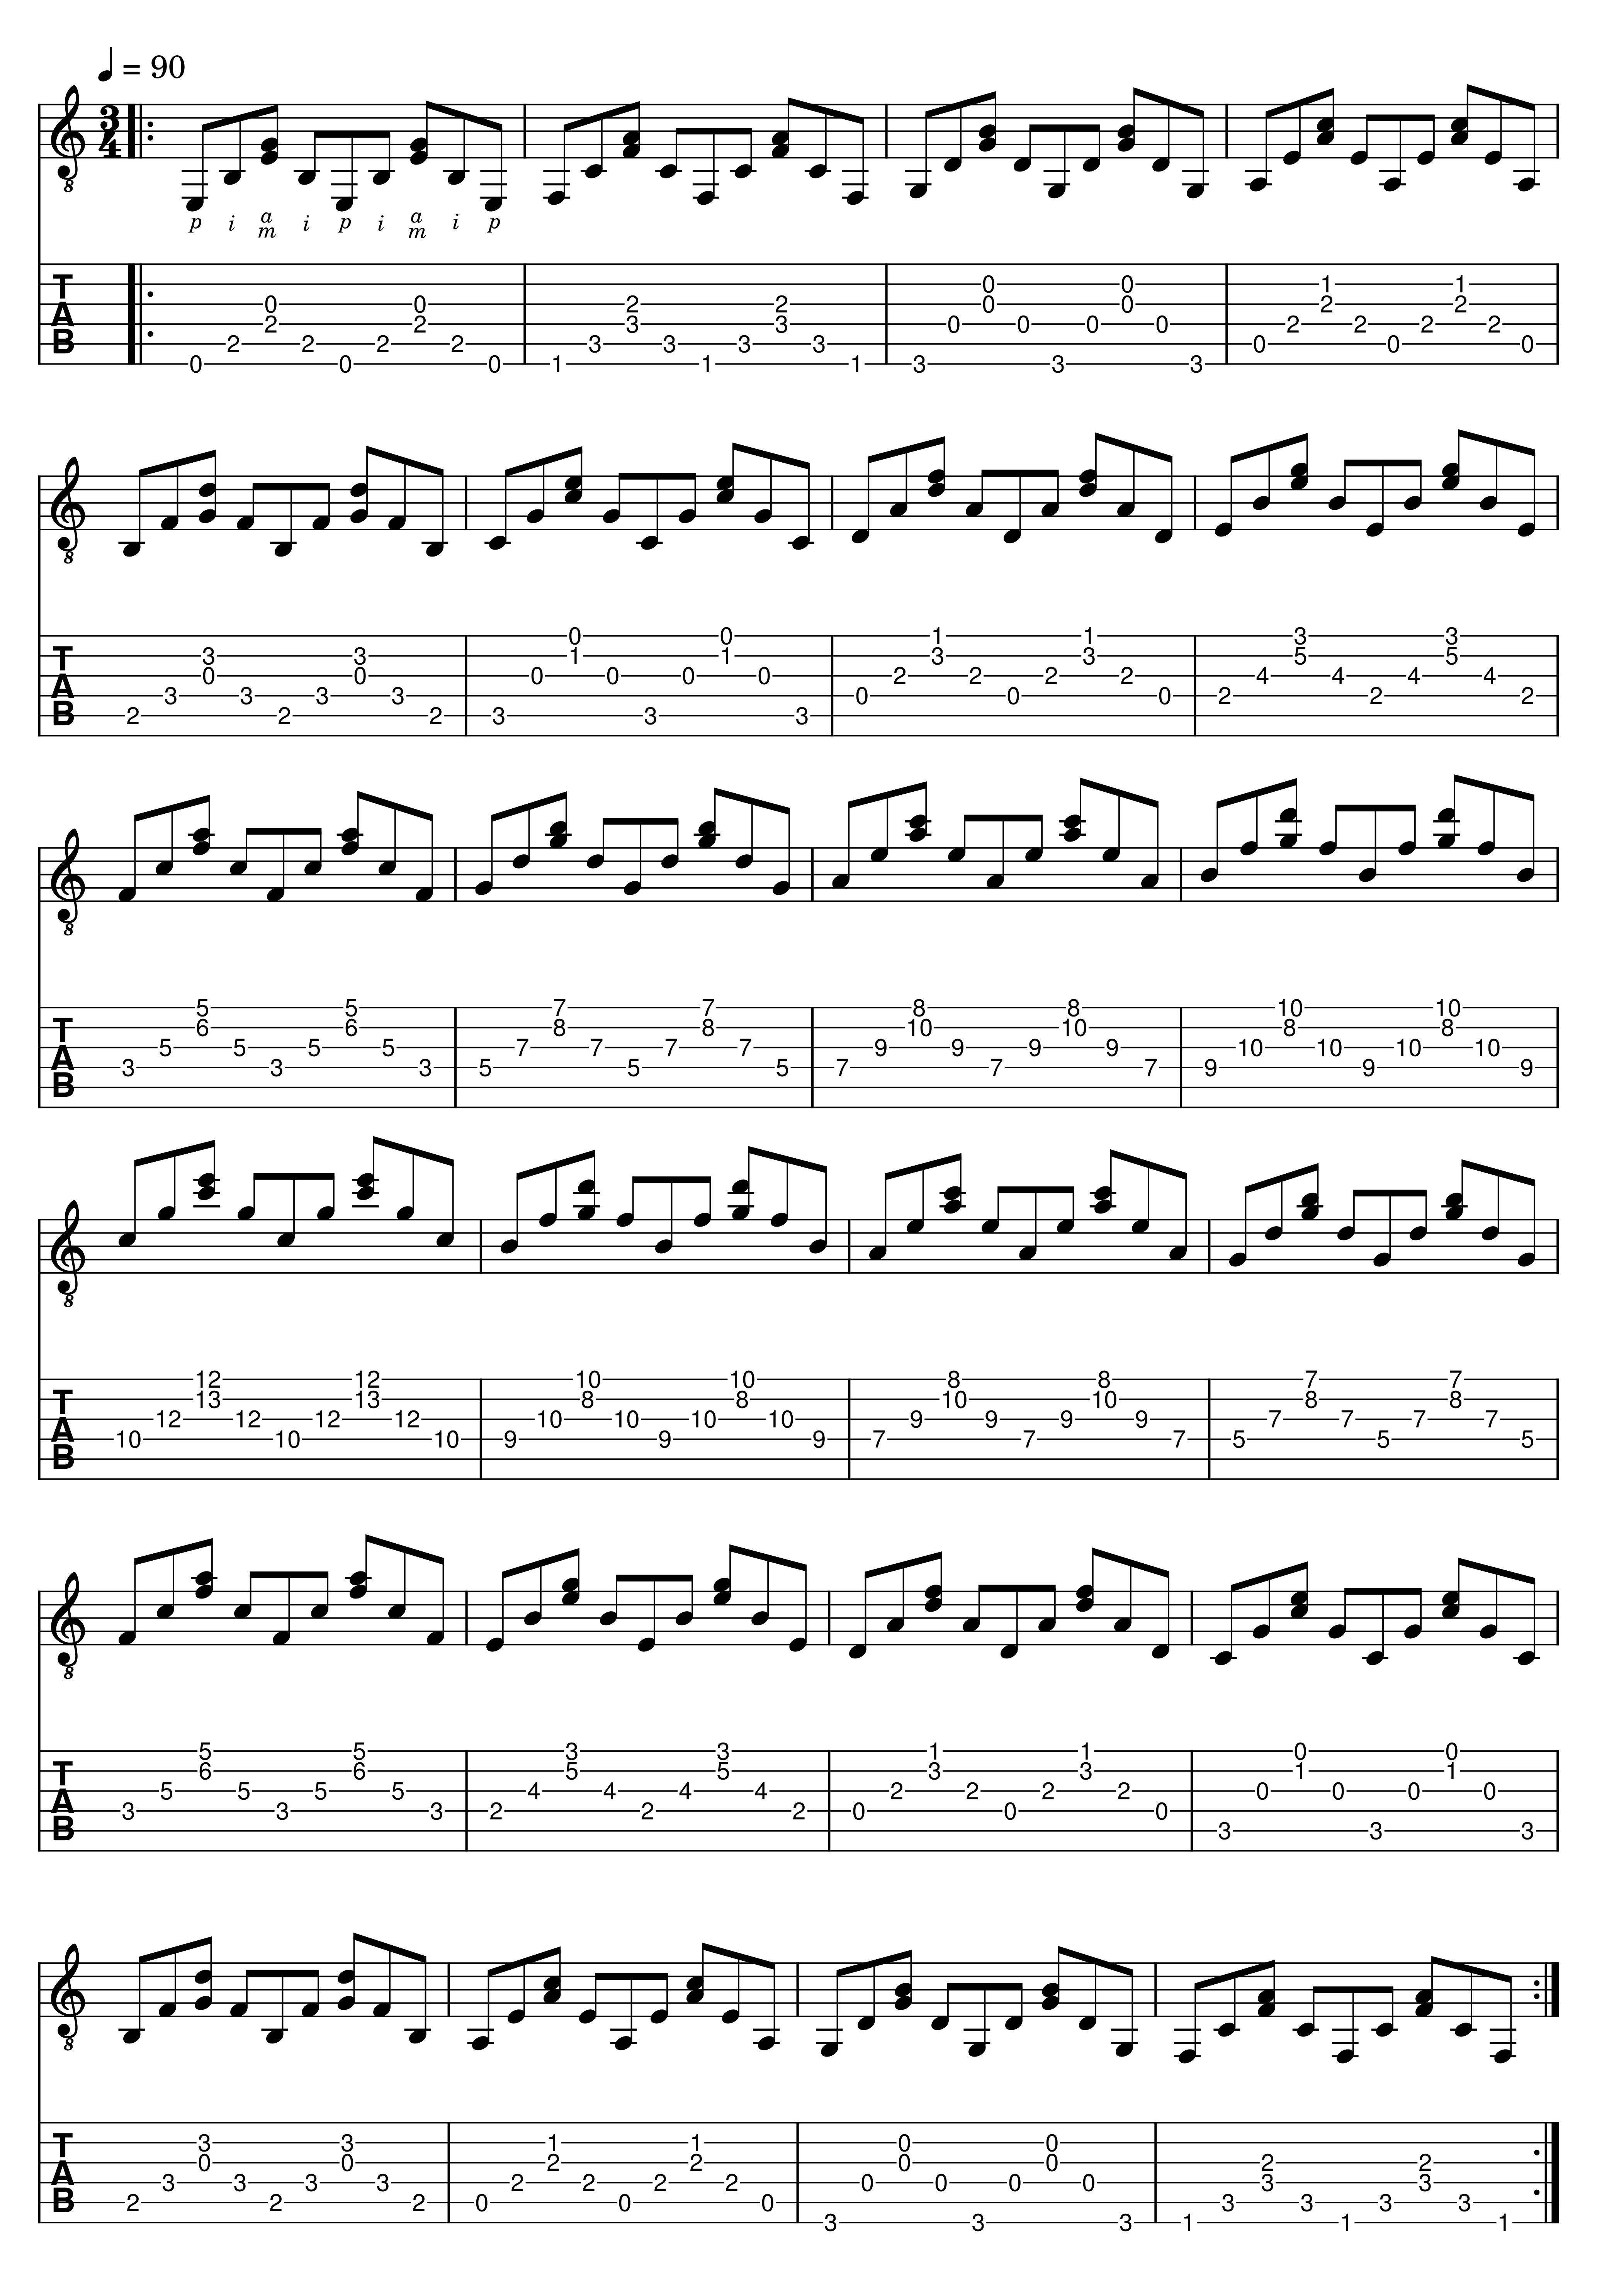
p-i am-i am-p (pattern 5). The next two patterns are in 3/4. This one is very similar to pattern 3.
p-i-am i-p-i am-i-p (pattern 6). In this offset arrangement, each beat falls on a different finger stroke.
p-i-am-i-p (pattern 7). I wanted to include a quintuplet horquilla pattern, and this is just one of several that are possible. This is the first exercise with more than one chord per measure, which will tire your hands quickly at faster tempos.
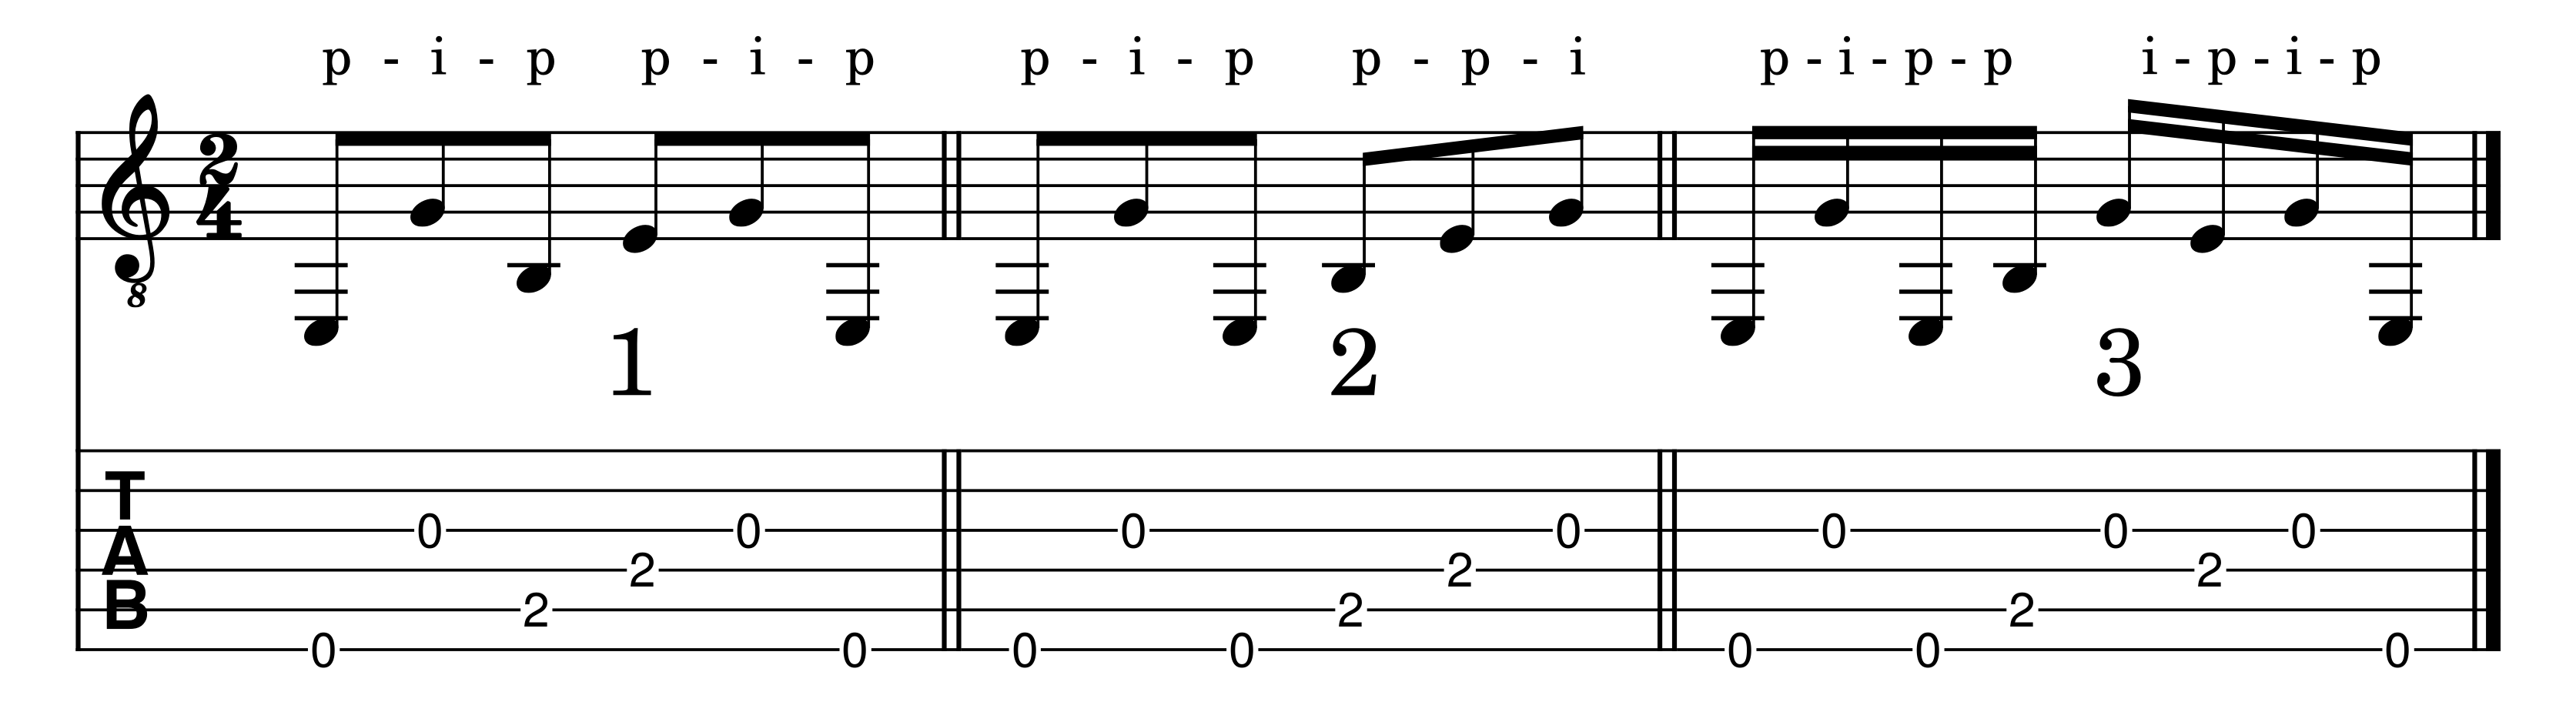
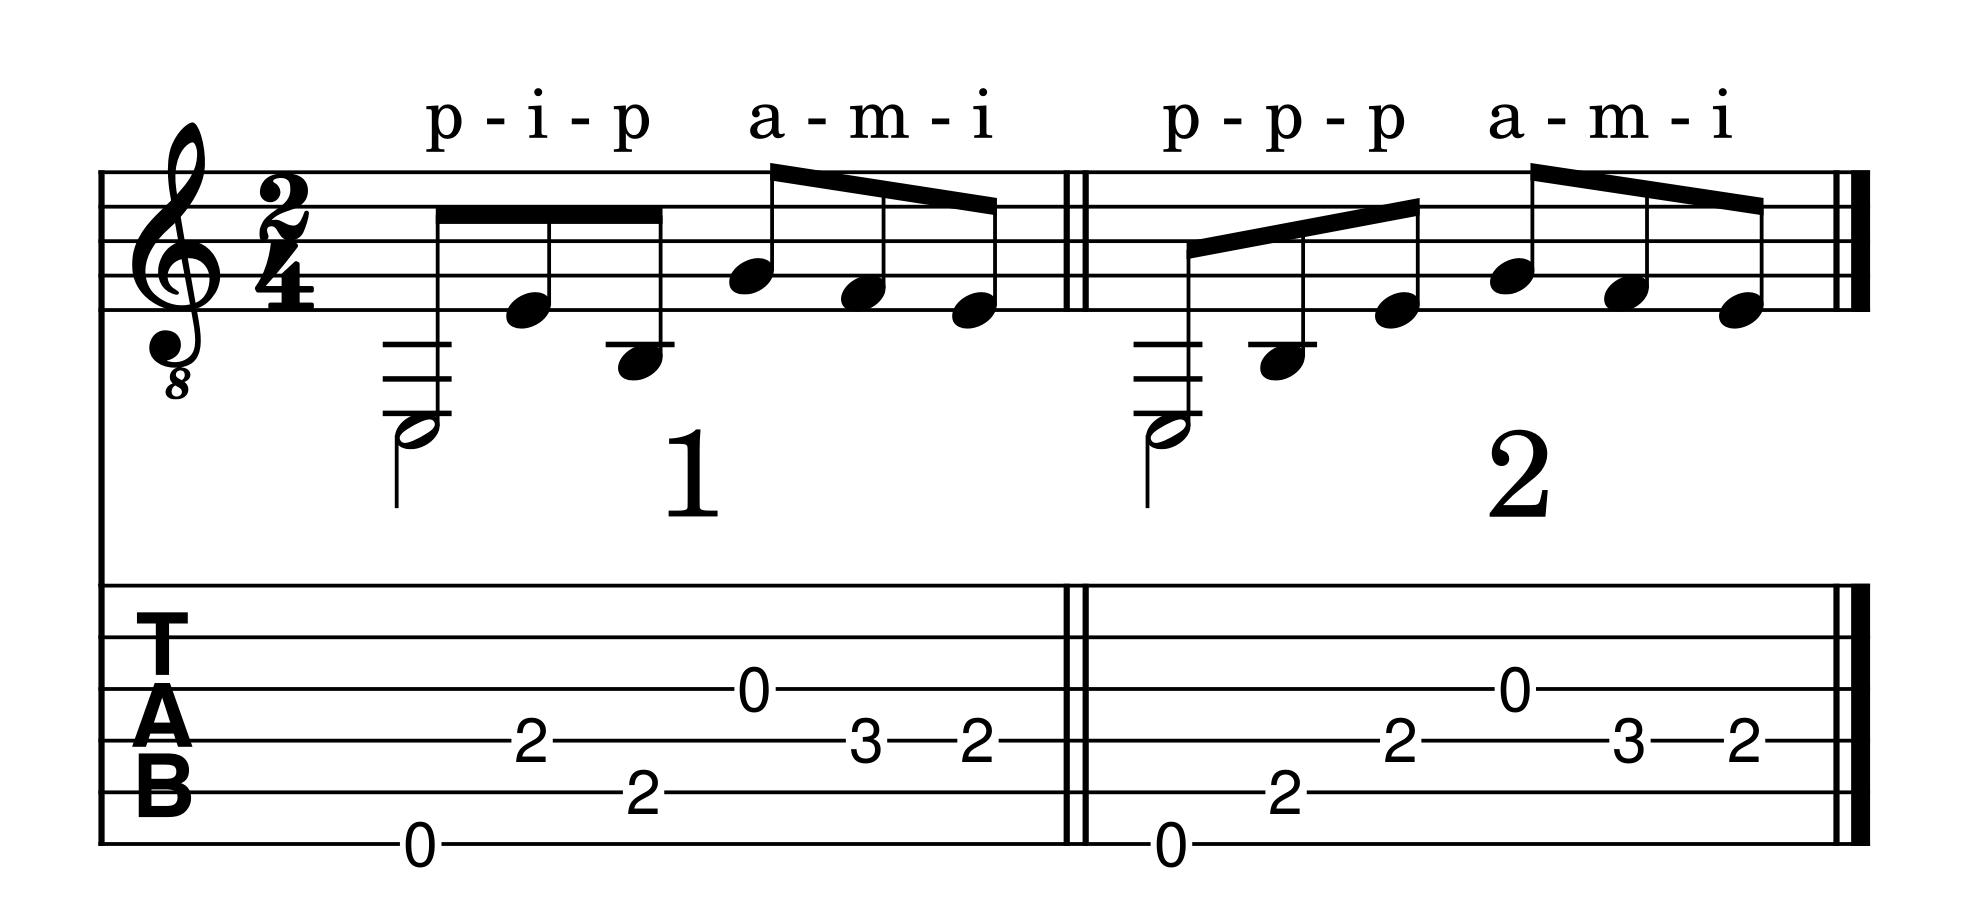
p-i-p p-i-p (pattern 1). As in the other exercises above, the first two patterns are the easiest. All three patterns start with a bass note and the third of that bass. You may have noticed (especially if you've read the introductory notes) that the G major and C major chords in the lower register skip the fifth and fourth strings, respectively. It's not an issue in the arpeggio and horquilla exercises, but it's noticeable here, especially in patterns 2 and 3, as the thumb has to jump the gap. Although it's not a big deal if you "break the rules" and keep your thumb strokes on consecutive strings, I recommend you play these patterns as written, because they sound better and are not too difficult. Let the strings ring as much as possible.
p-i-p p-p-i (pattern 2). As noted above, in the third and sixth measures, the thumb has to jump the gap across the fifth and fourth strings, respectively. Let the strings ring as much as possible.
p-i-p-p i-p-i-p (pattern 3). This oddly syncopated pattern in sixteenths is a little harder. As noted above, in the third and sixth measures, the thumb has to jump the gap across the fifth and fourth strings, respectively. Let the strings ring as much as possible.
p-i-p a-m-i (pattern 1). These patterns combine thumb mechanisms with single-note lines. In each measure, beat 2 starts with the third of the bass note of beat 1. Break the barre in the twelfth measure on beat 2 and fret the first-string C with your index. Let the strings ring as much as possible.
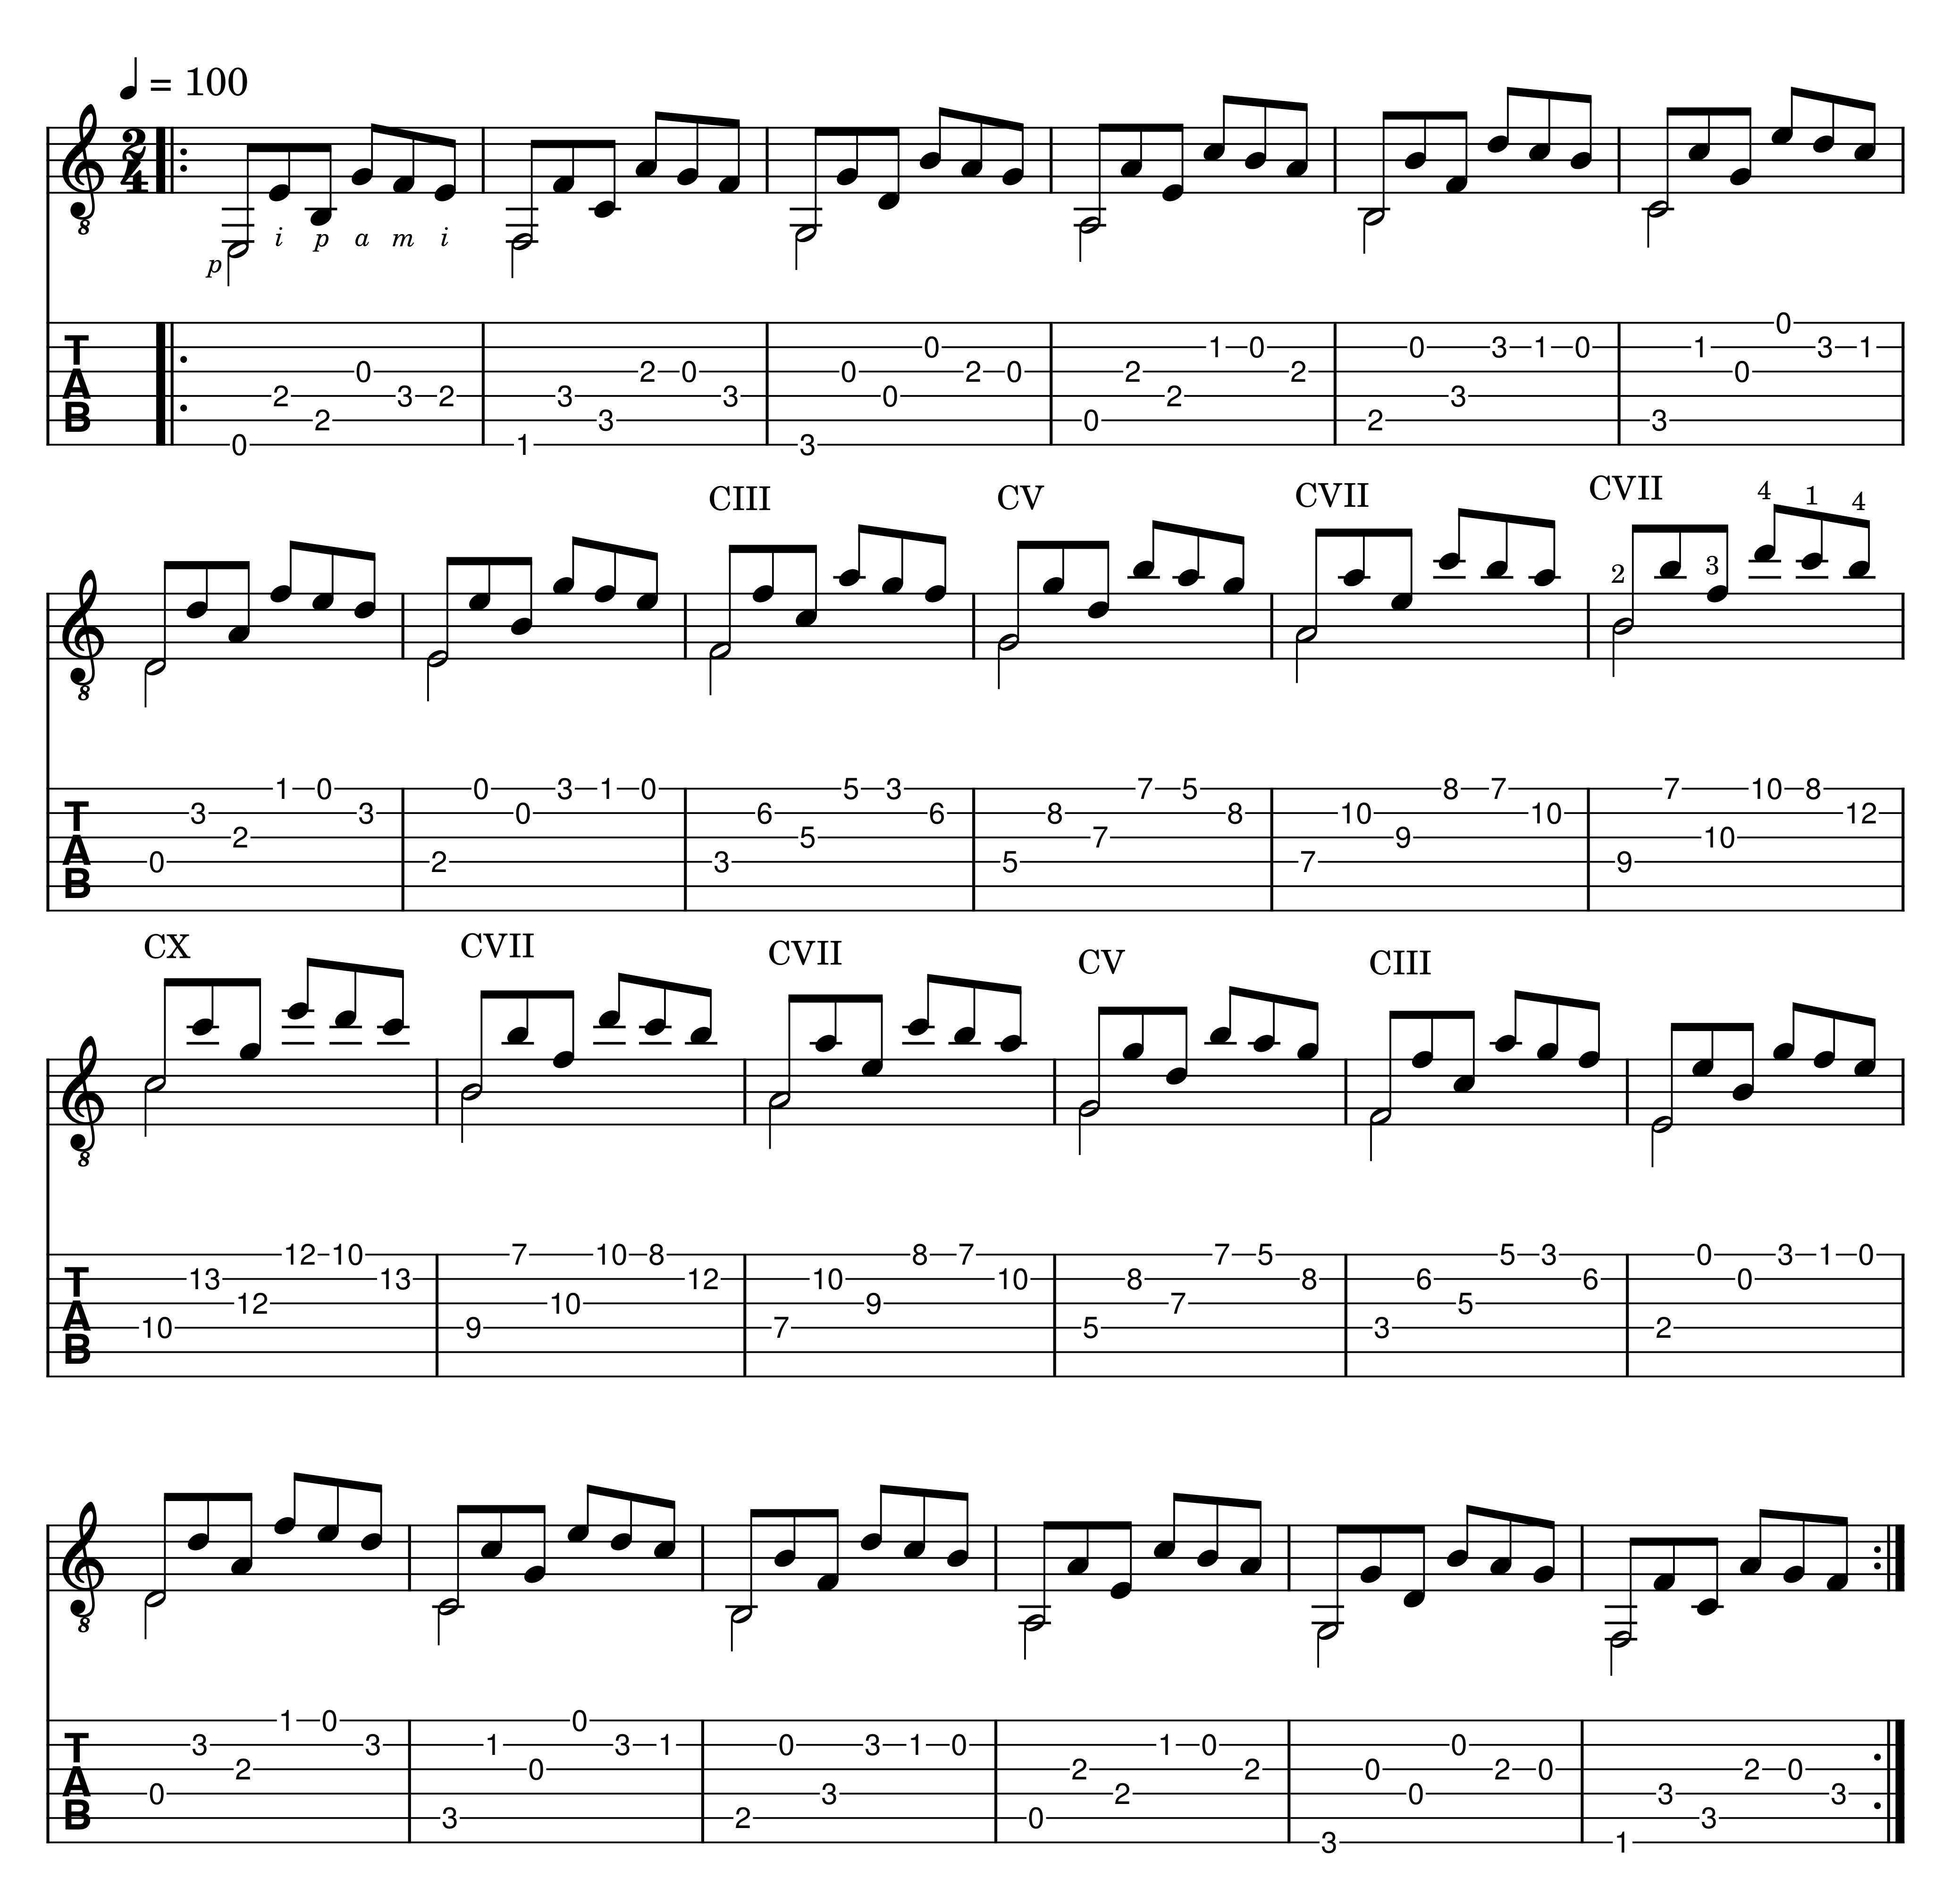
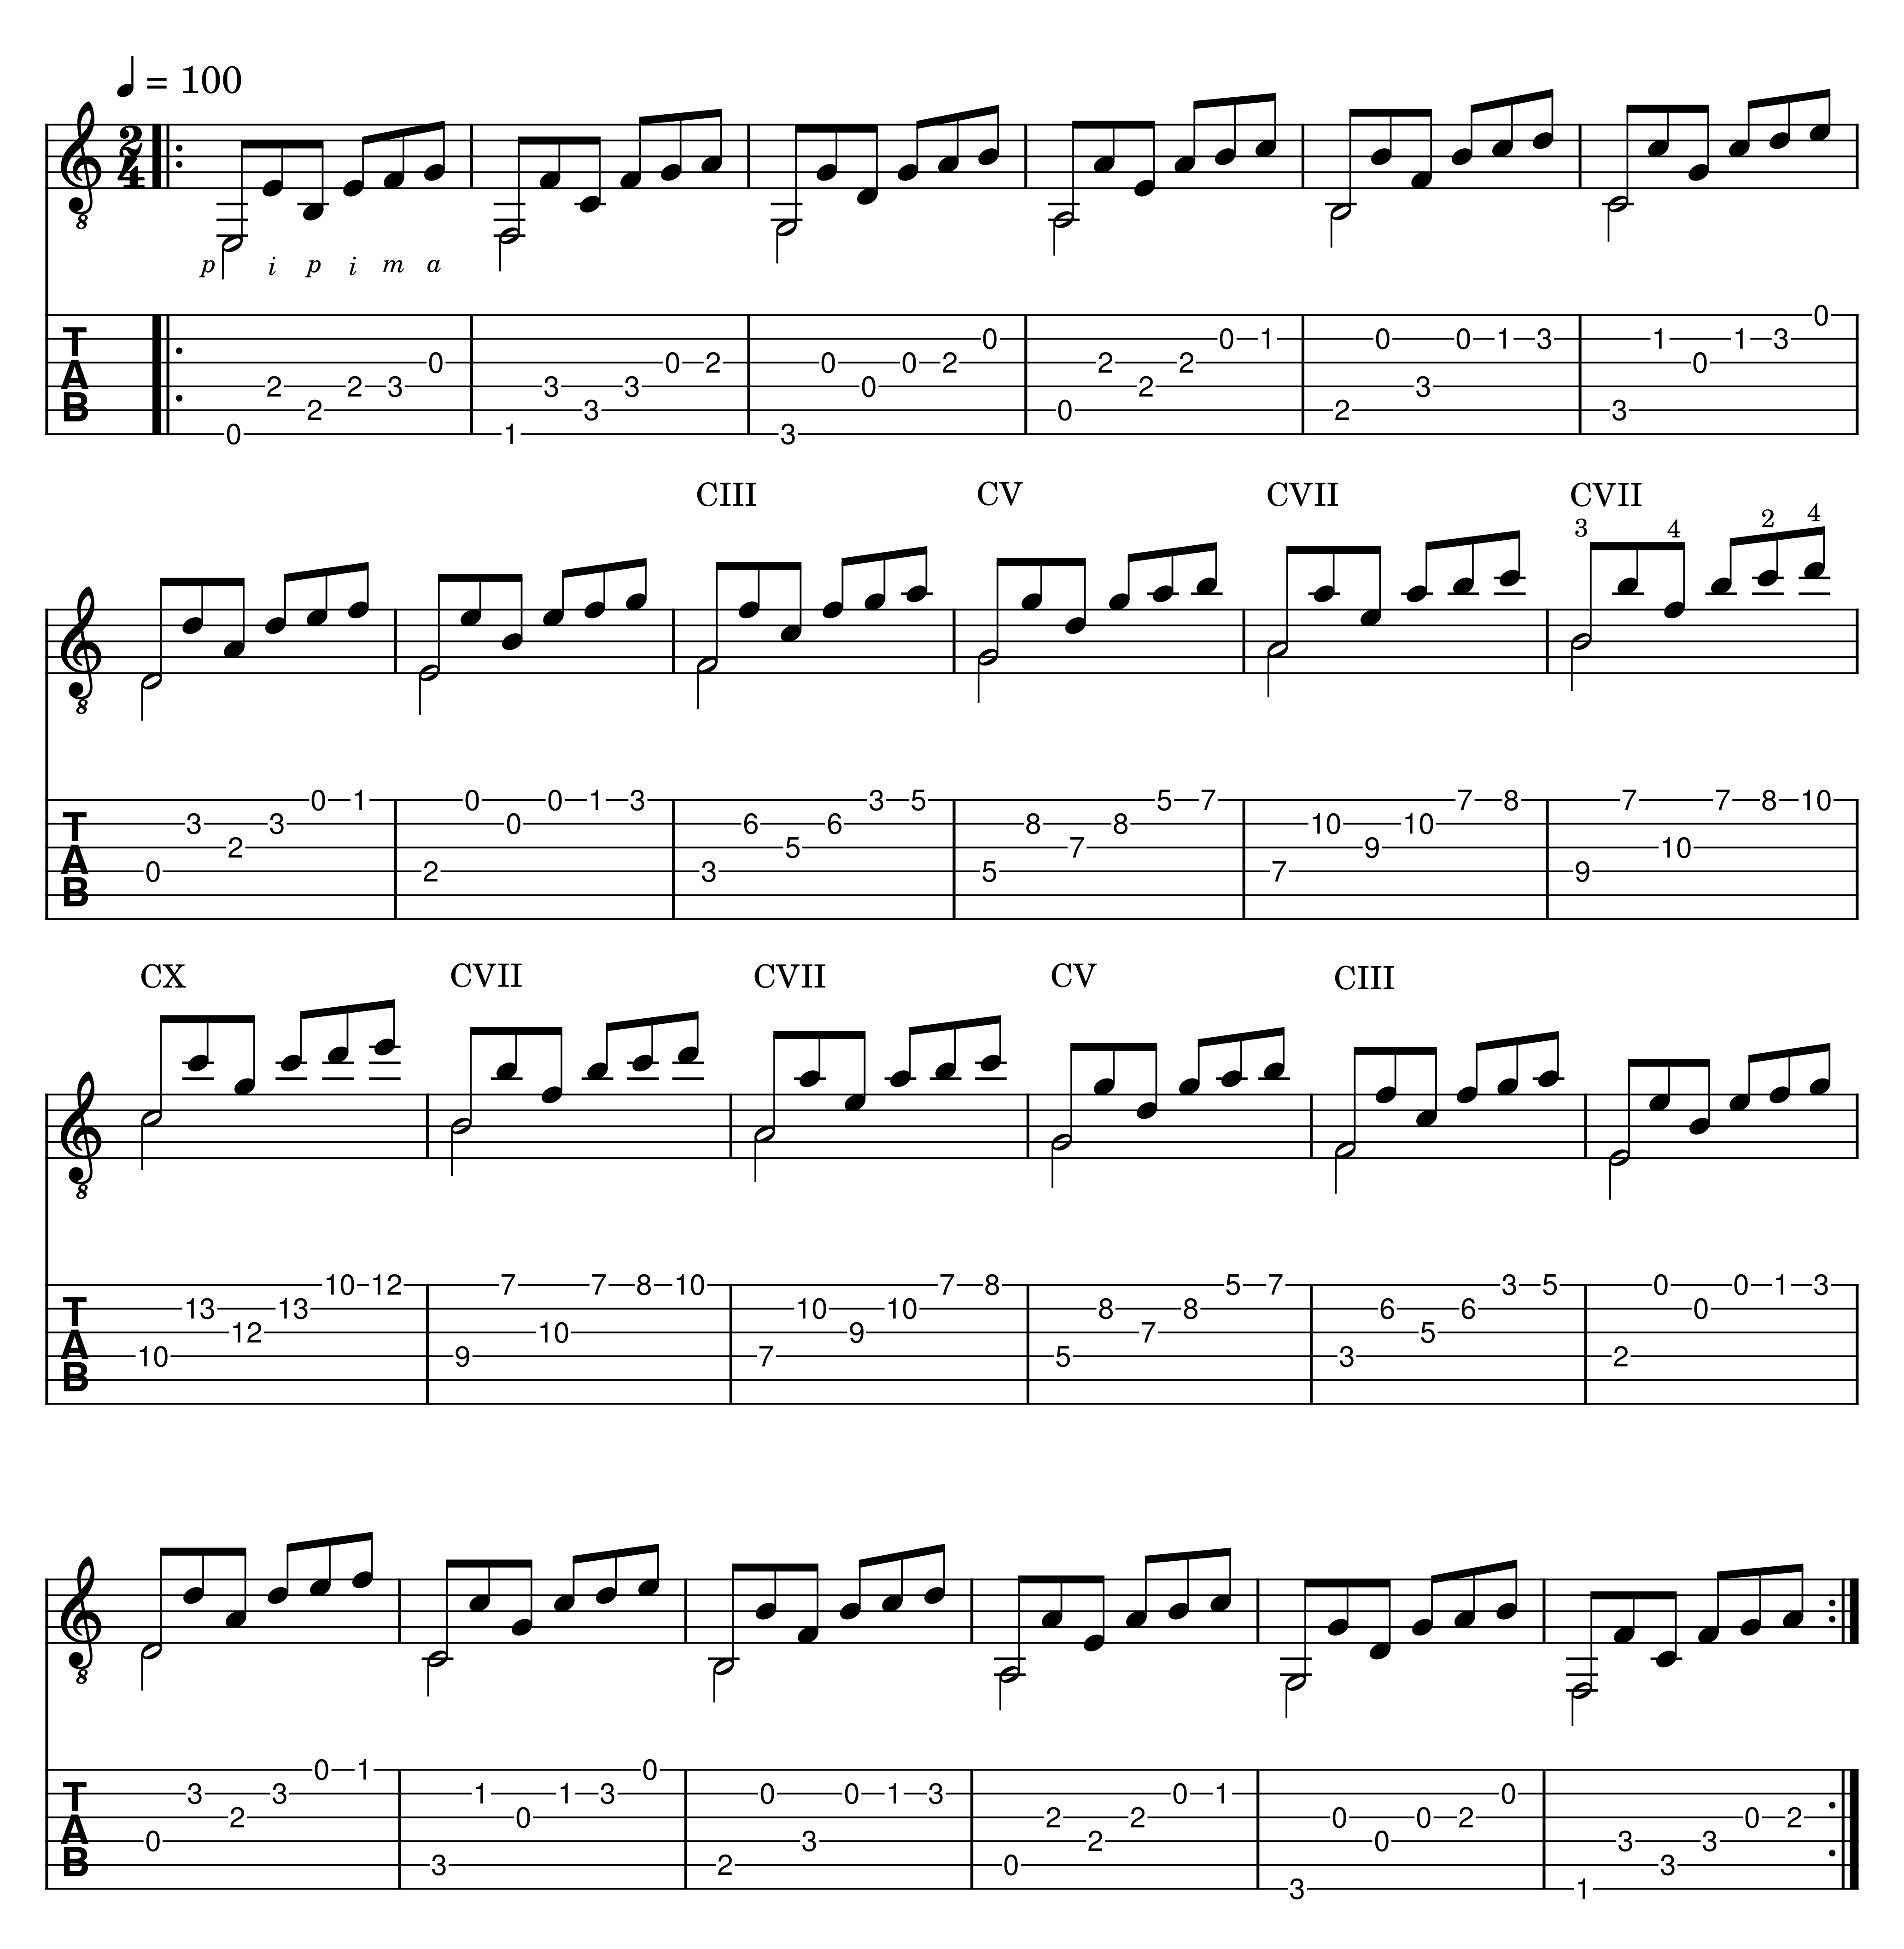
p-i-p i-m-a (reverse of pattern 1). In each measure, beat 2 starts with the octave of the bass note of beat 1. Notice the fingering in the 12th measure.
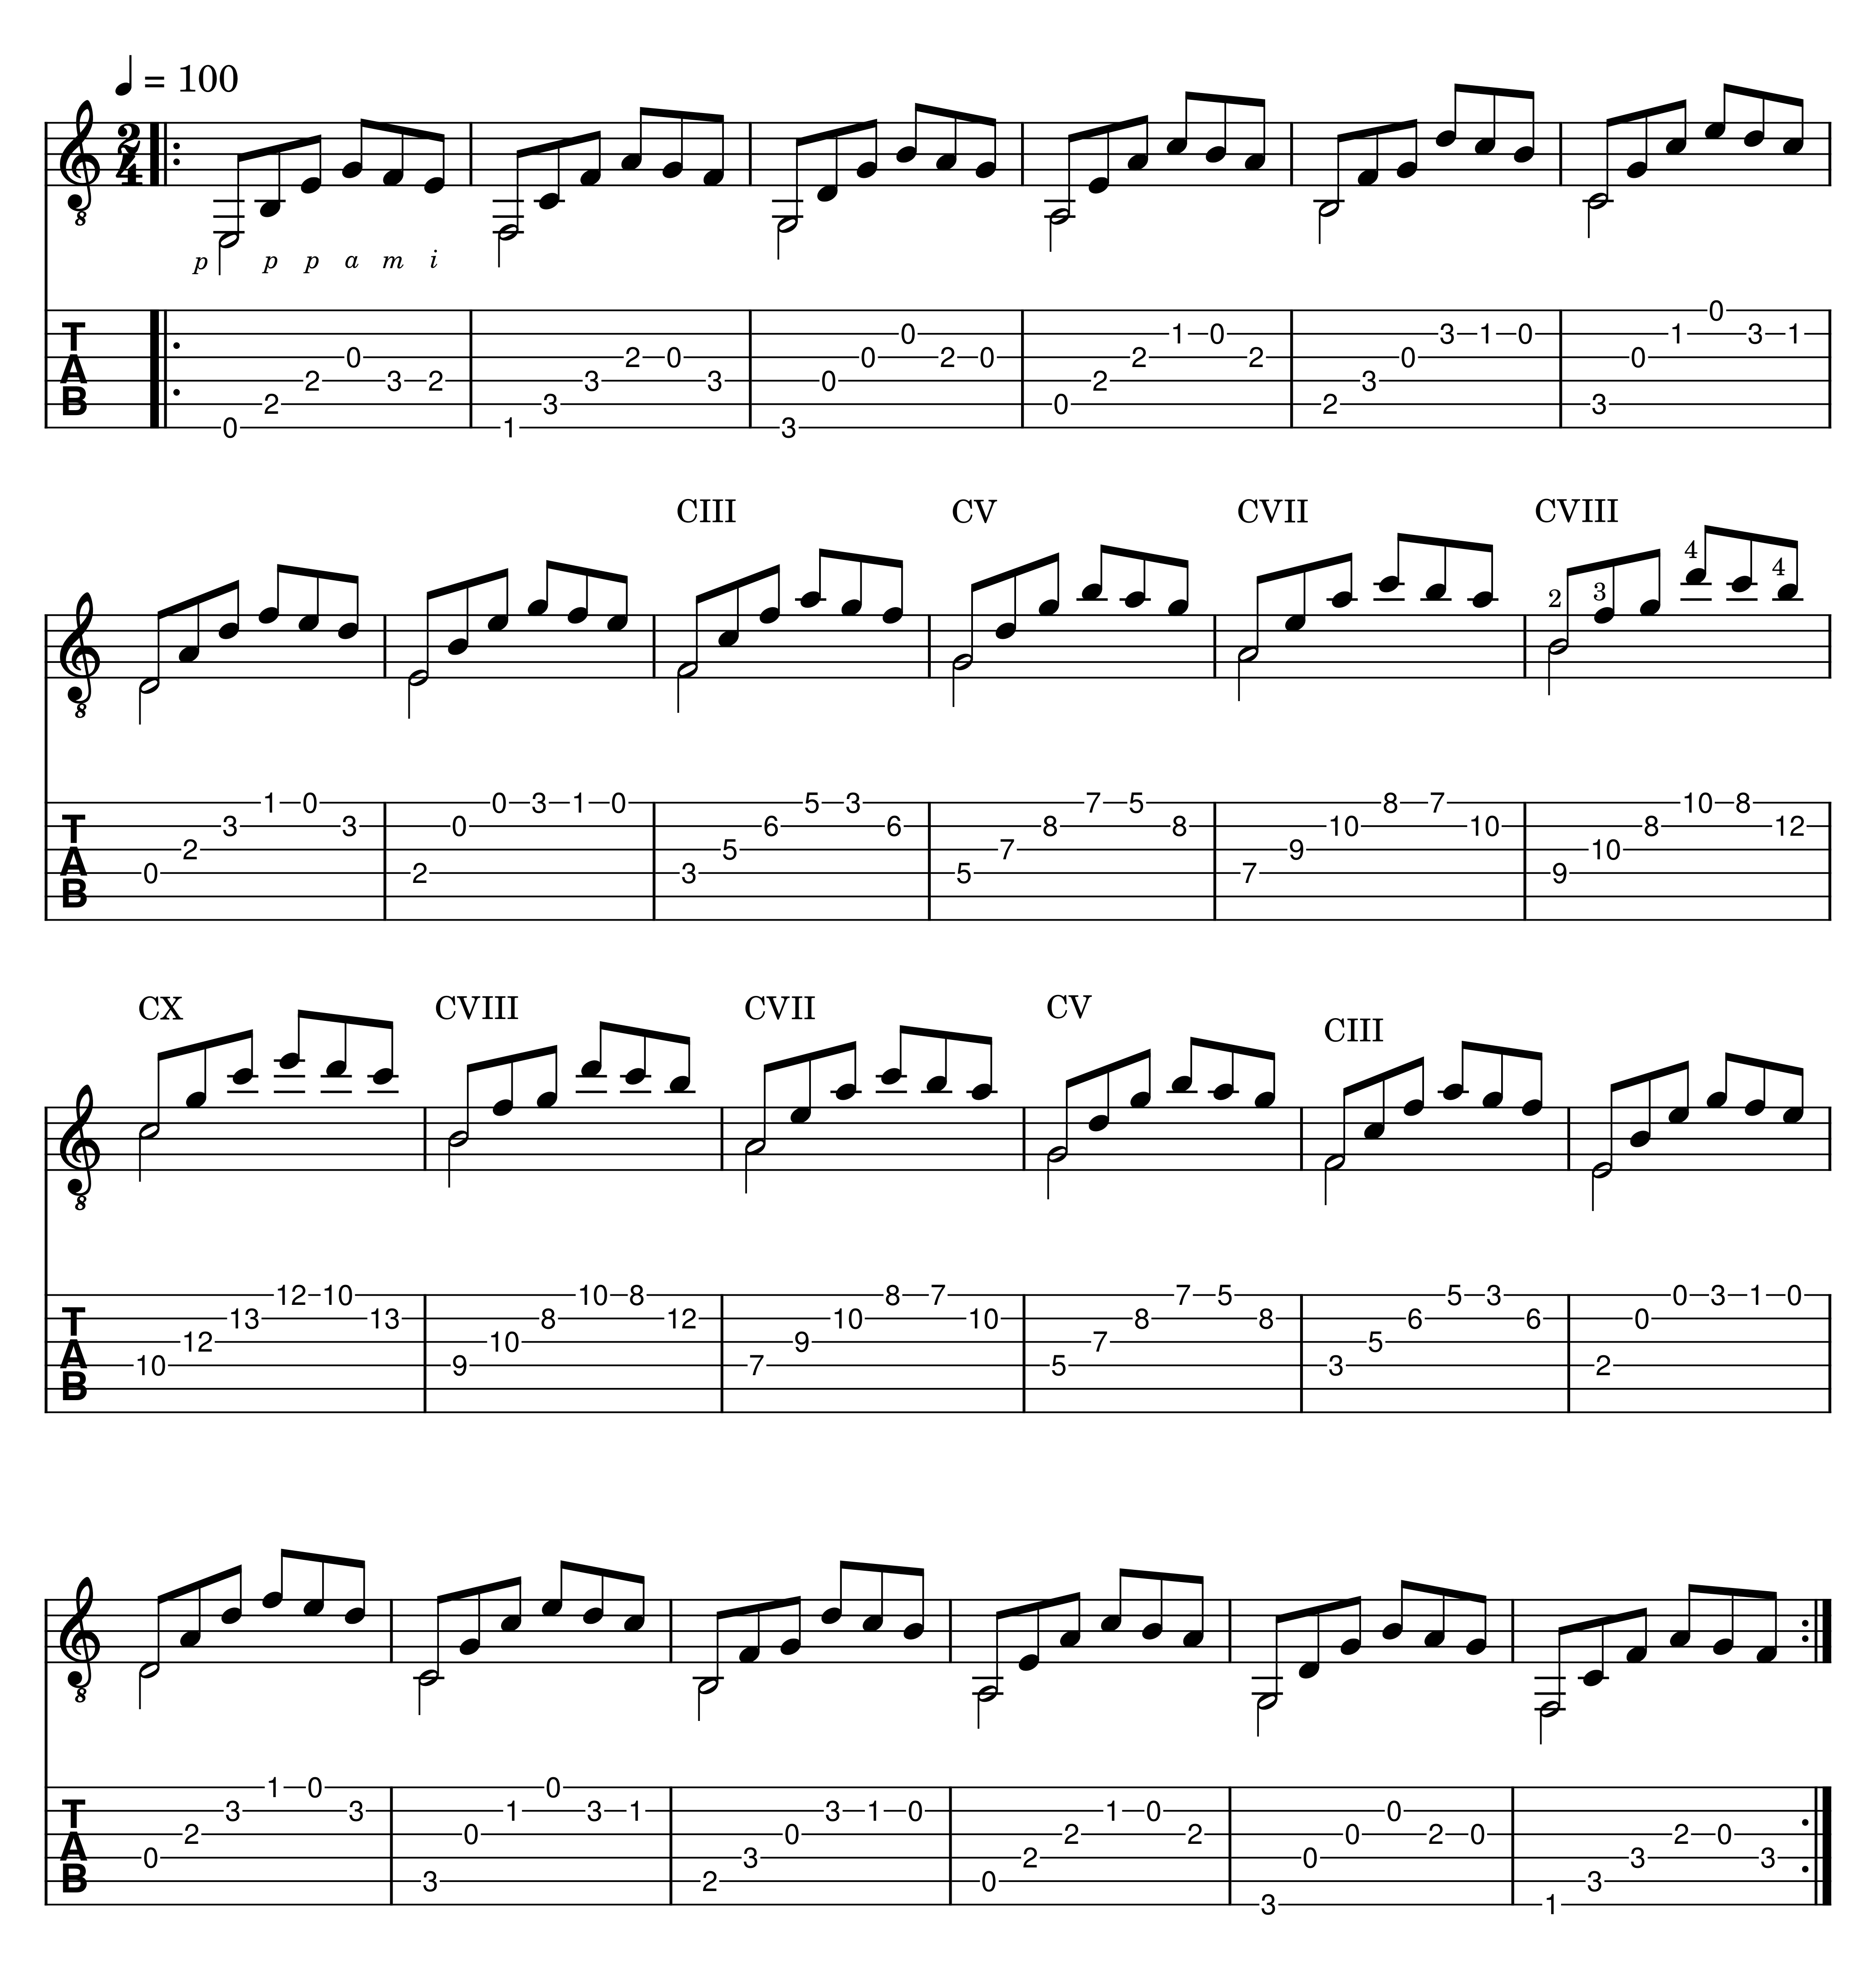
p-p-p a-m-i (pattern 2). In each measure, beat 2 starts with the third of the bass note of beat 1. Notice the fingering in the 12th measure (I use a partial barre).

The exercises in this section are among the easiest and the hardest. Whereas patterns 1 and 3 are very simple and require little effort, in patterns 2 and 4, you'll have to pay attention to the fretting of the G7 and C chords at the top end of the progression. Although pattern 5 is very simple, it will tire your hands quickly at faster tempos. As noted above, all the chords in the upper register are barred. Have a look at the following details:
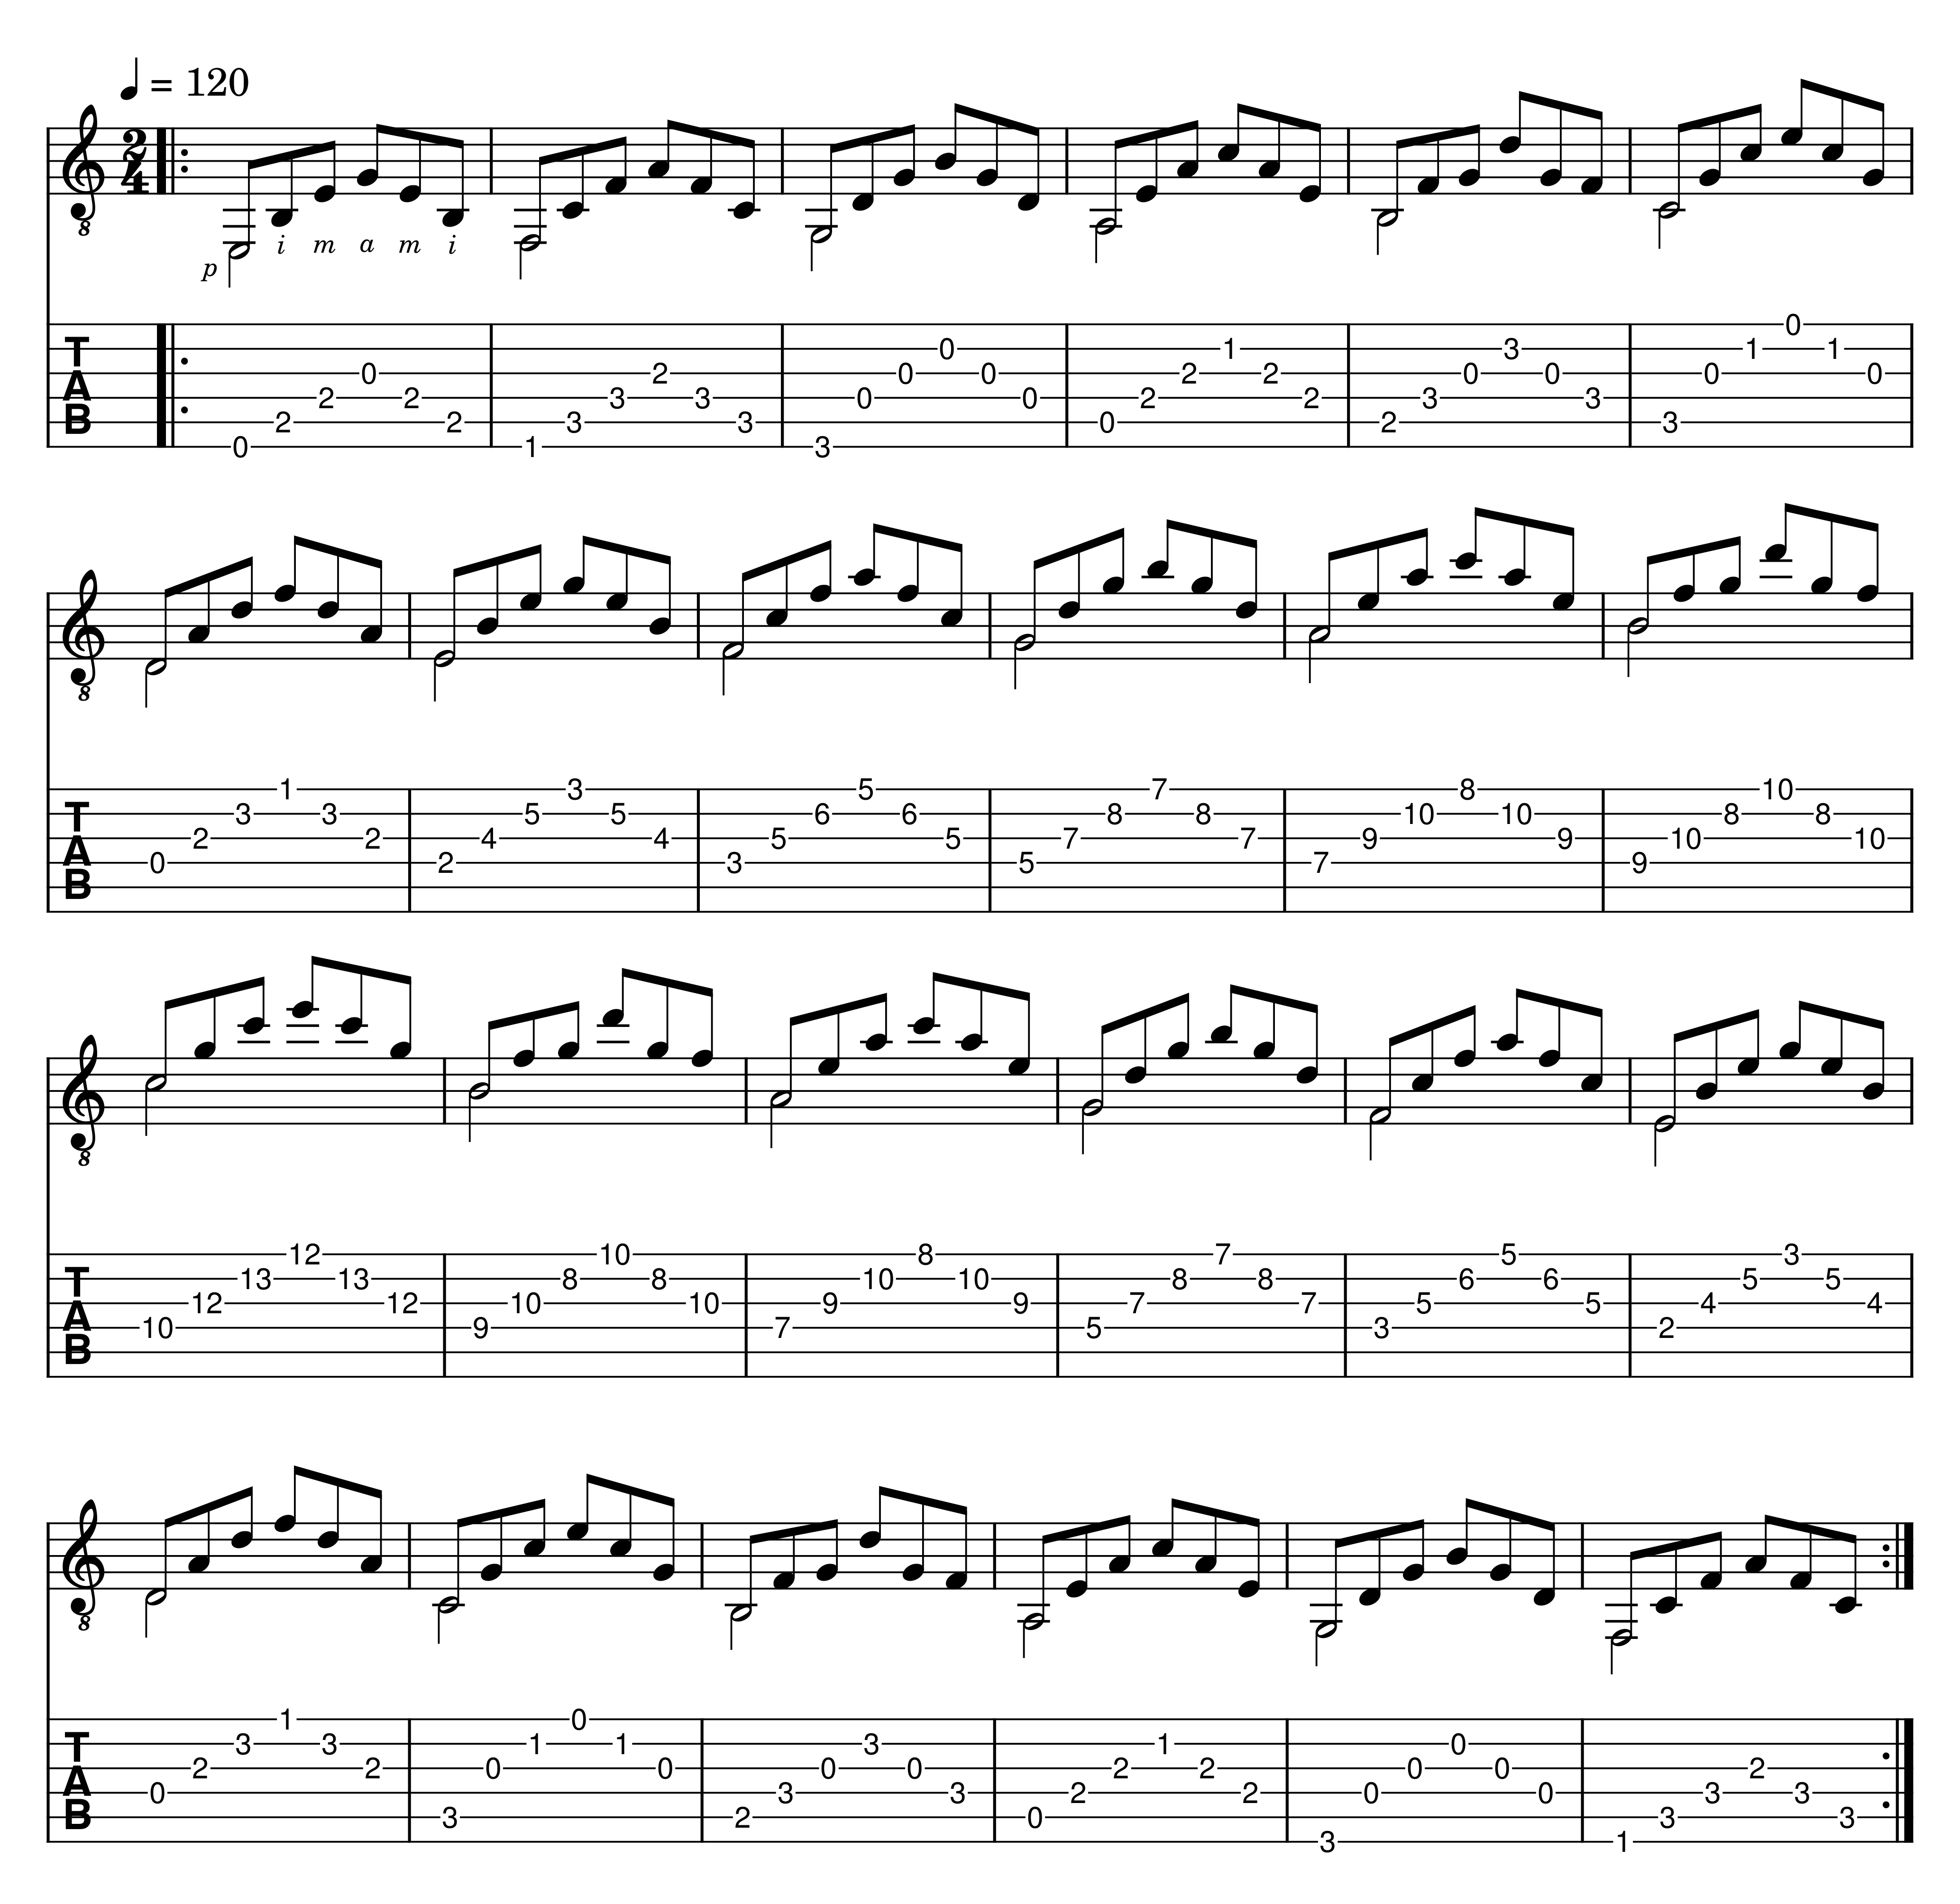
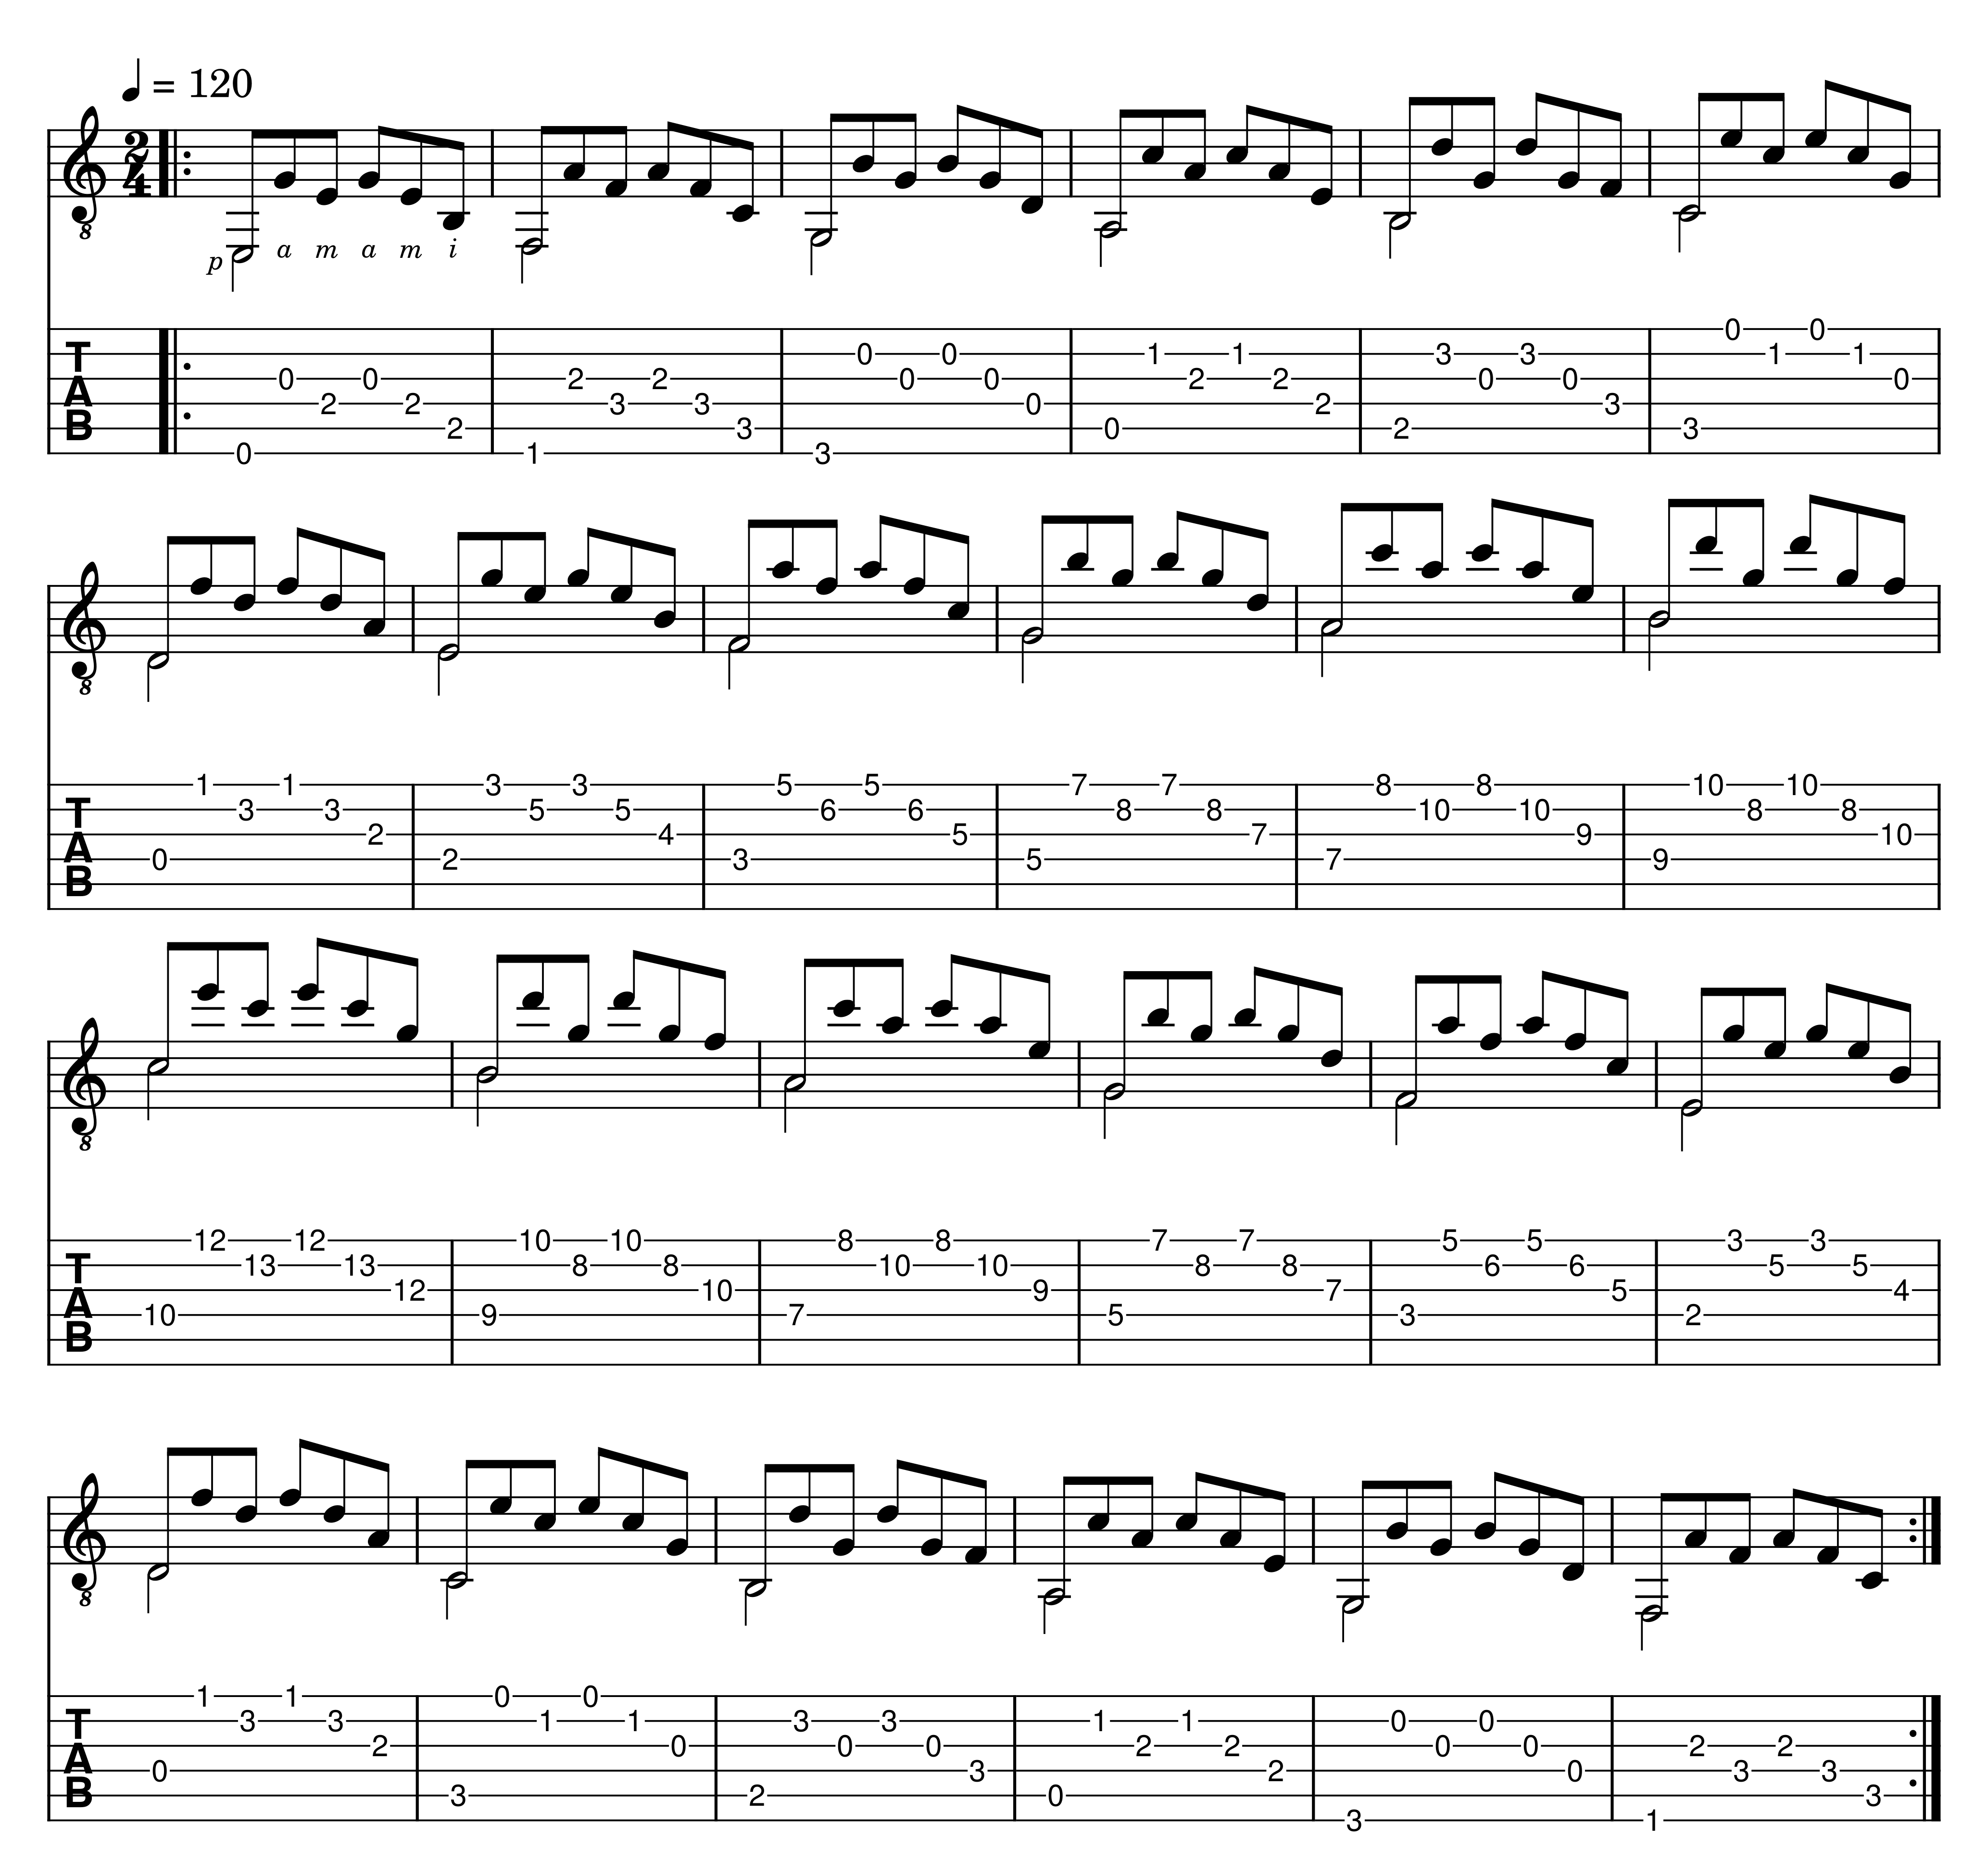
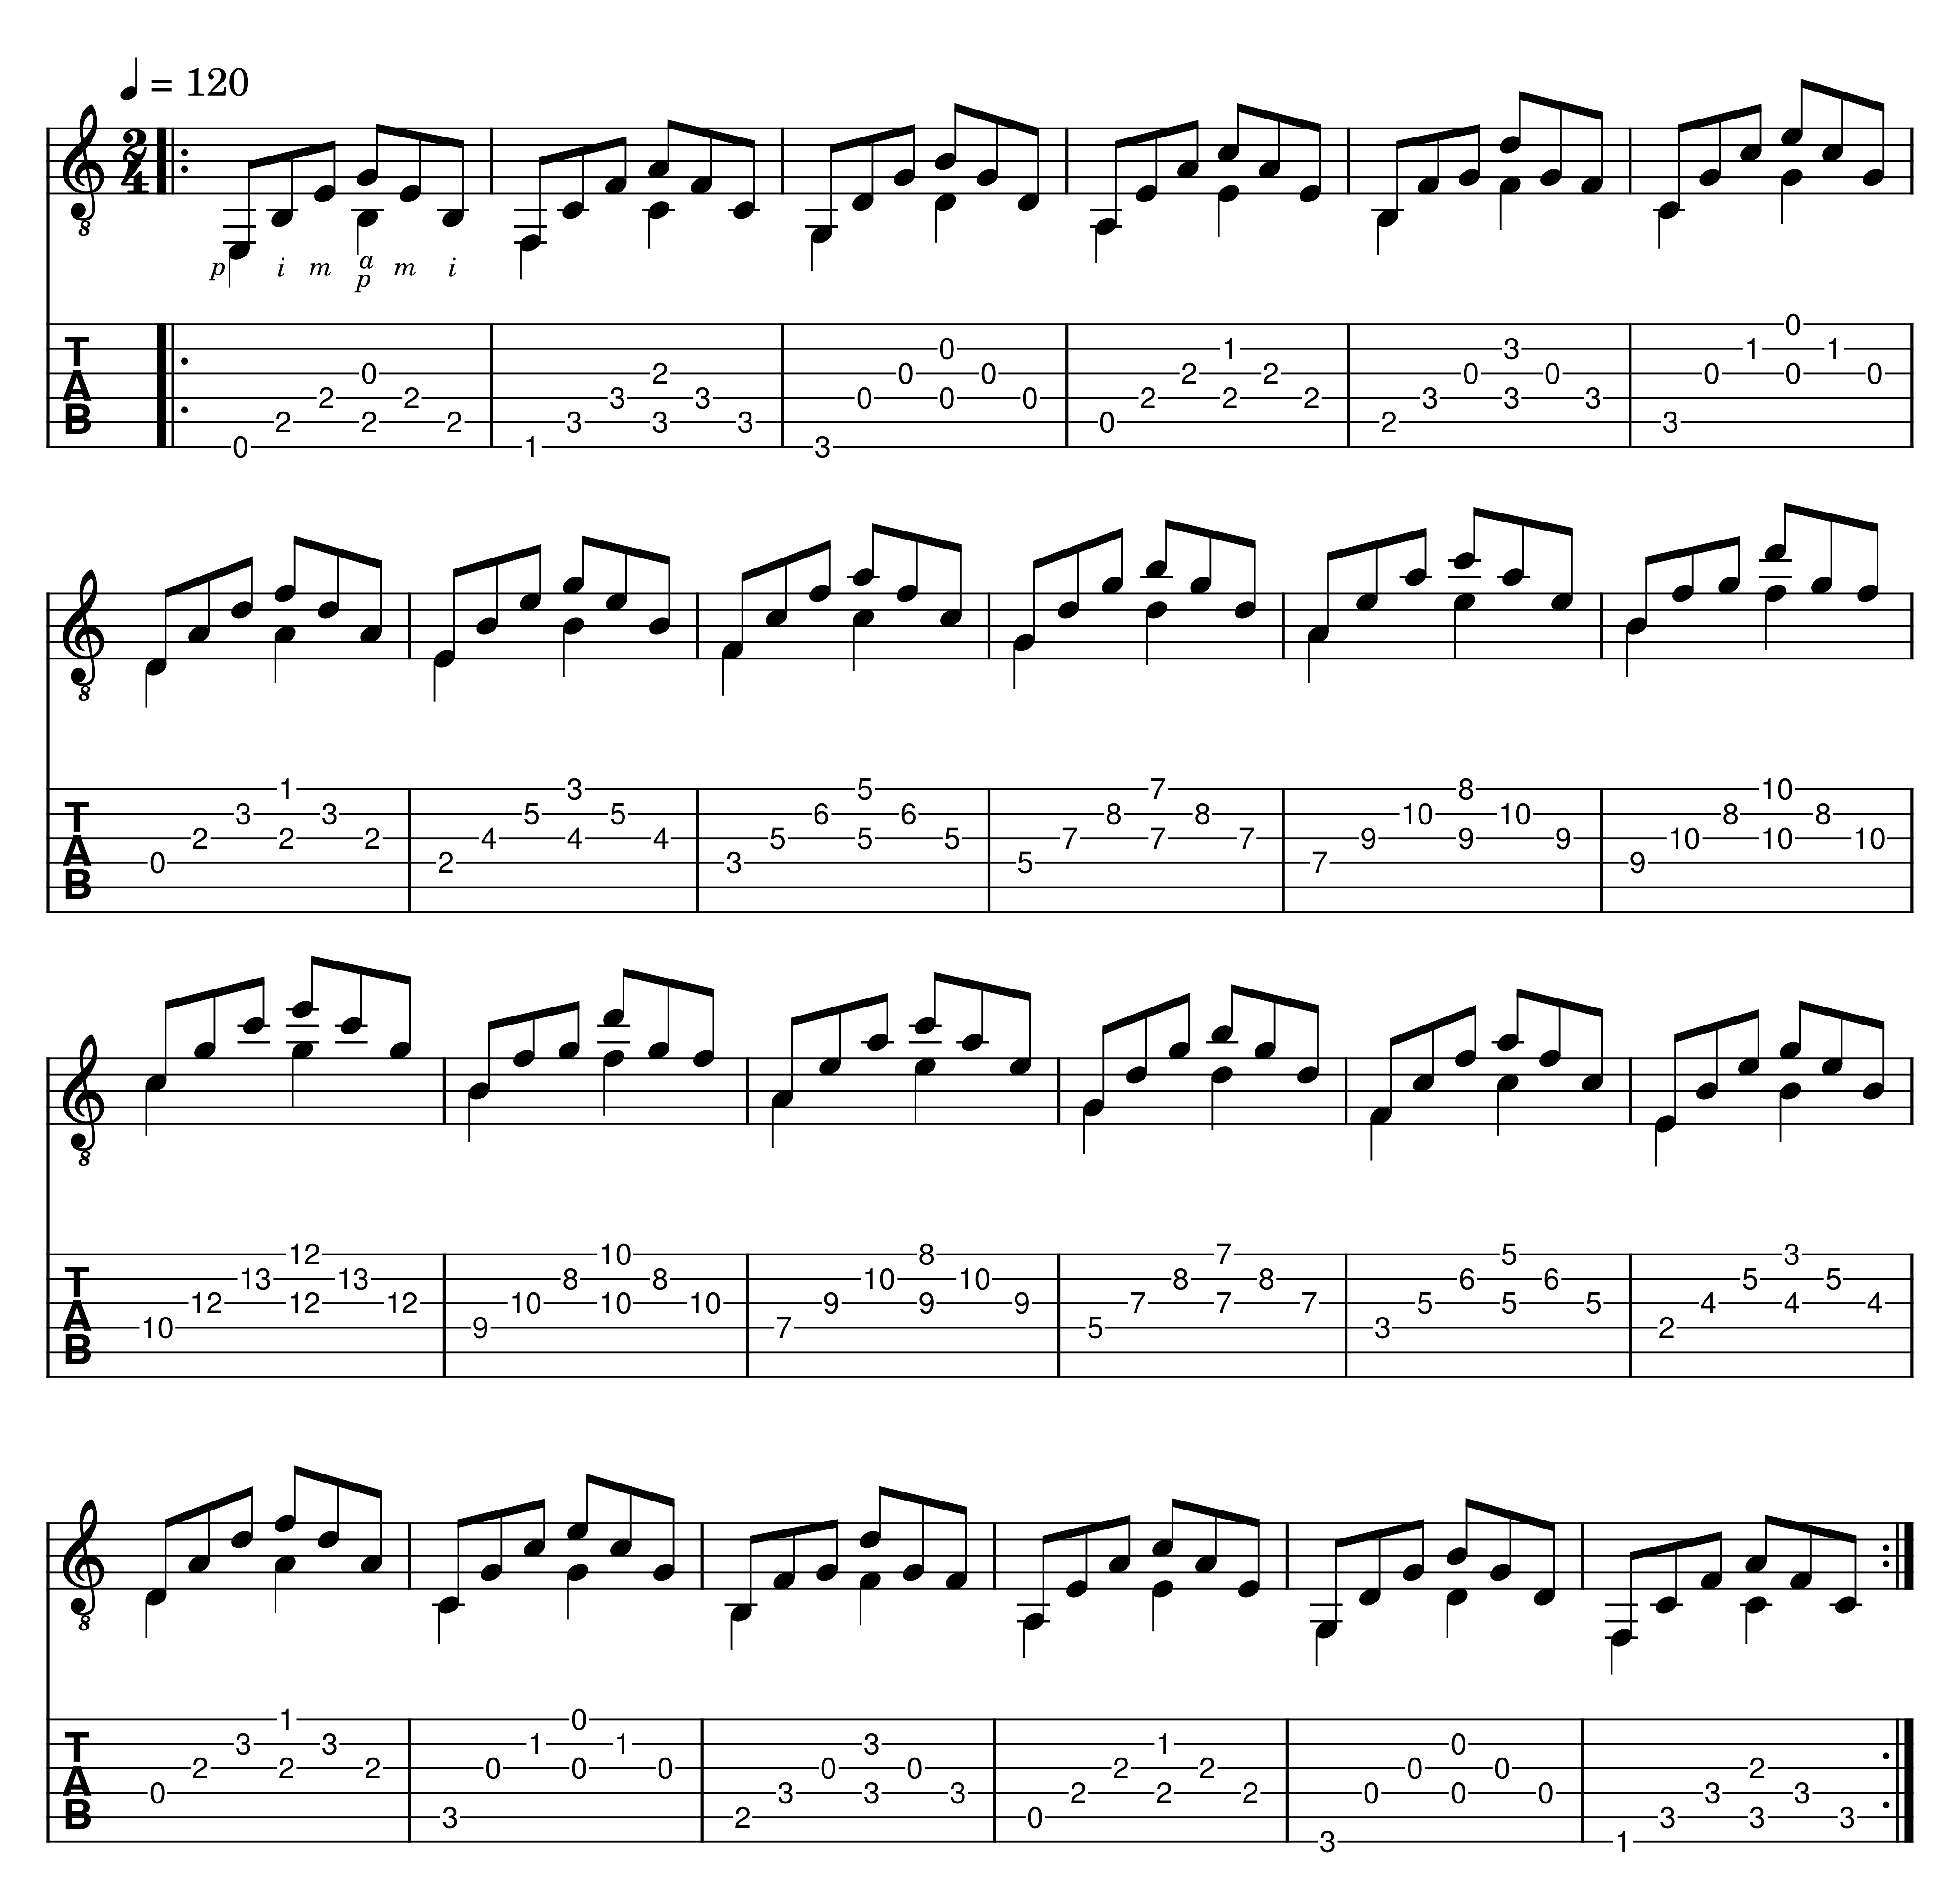
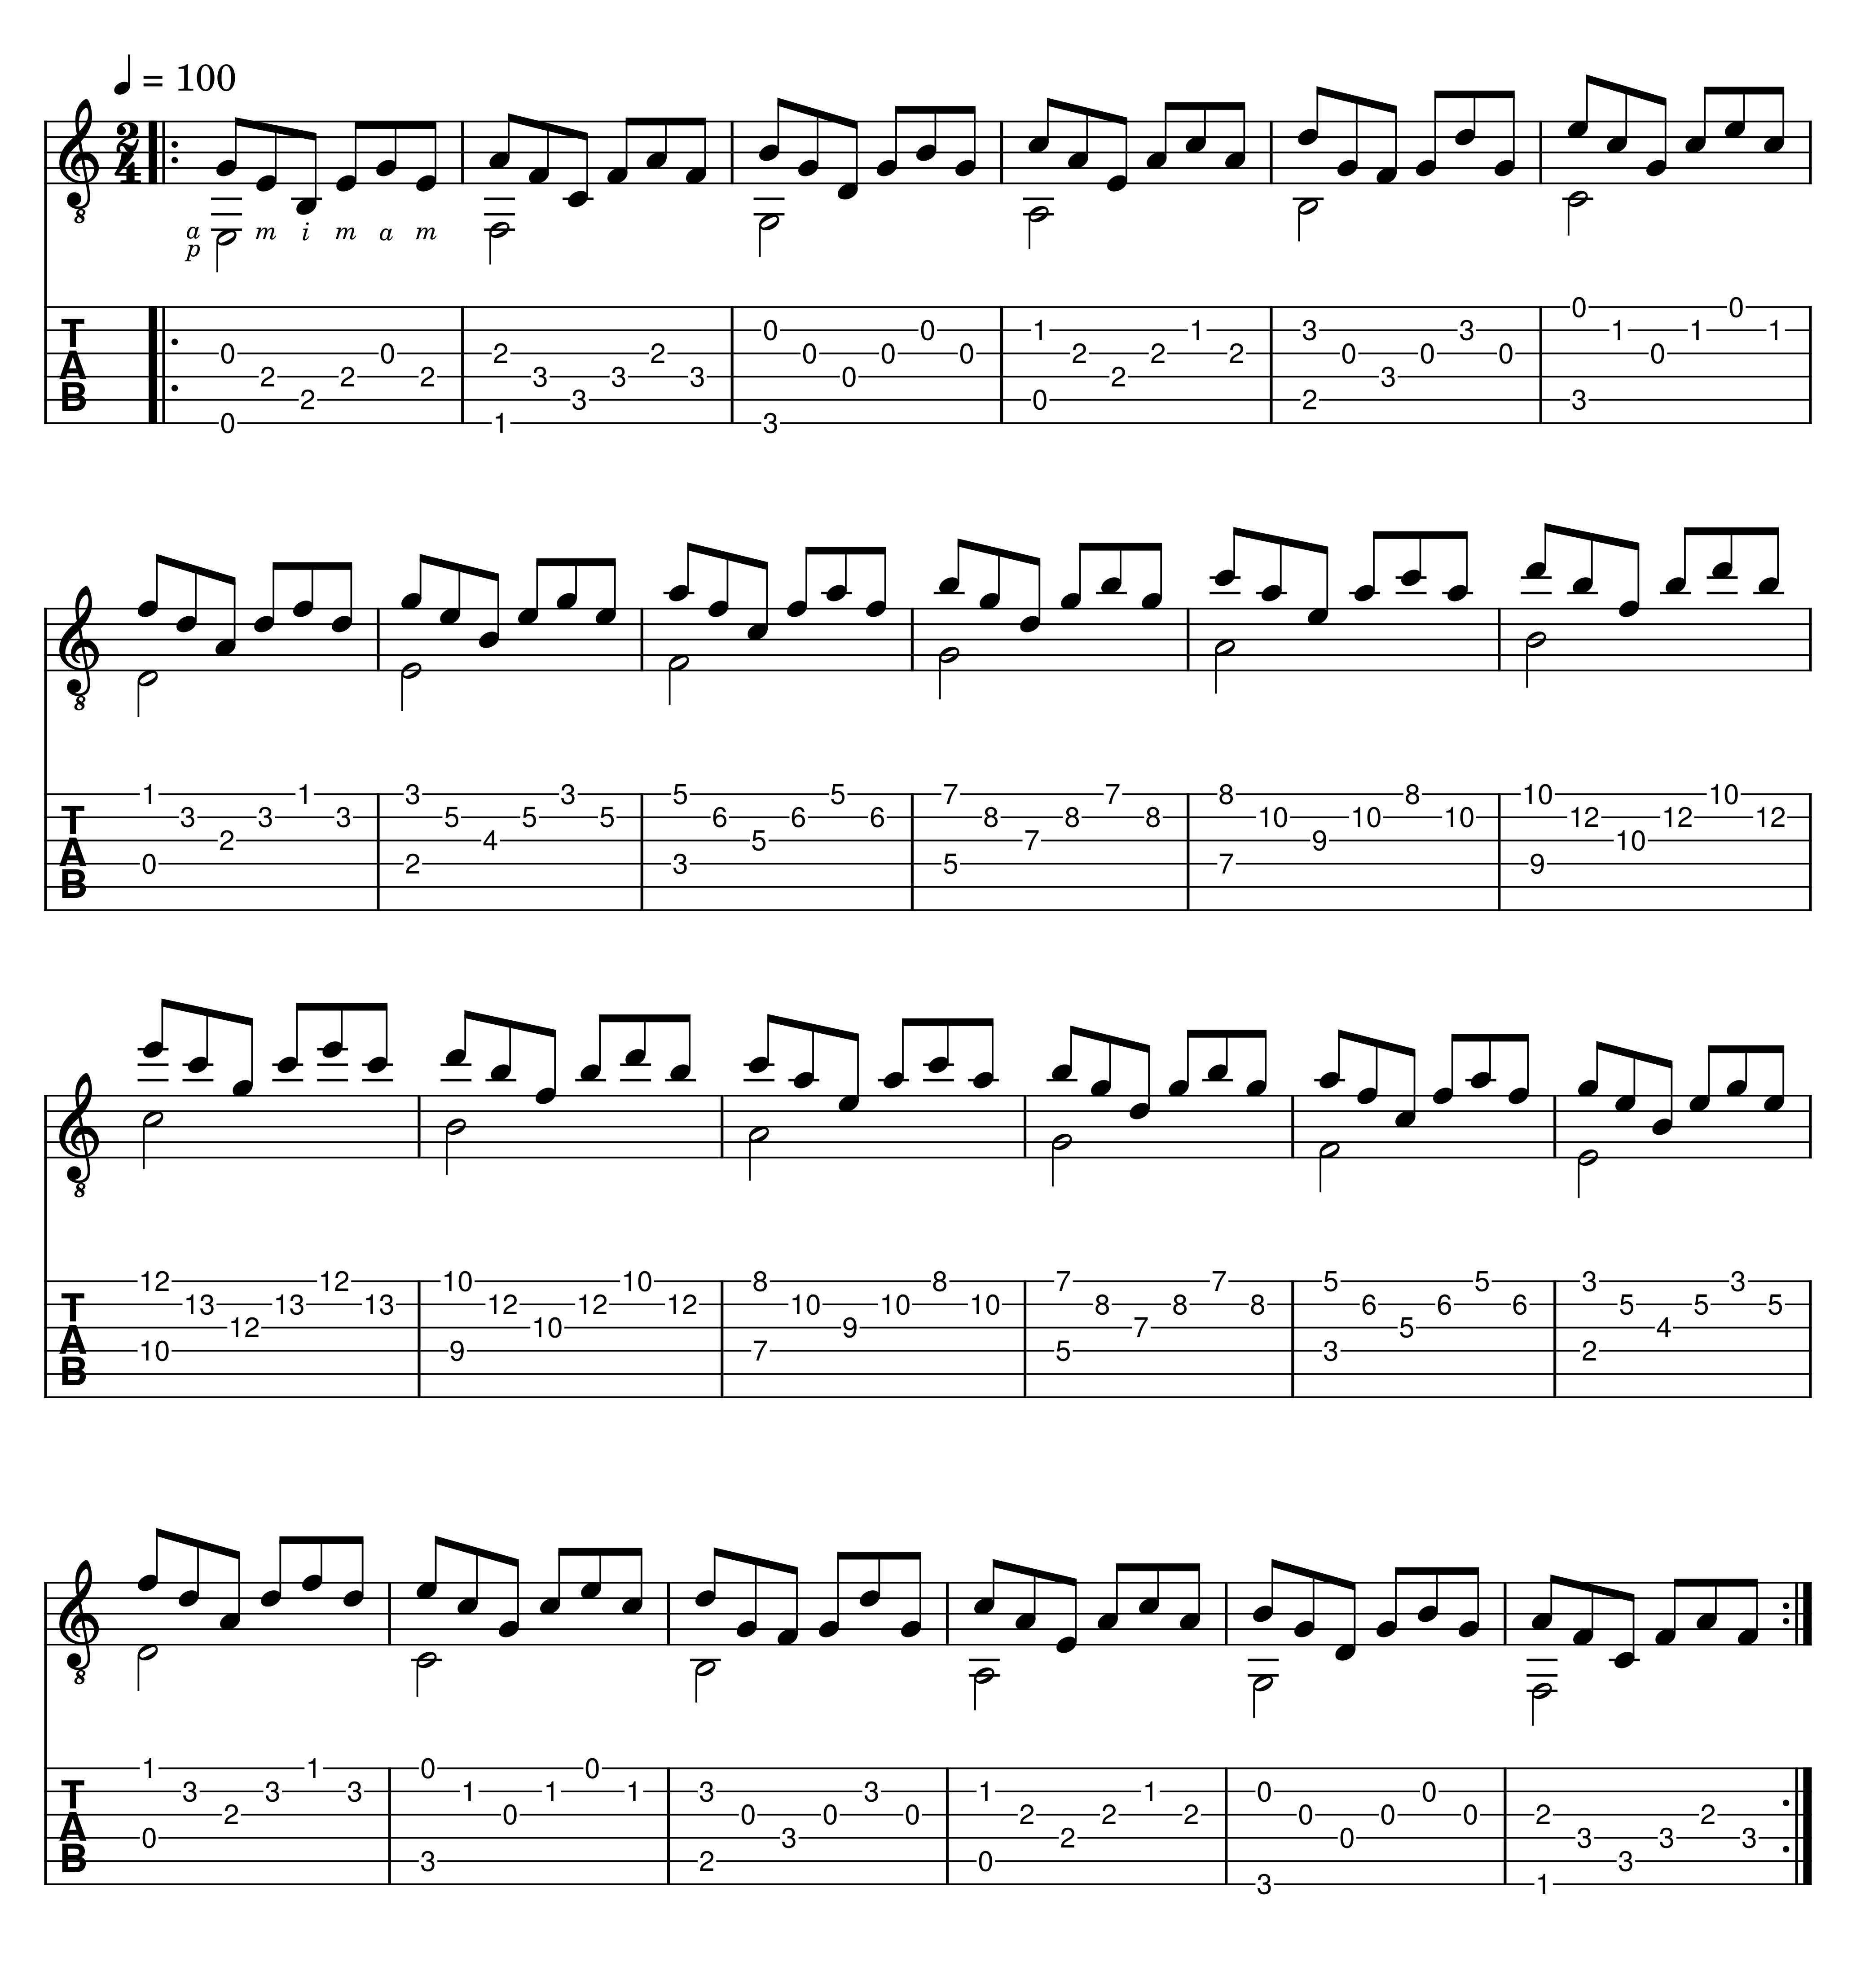
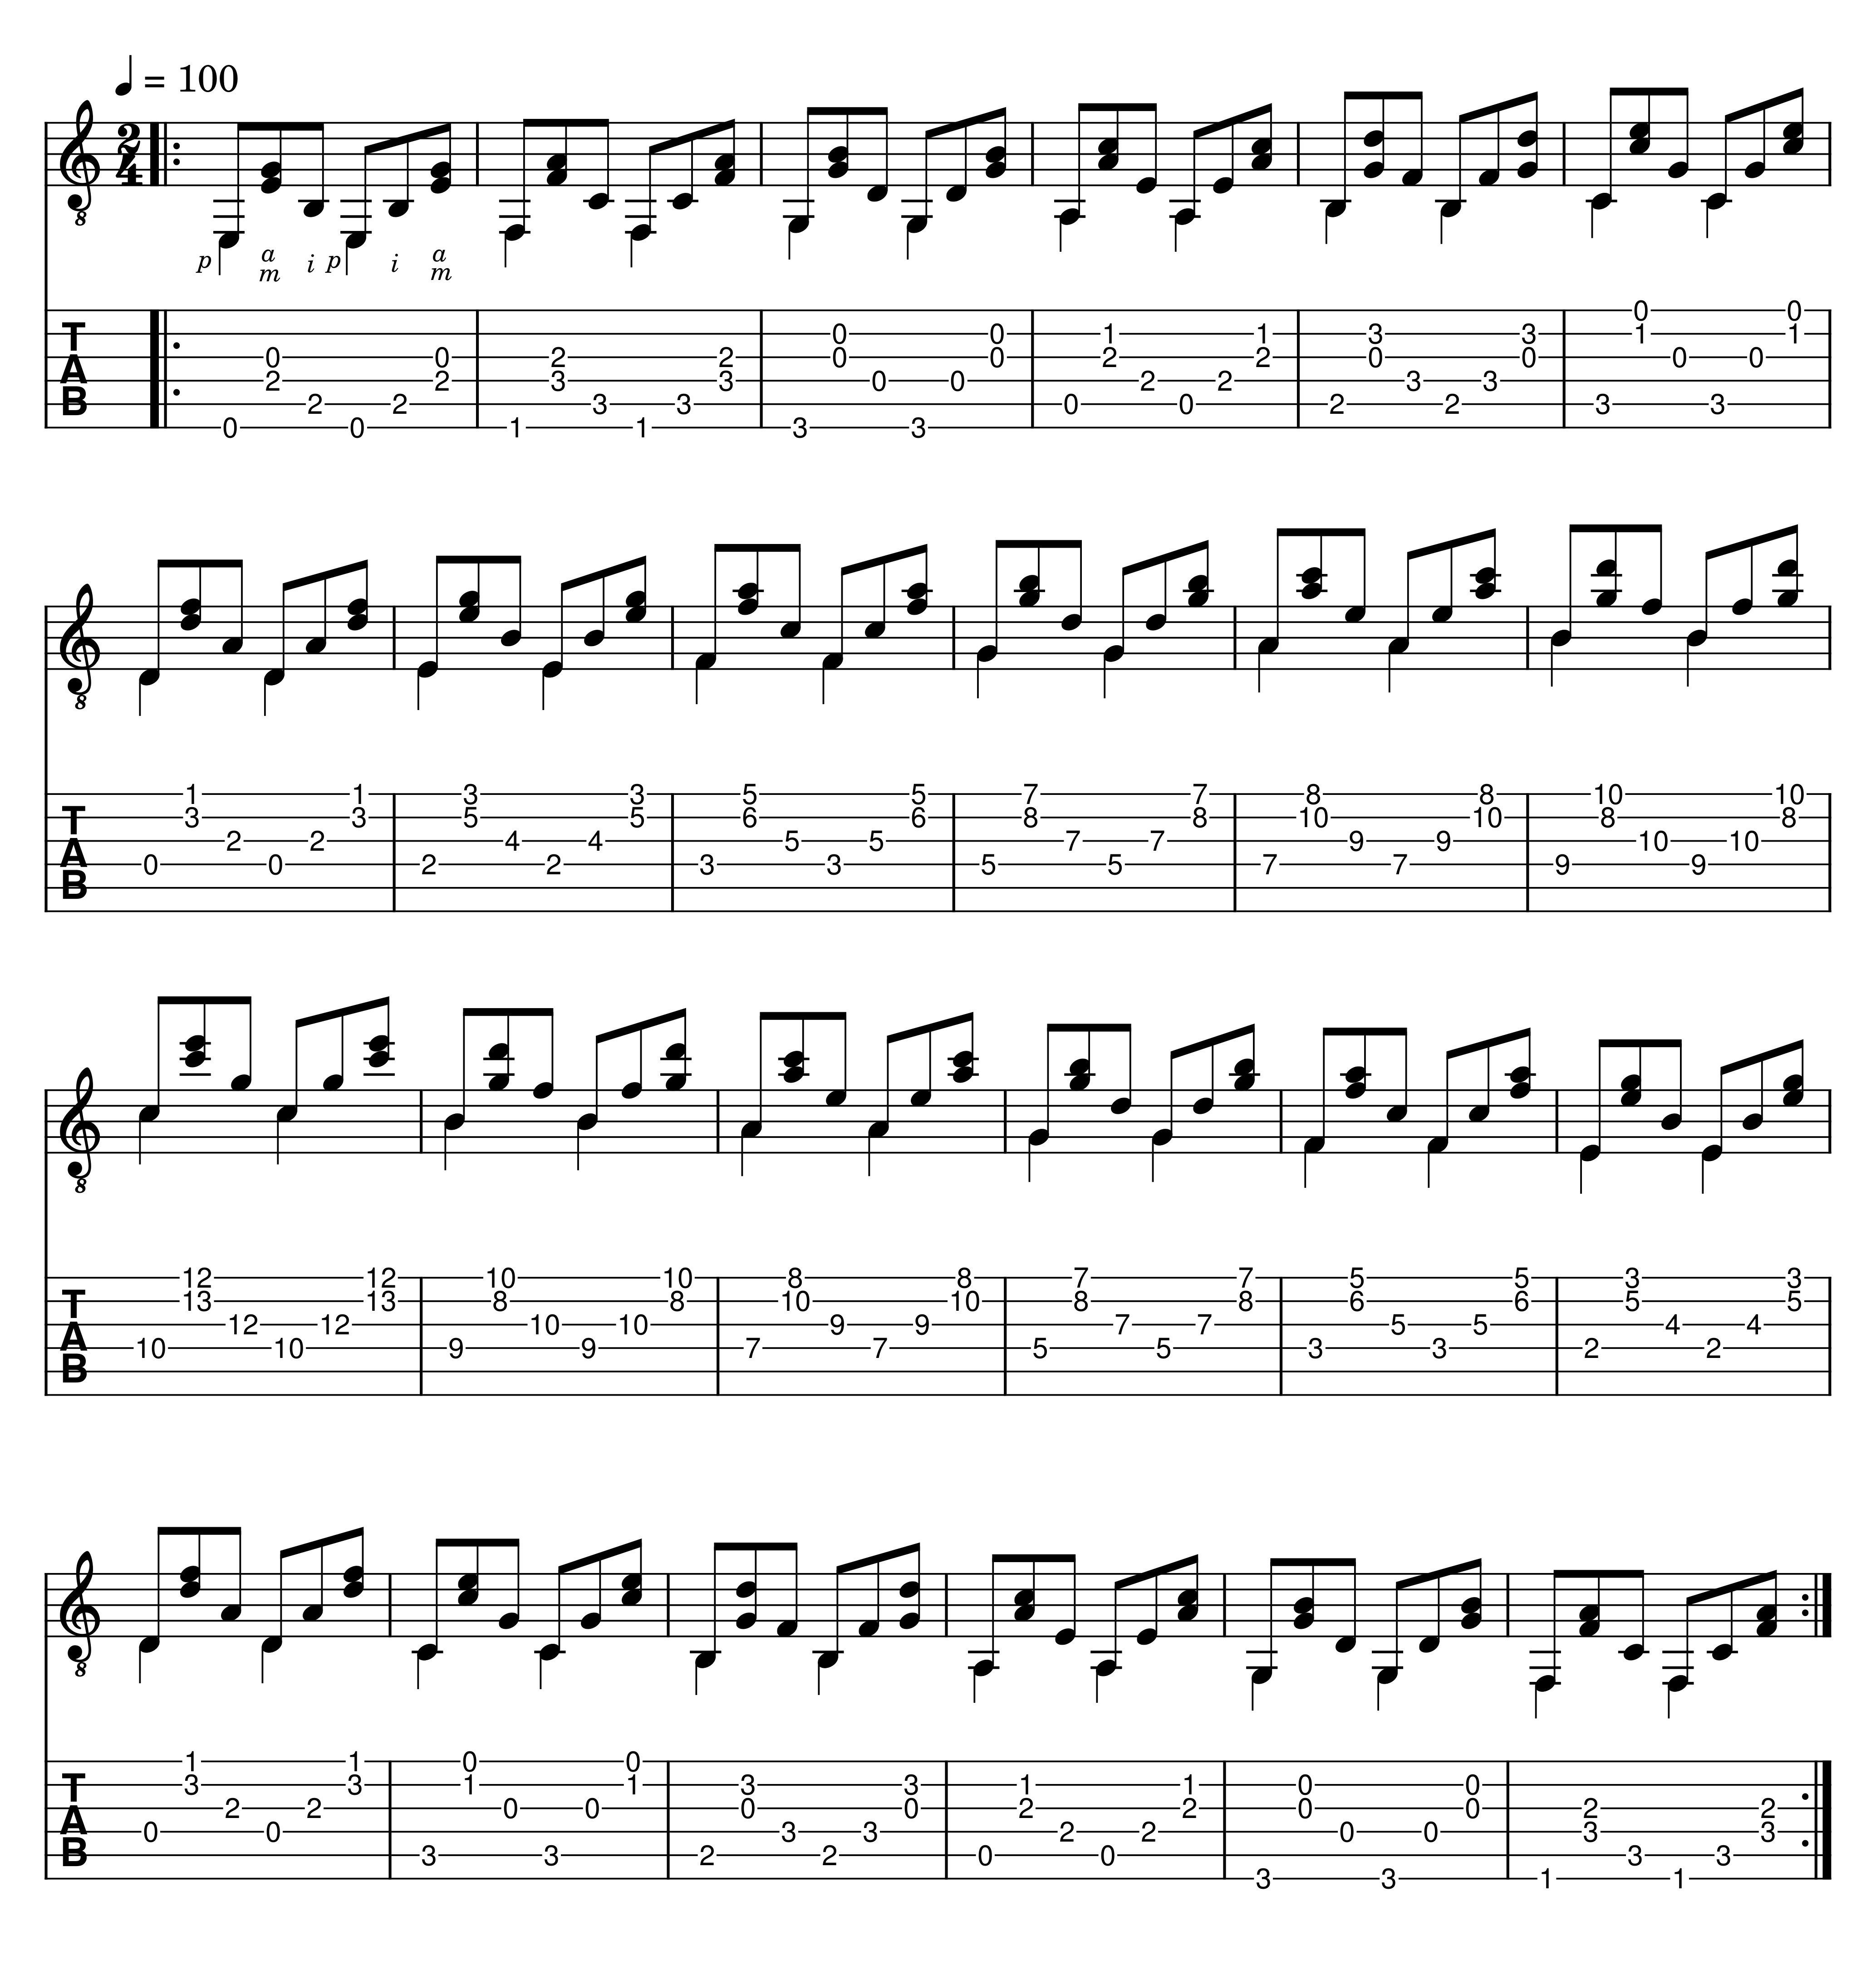
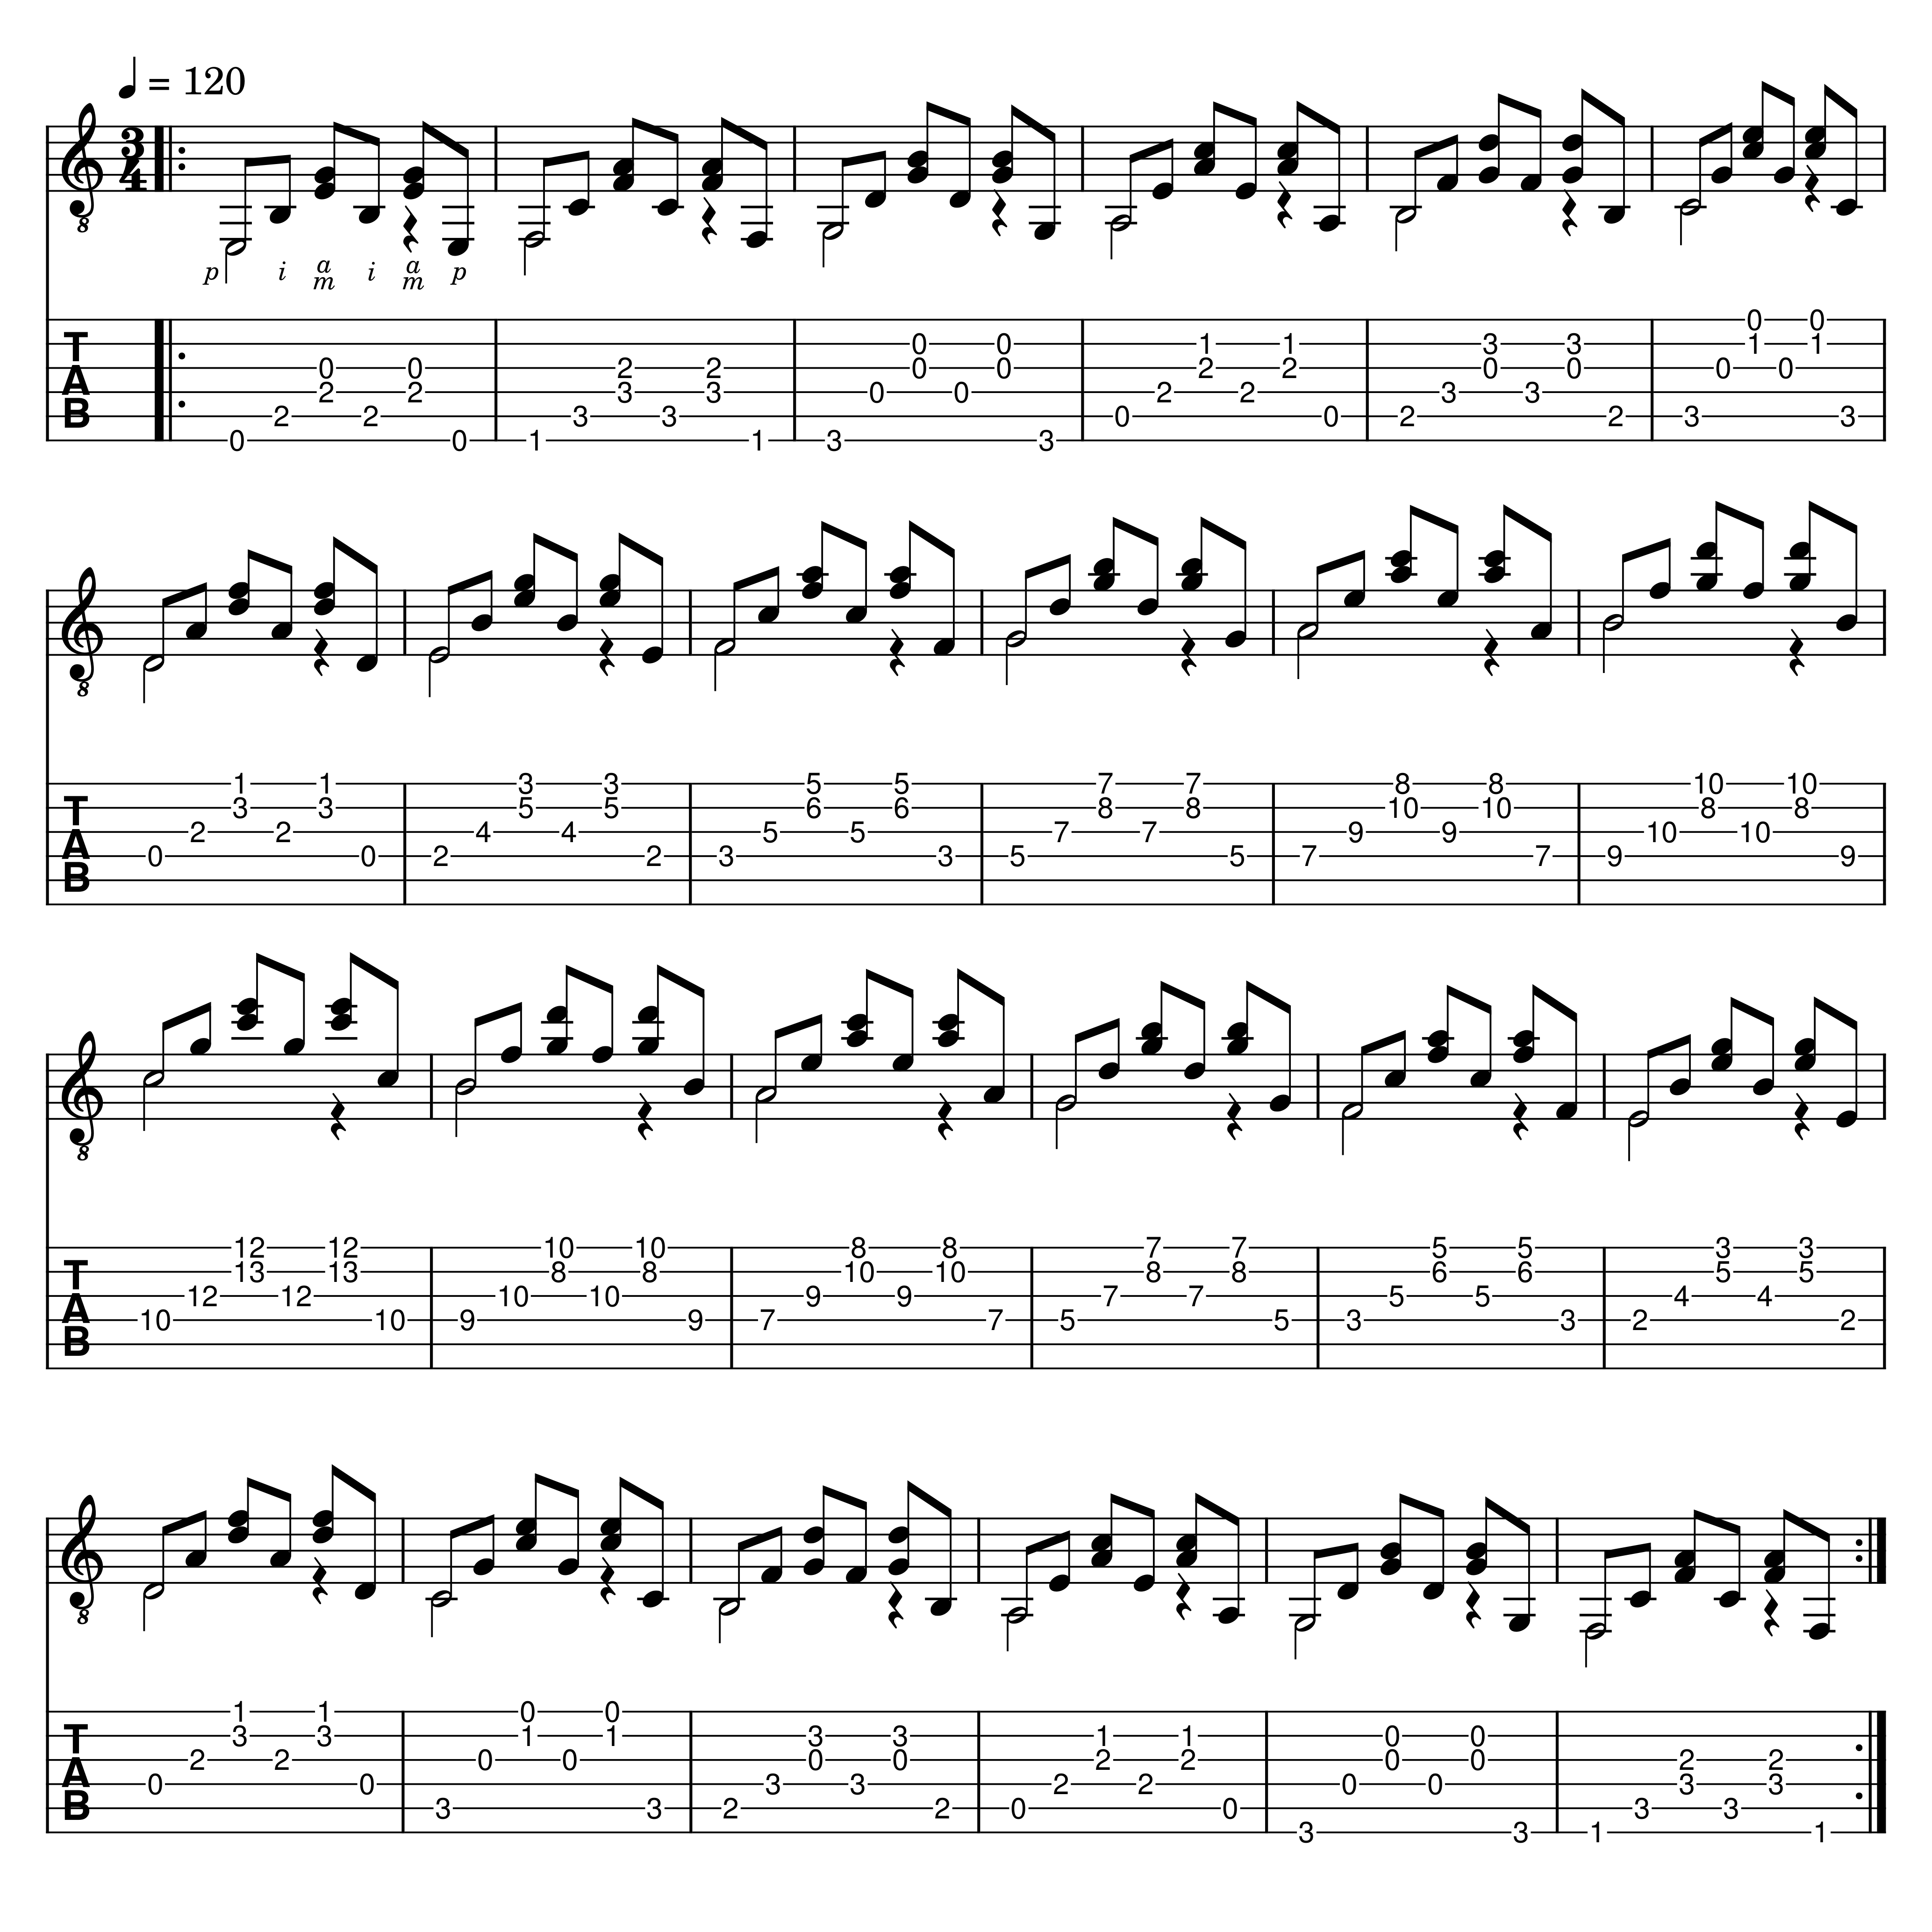
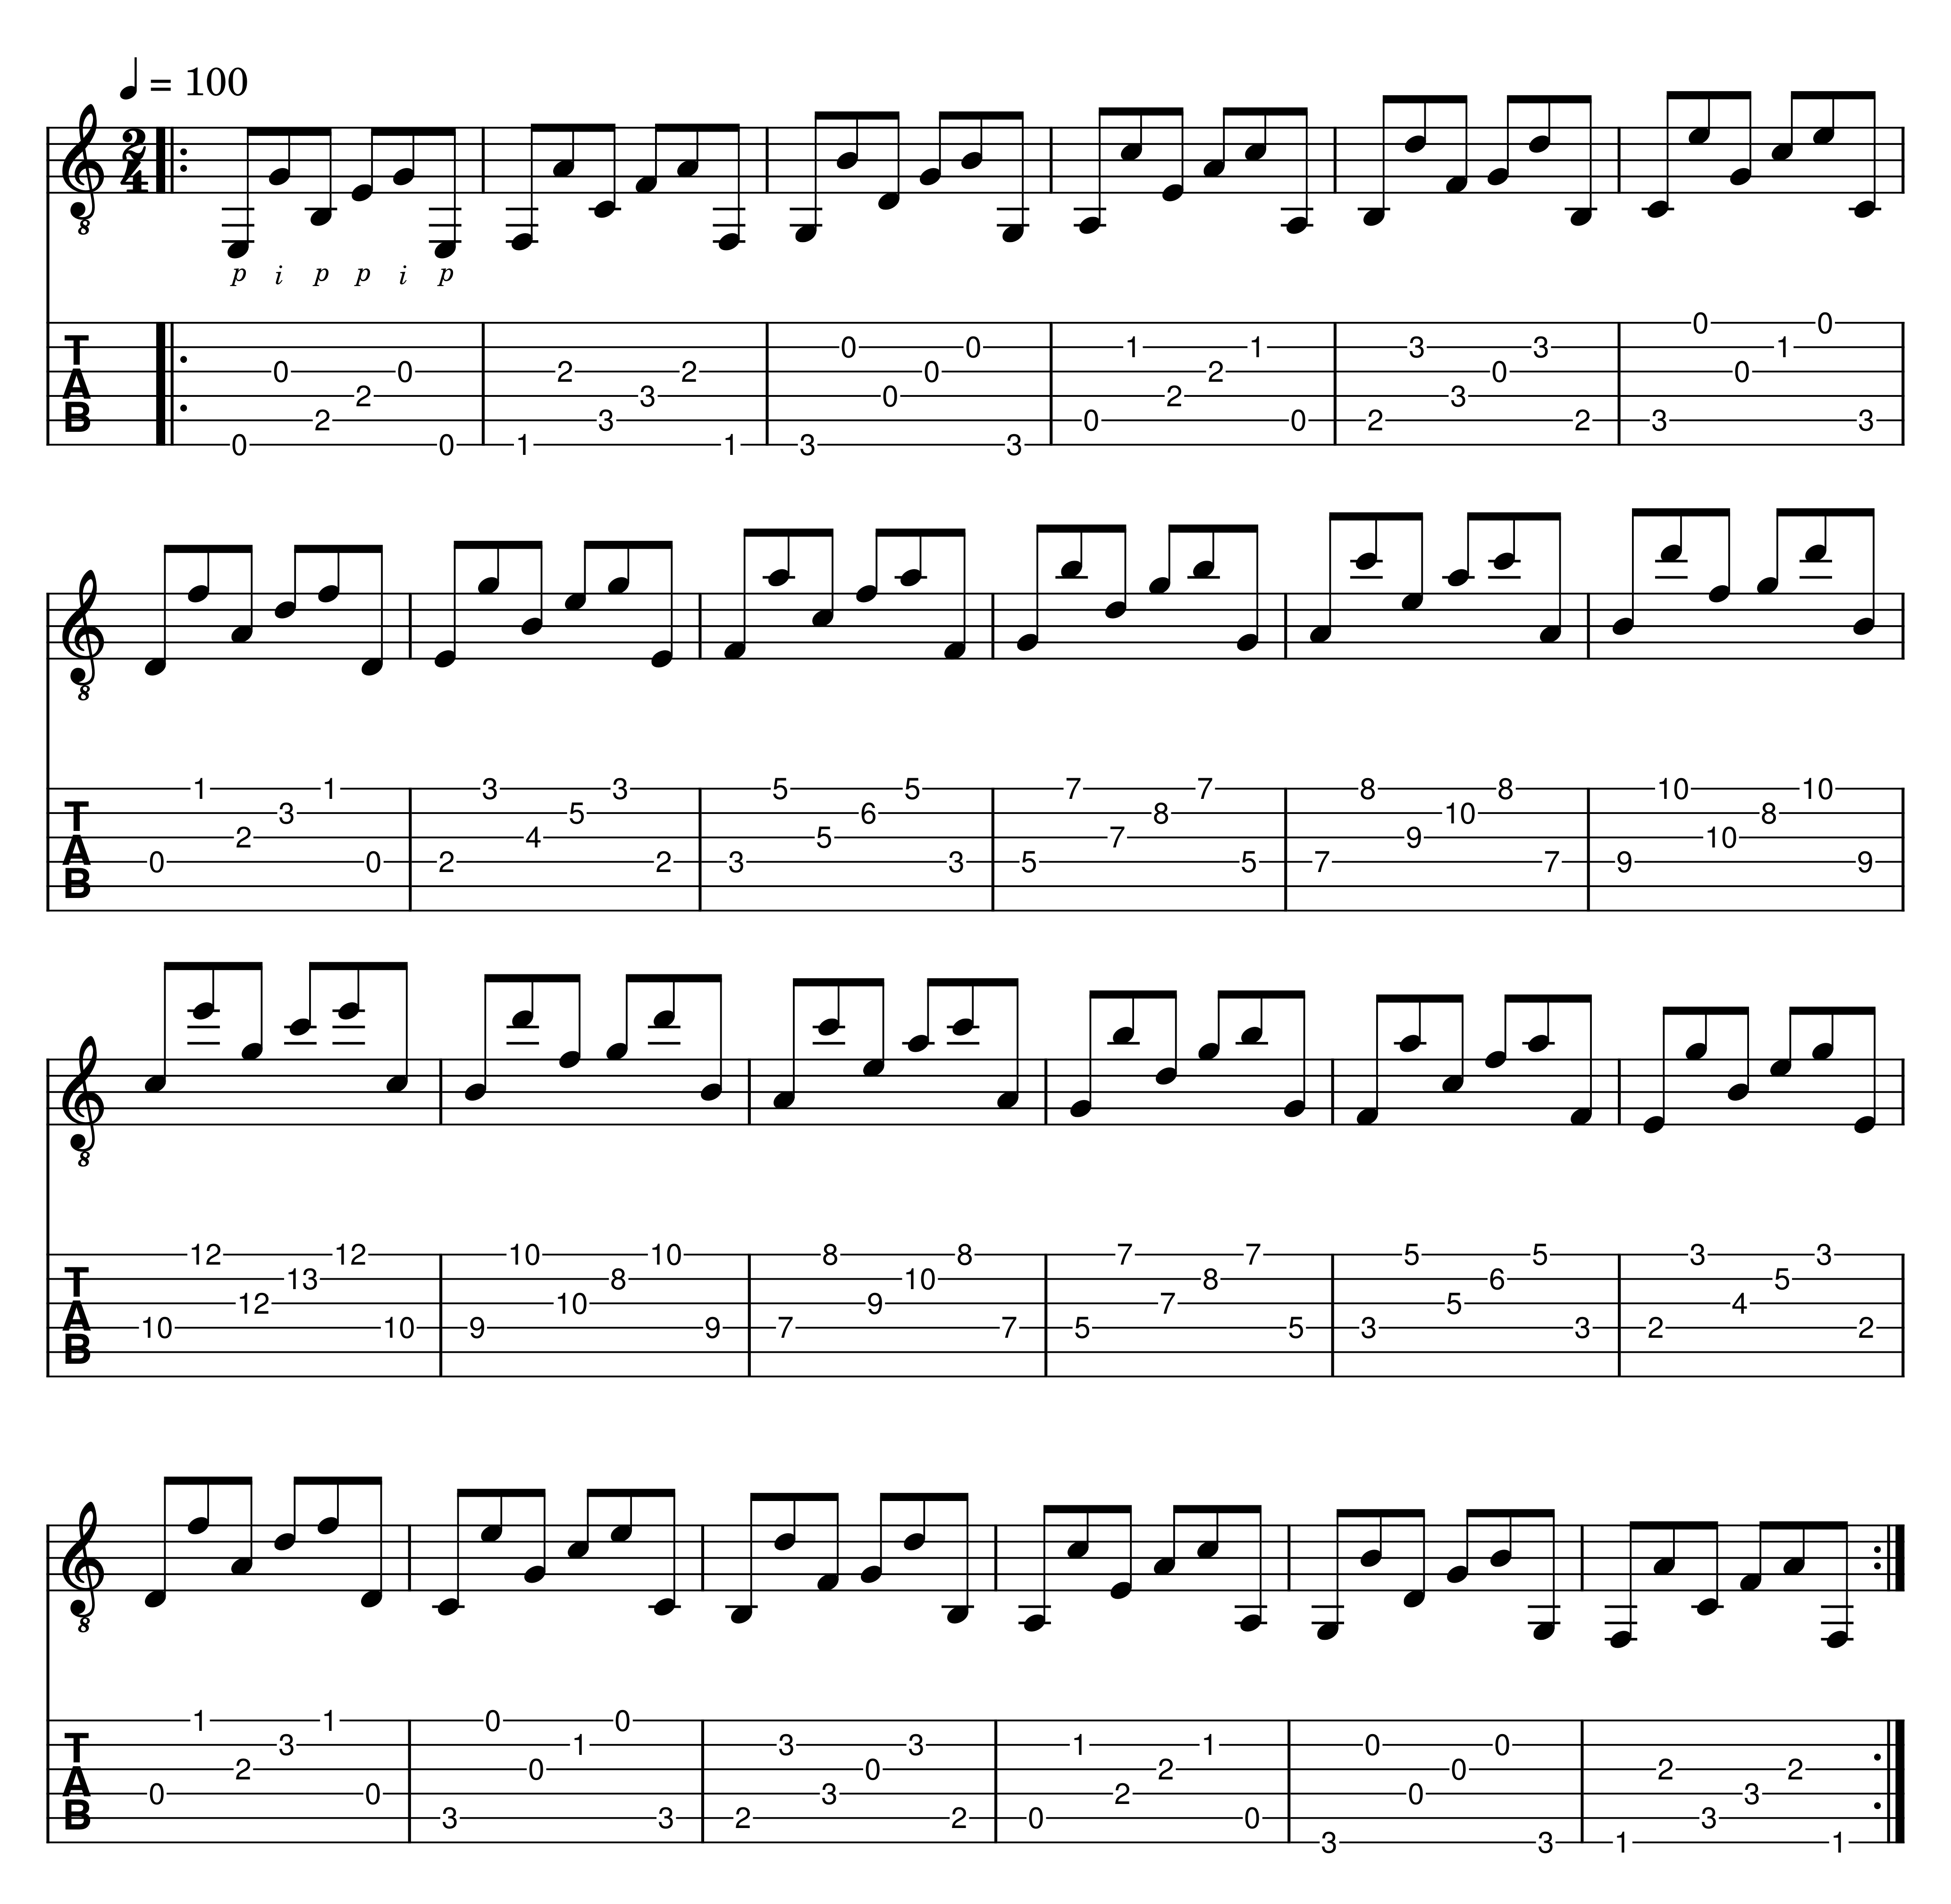
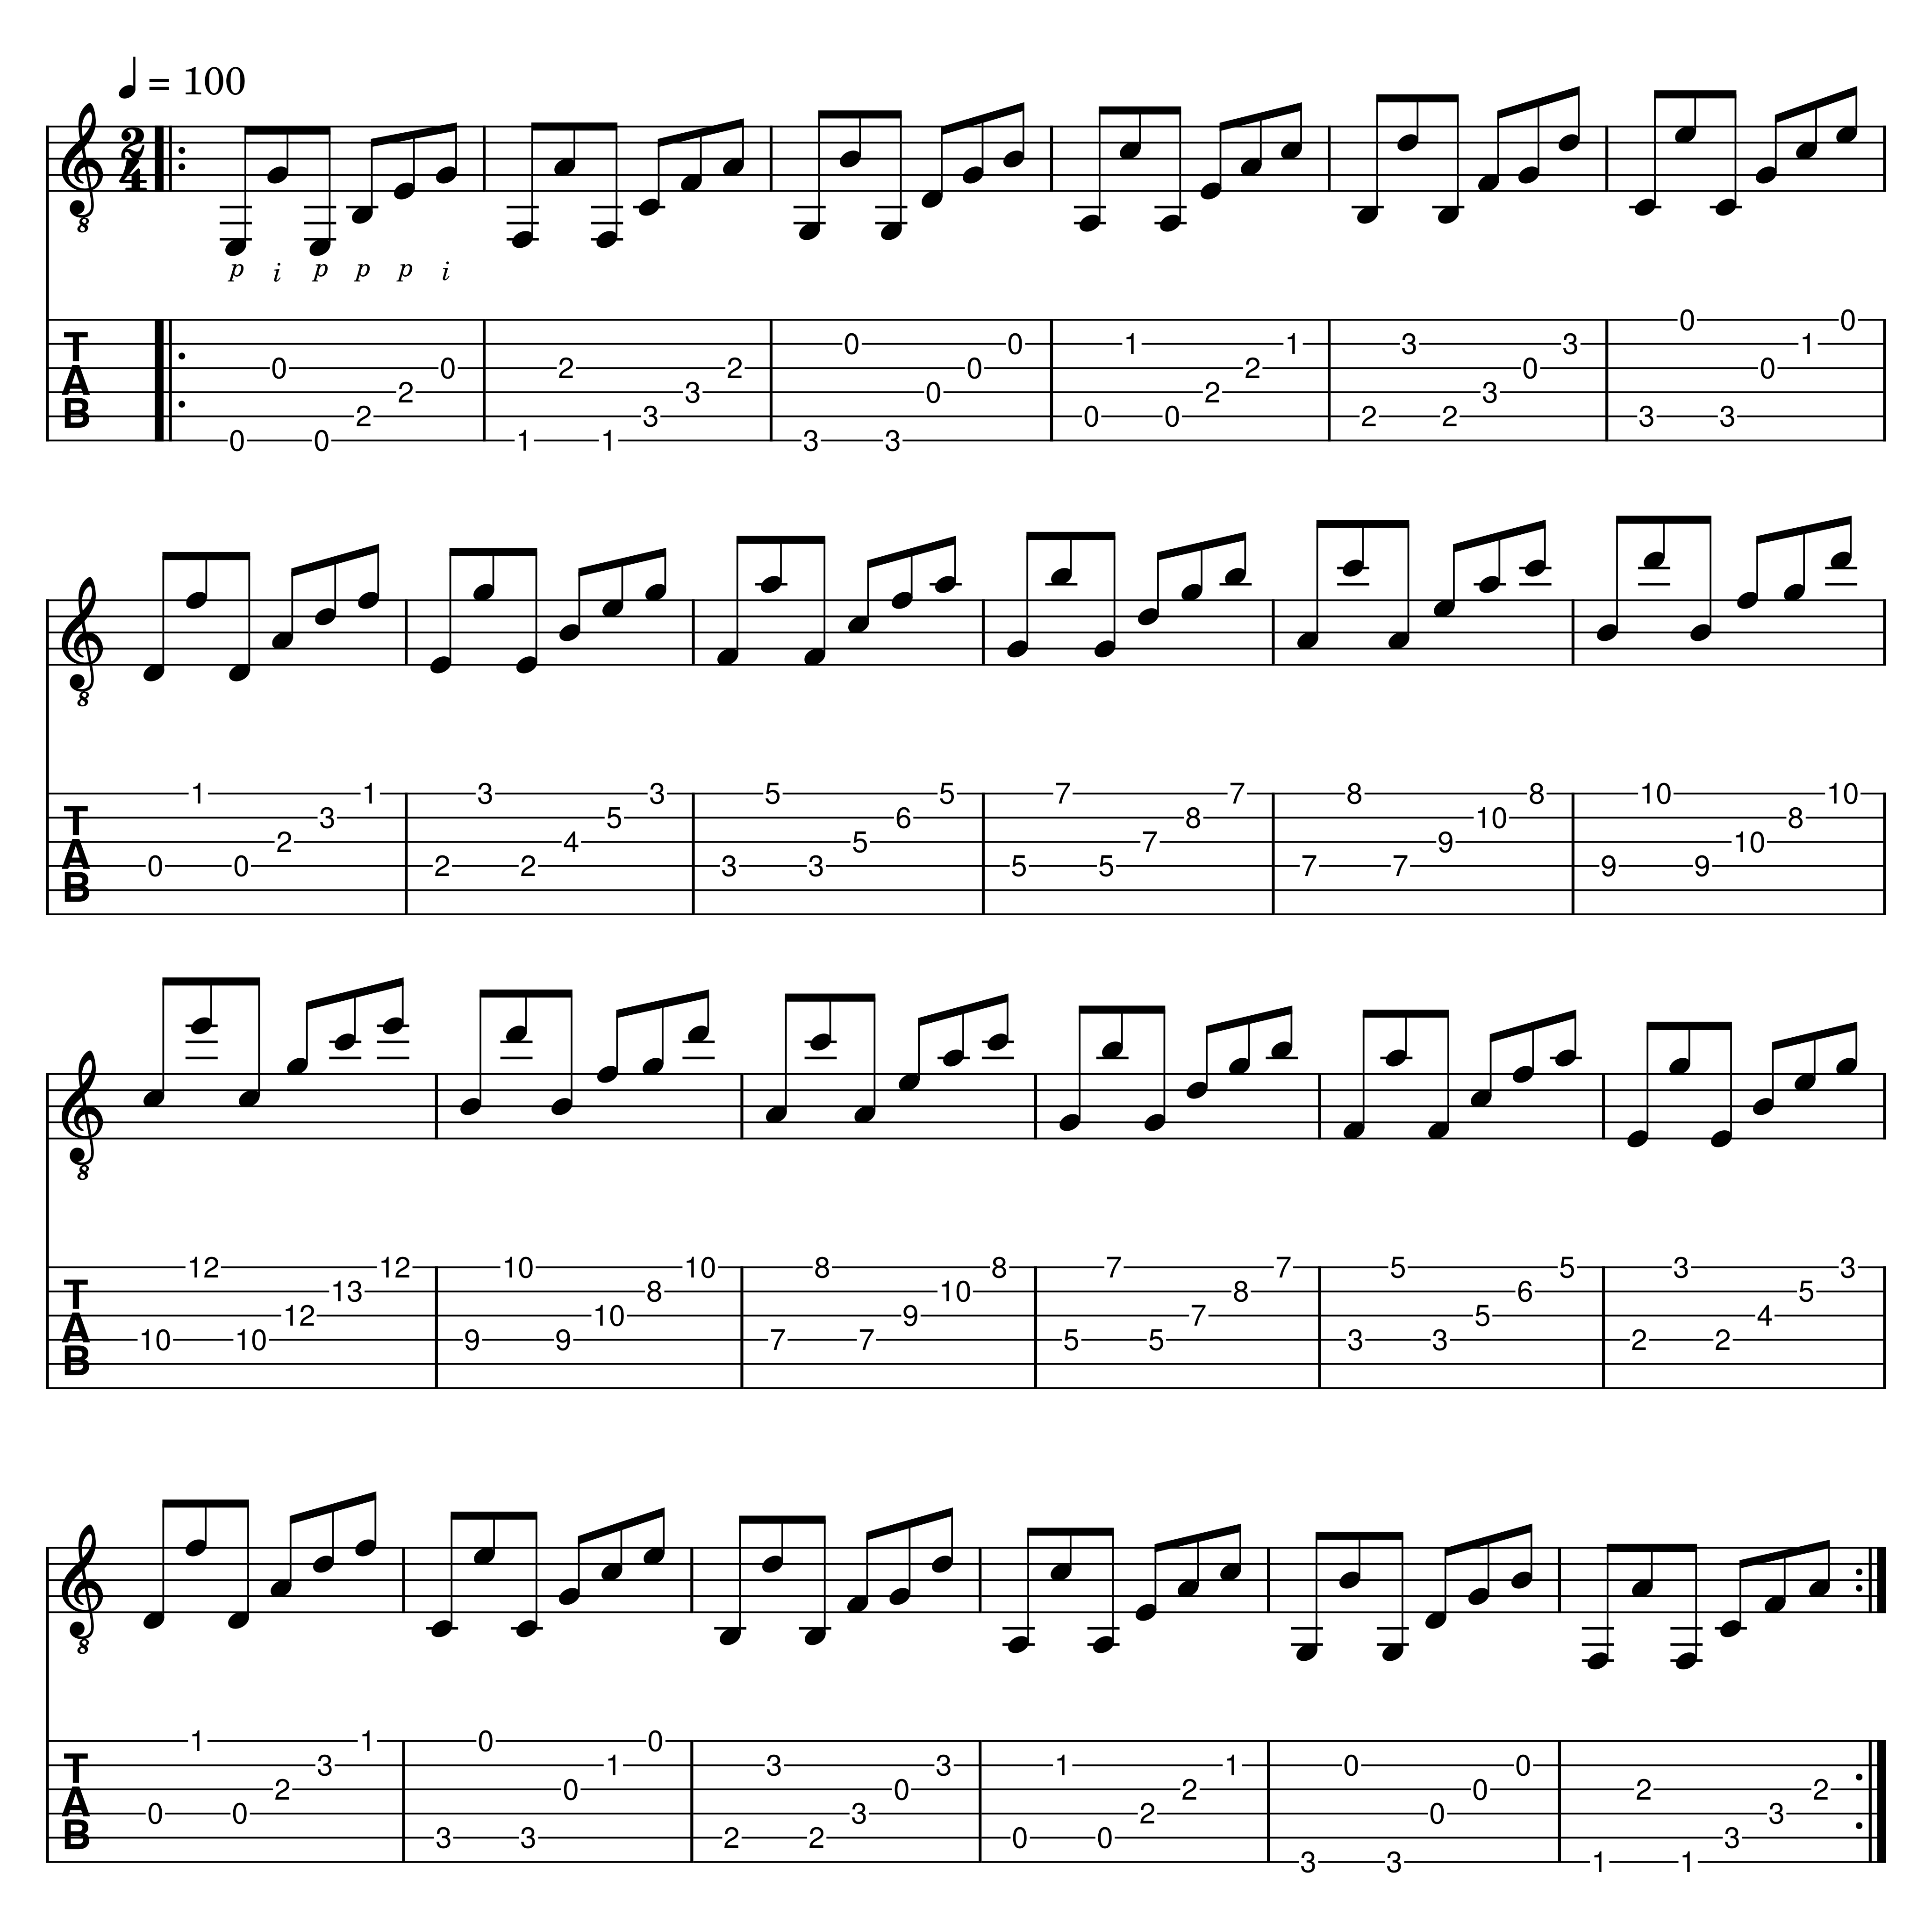
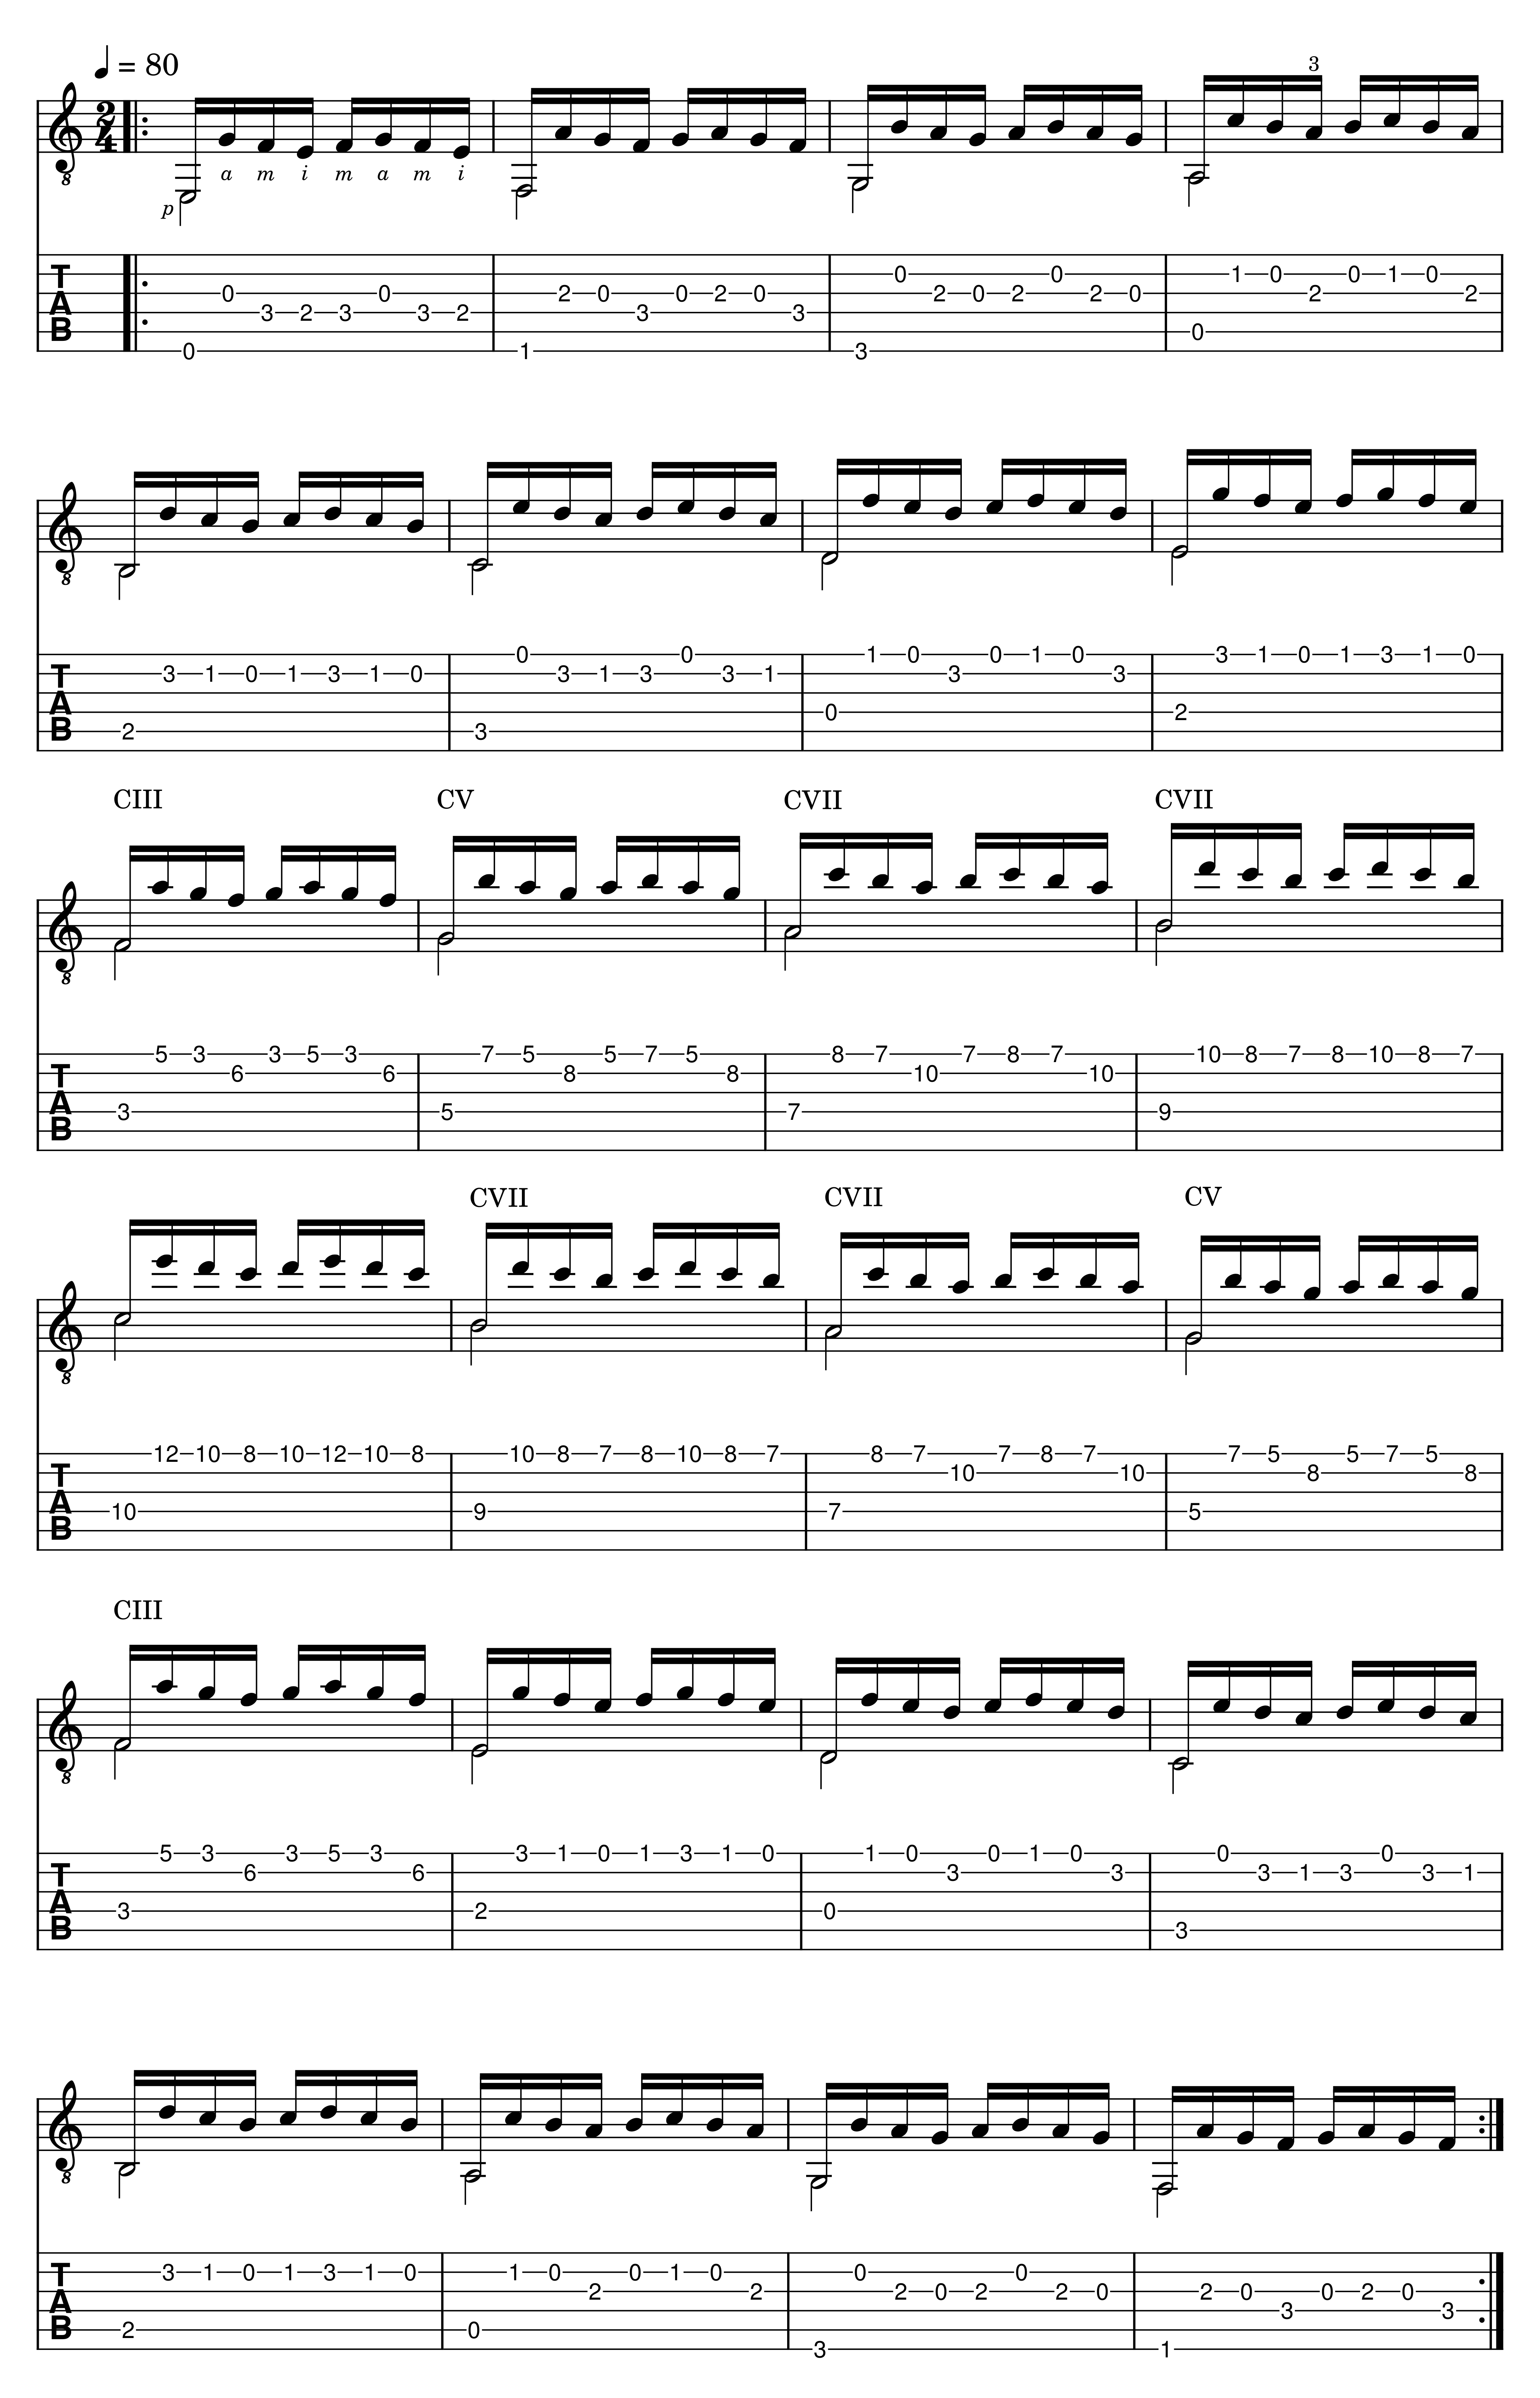
p-a-m i-m-a (pattern 1). Each measure starts with a bass note and its third. As stated above, this exercise is very easy. If you find it difficult, make sure your fretting-hand thumb remains in the same spot as much as possible (in the lower register) and notice that some of the grips are similar or identical (in the upper register).
p-i-m a-m-i (reverse of pattern 1). Each measure starts with a bass note and its octave. Notice the fingering in the fourth measure.
p-a-m pi-m-a (pattern 2). Each measure starts with a bass note and its third. In this variation of pattern 1, another bass note is played on beat 2 in each measure. In the 12th measure, you can follow the indicated fingering (I use a partial barre) or rearrange the idea to keep the melody on the first string without a barre.
p-i-m pa-m-i (reverse of pattern 2). Each measure starts with a bass note and its octave. In the 12th measure, you can play as indicated with or without a partial barre. The fingering in the 22nd measure leaves your ring finger available for the G major chord in the next measure. Notice that the C major chord in the 13th measure is the same one used in the arpeggio exercises.
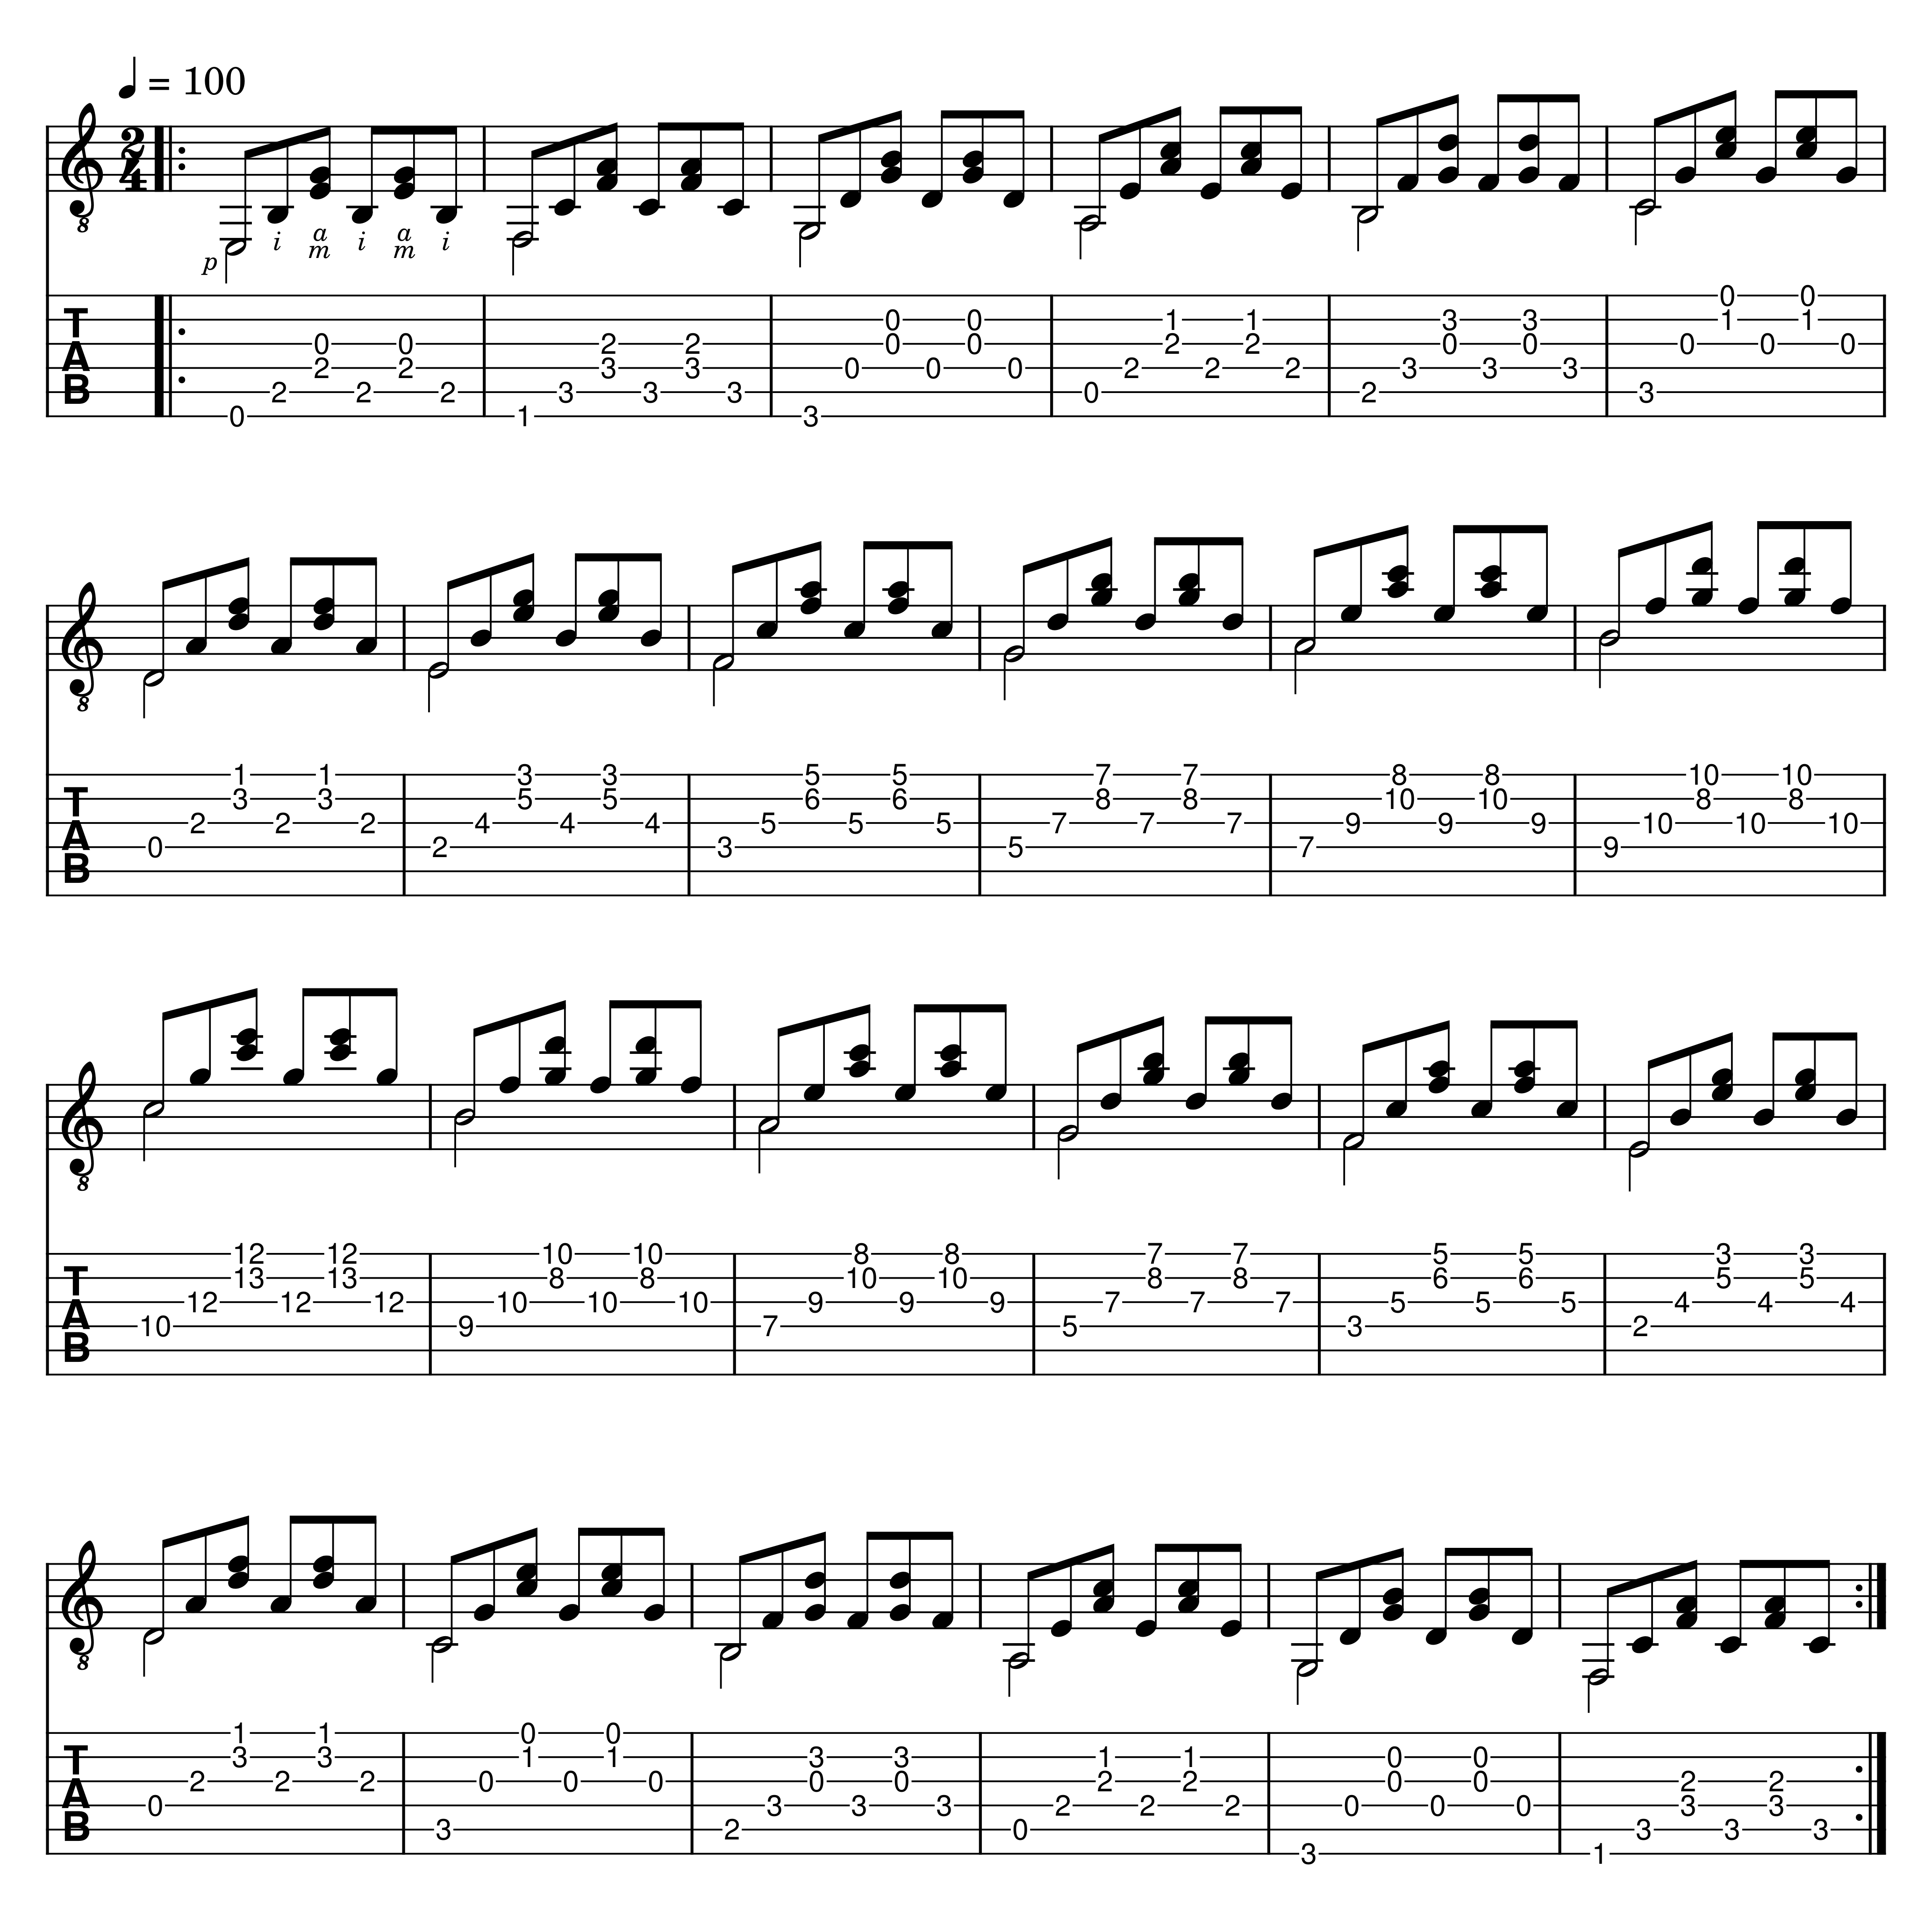
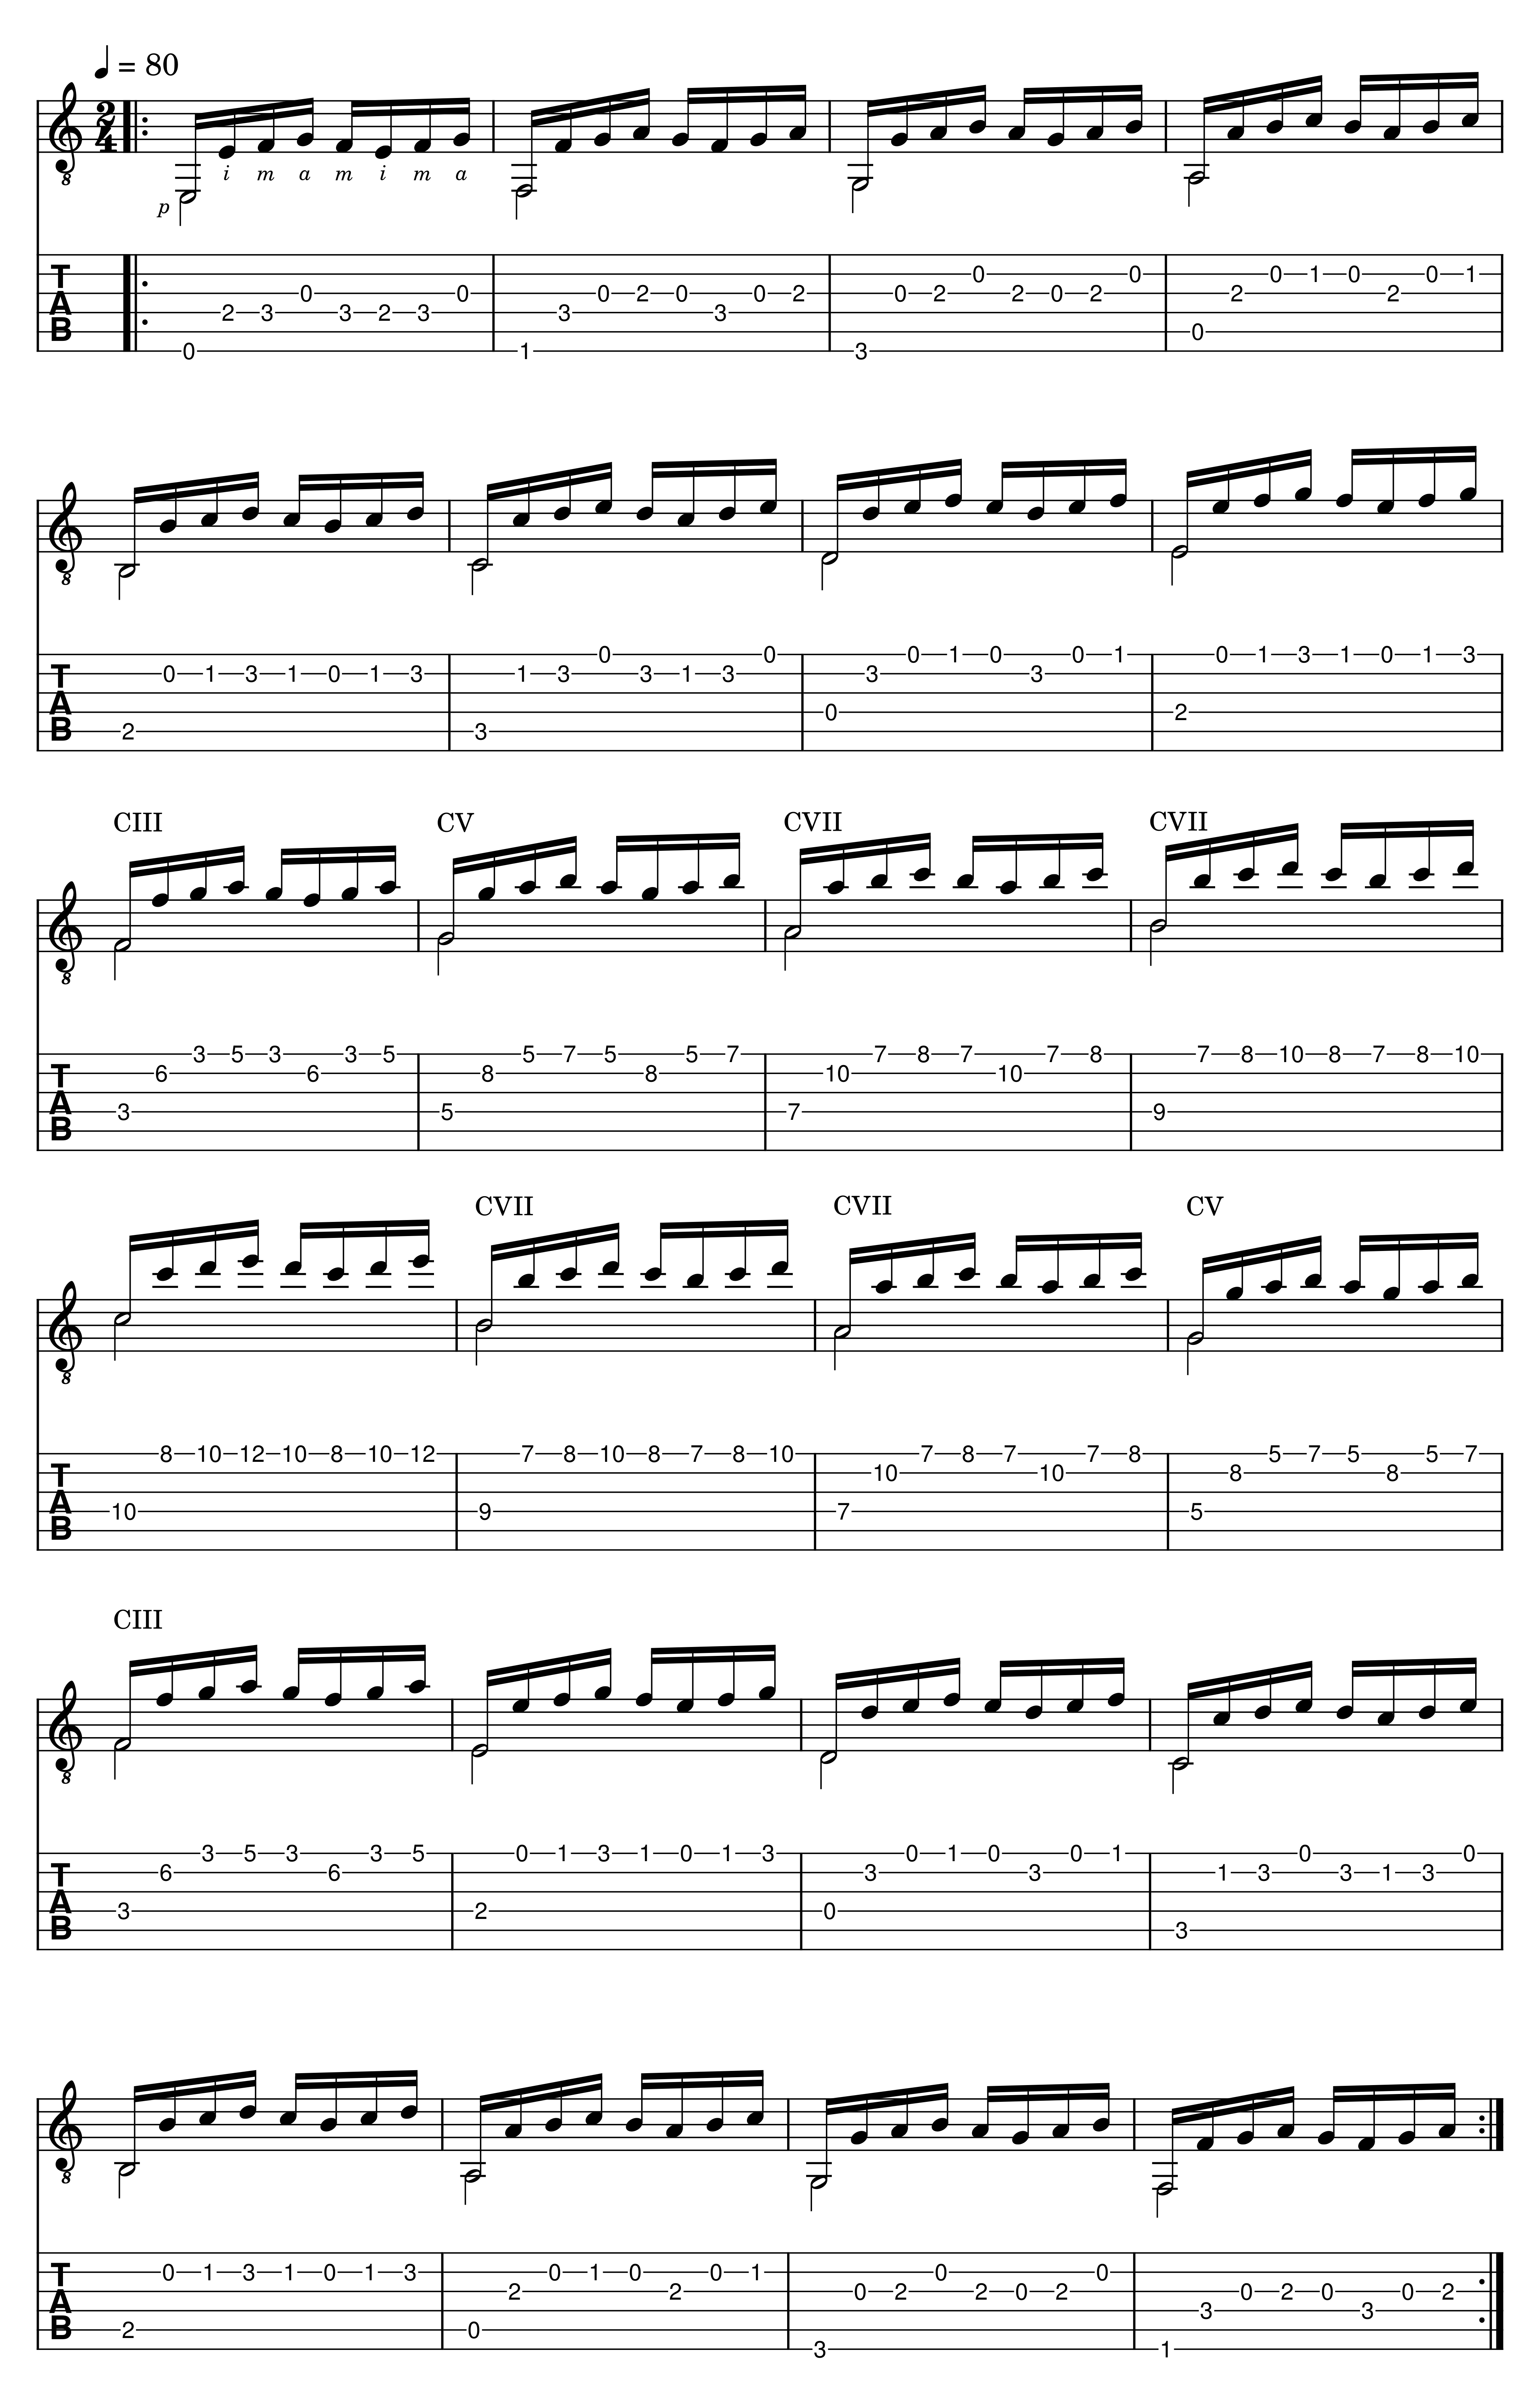
p-a-m-i m-a-m-i (pattern 3). Each measure starts with a bass note and its third. A similar idea in sixteenths. Notice the fingering in the fourth measure.
p-i-m-a m-i-m-a (reverse of pattern 3). Each measure starts with a bass note and its octave.
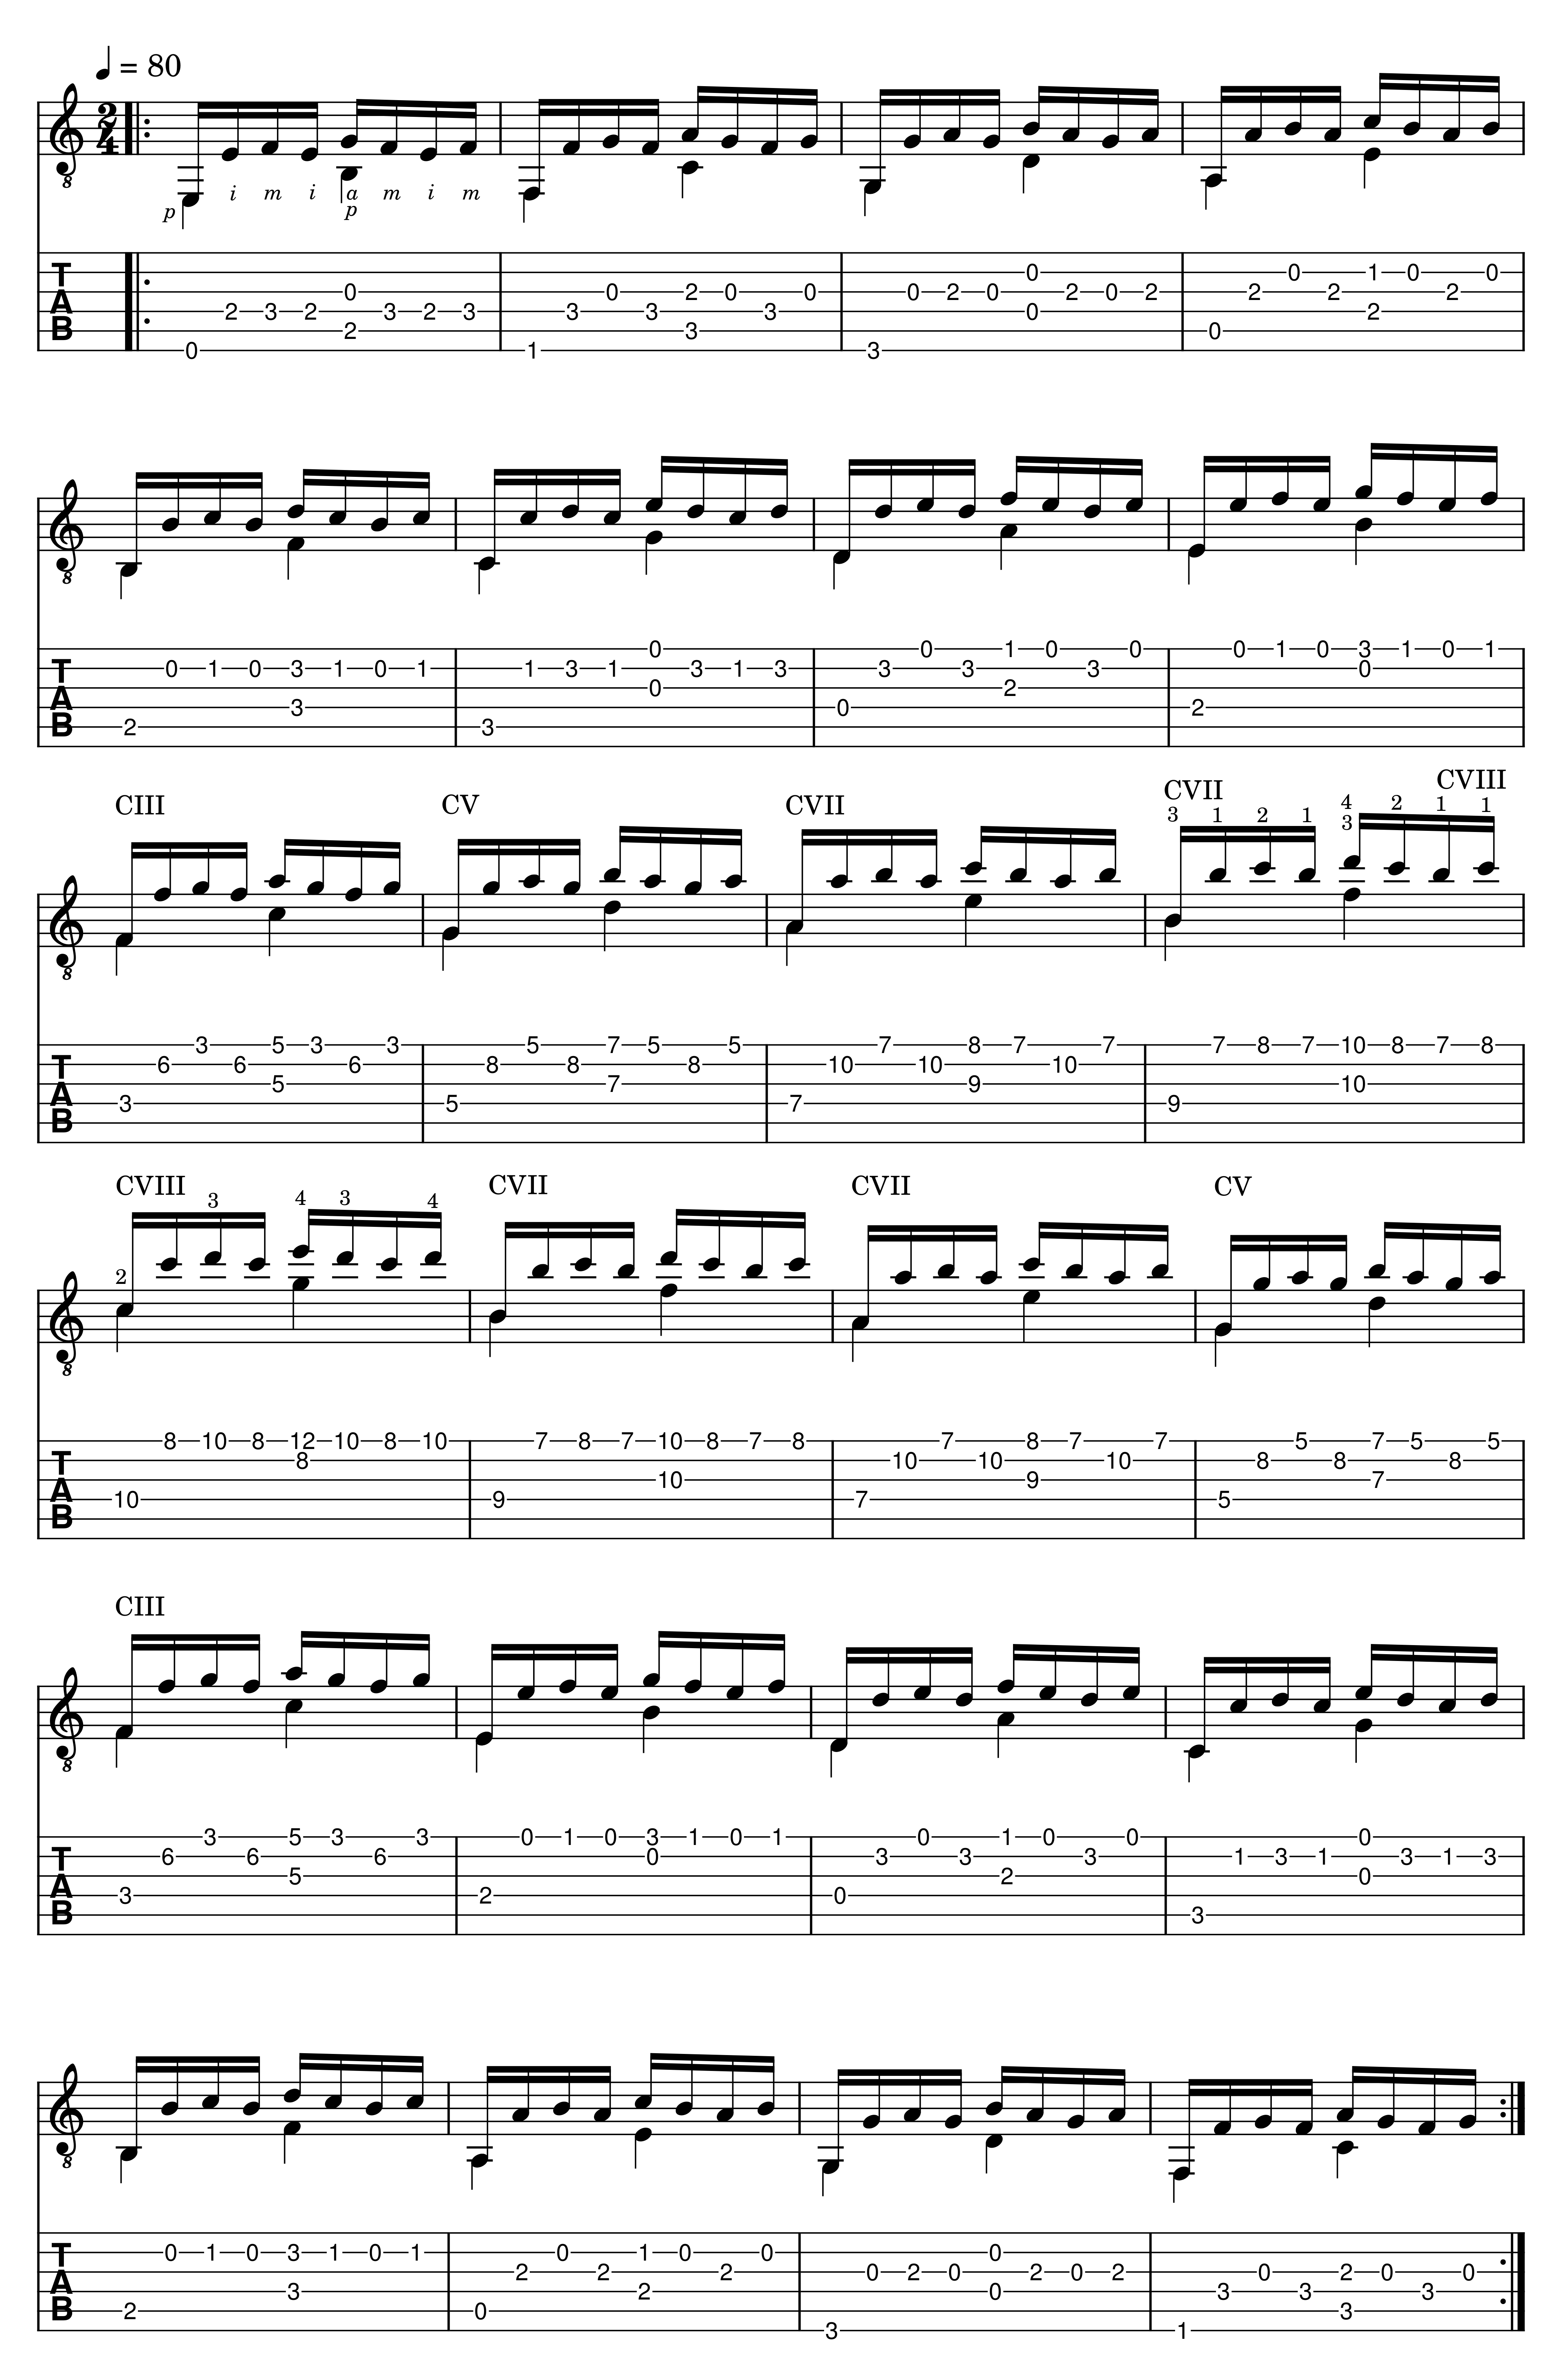
p-a-m-a pi-m-a-m (pattern 4). Each measure starts with a bass note and its third. As we have seen in the triplet patterns, another bass note is added at beat 2 of each measure. For the last note in measure 12, move the barre up a fret. Similarly, the last note in measure 13 is fretted with the little finger to facilitate the passage to the next chord.
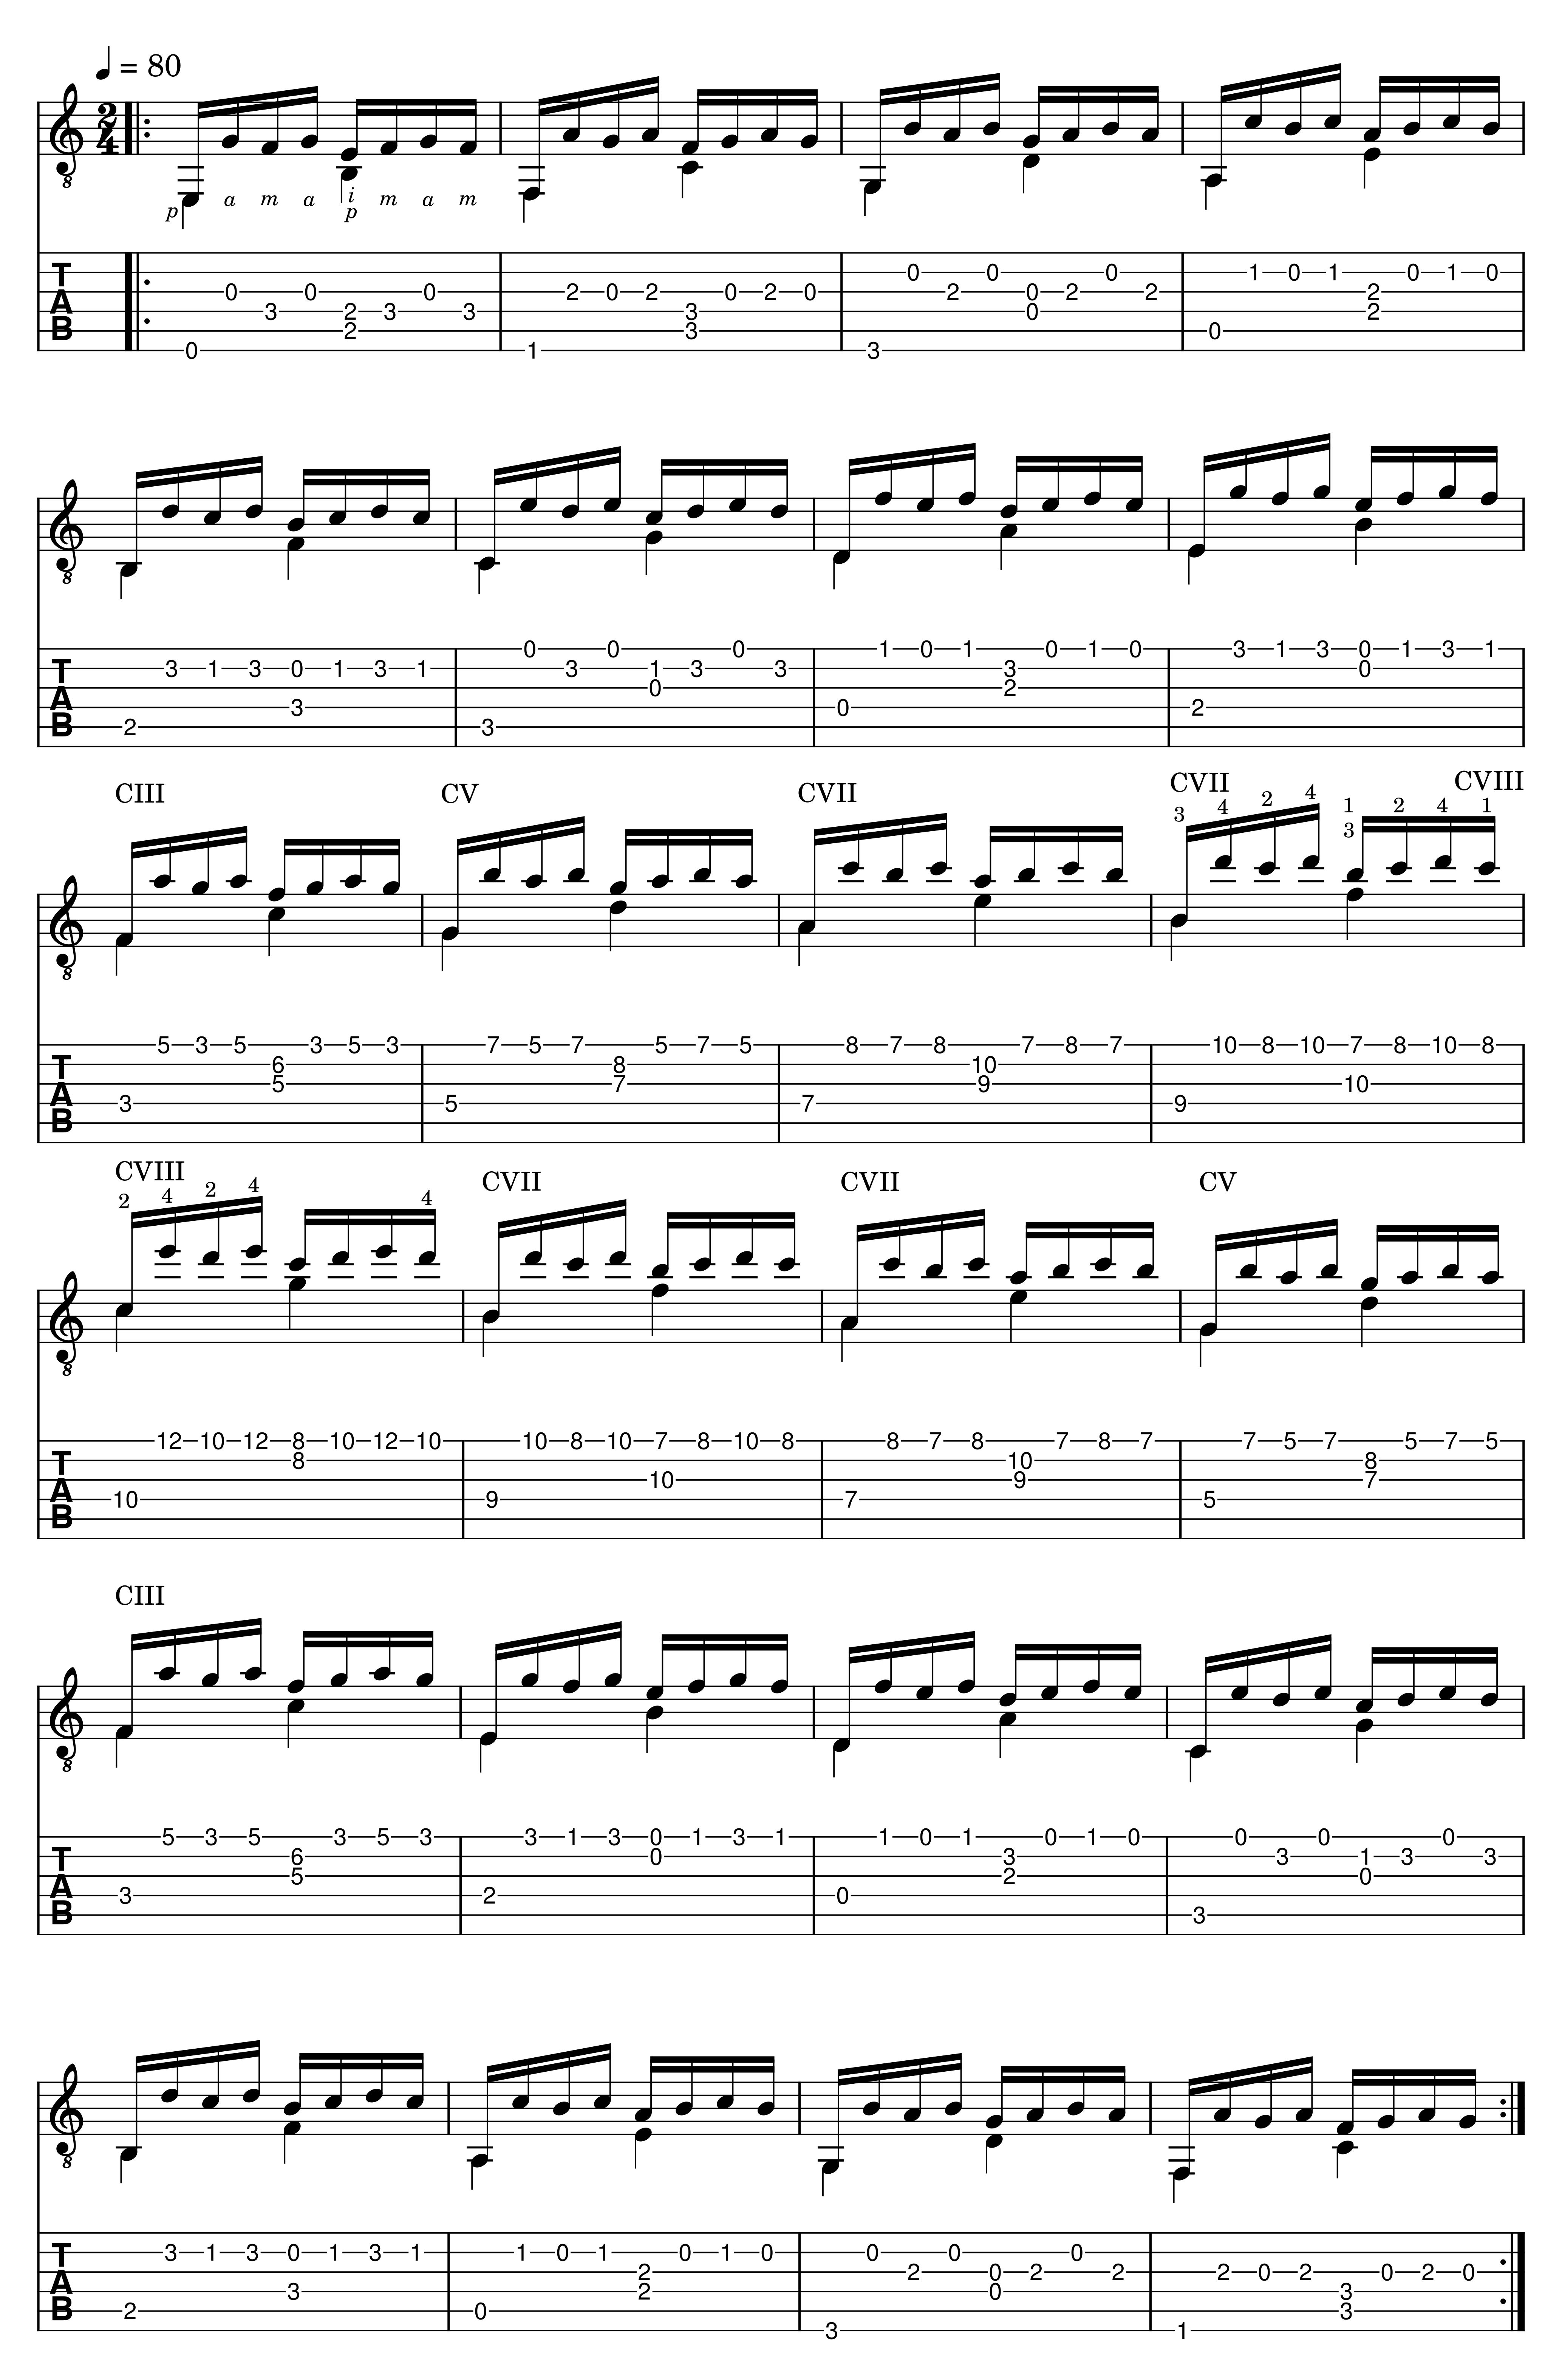
p-i-m-i pa-m-i-m (reverse of pattern 4). Each measure starts with a bass note and its octave.
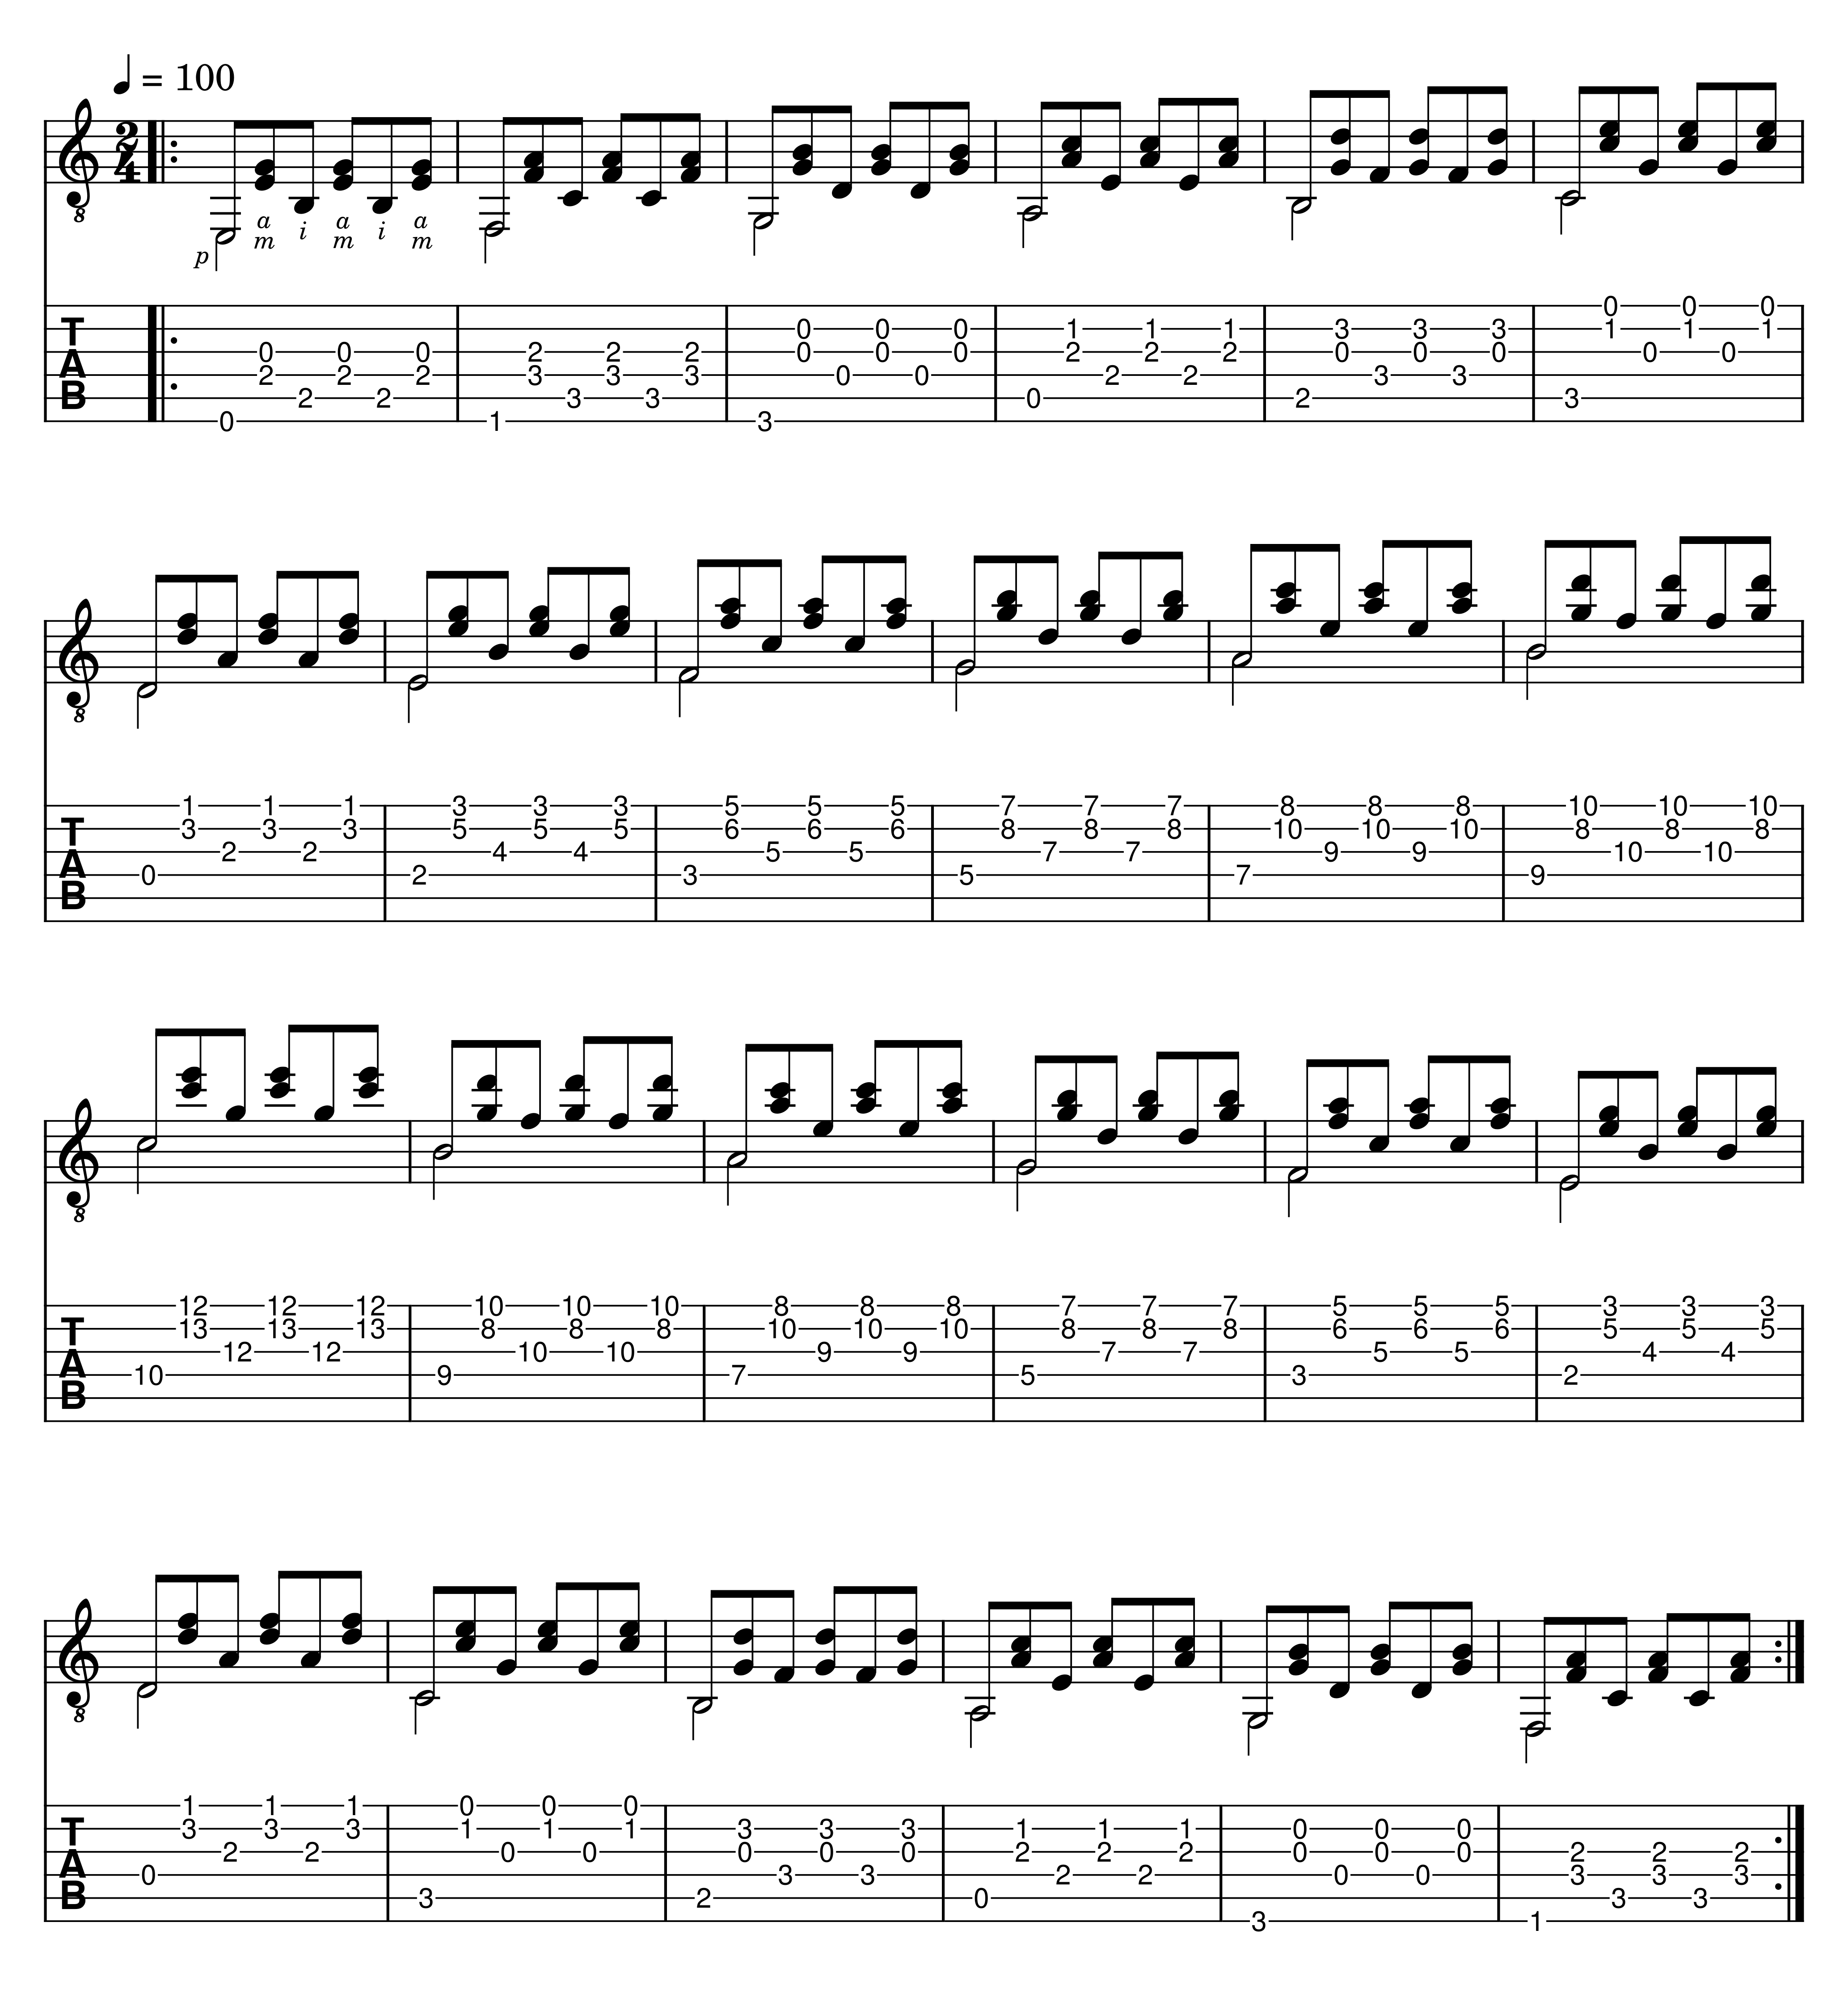
pa-m-i (pattern 5). The next two patterns may be the hardest of these single-note exercises, especially because your hands will tire quickly playing three chords per measure at faster tempos. Each beat starts with a bass note and its third. Notice the fingering in the second measure.
pi-m-a (reverse of pattern 5). Each beat starts with a bass note and its octave.
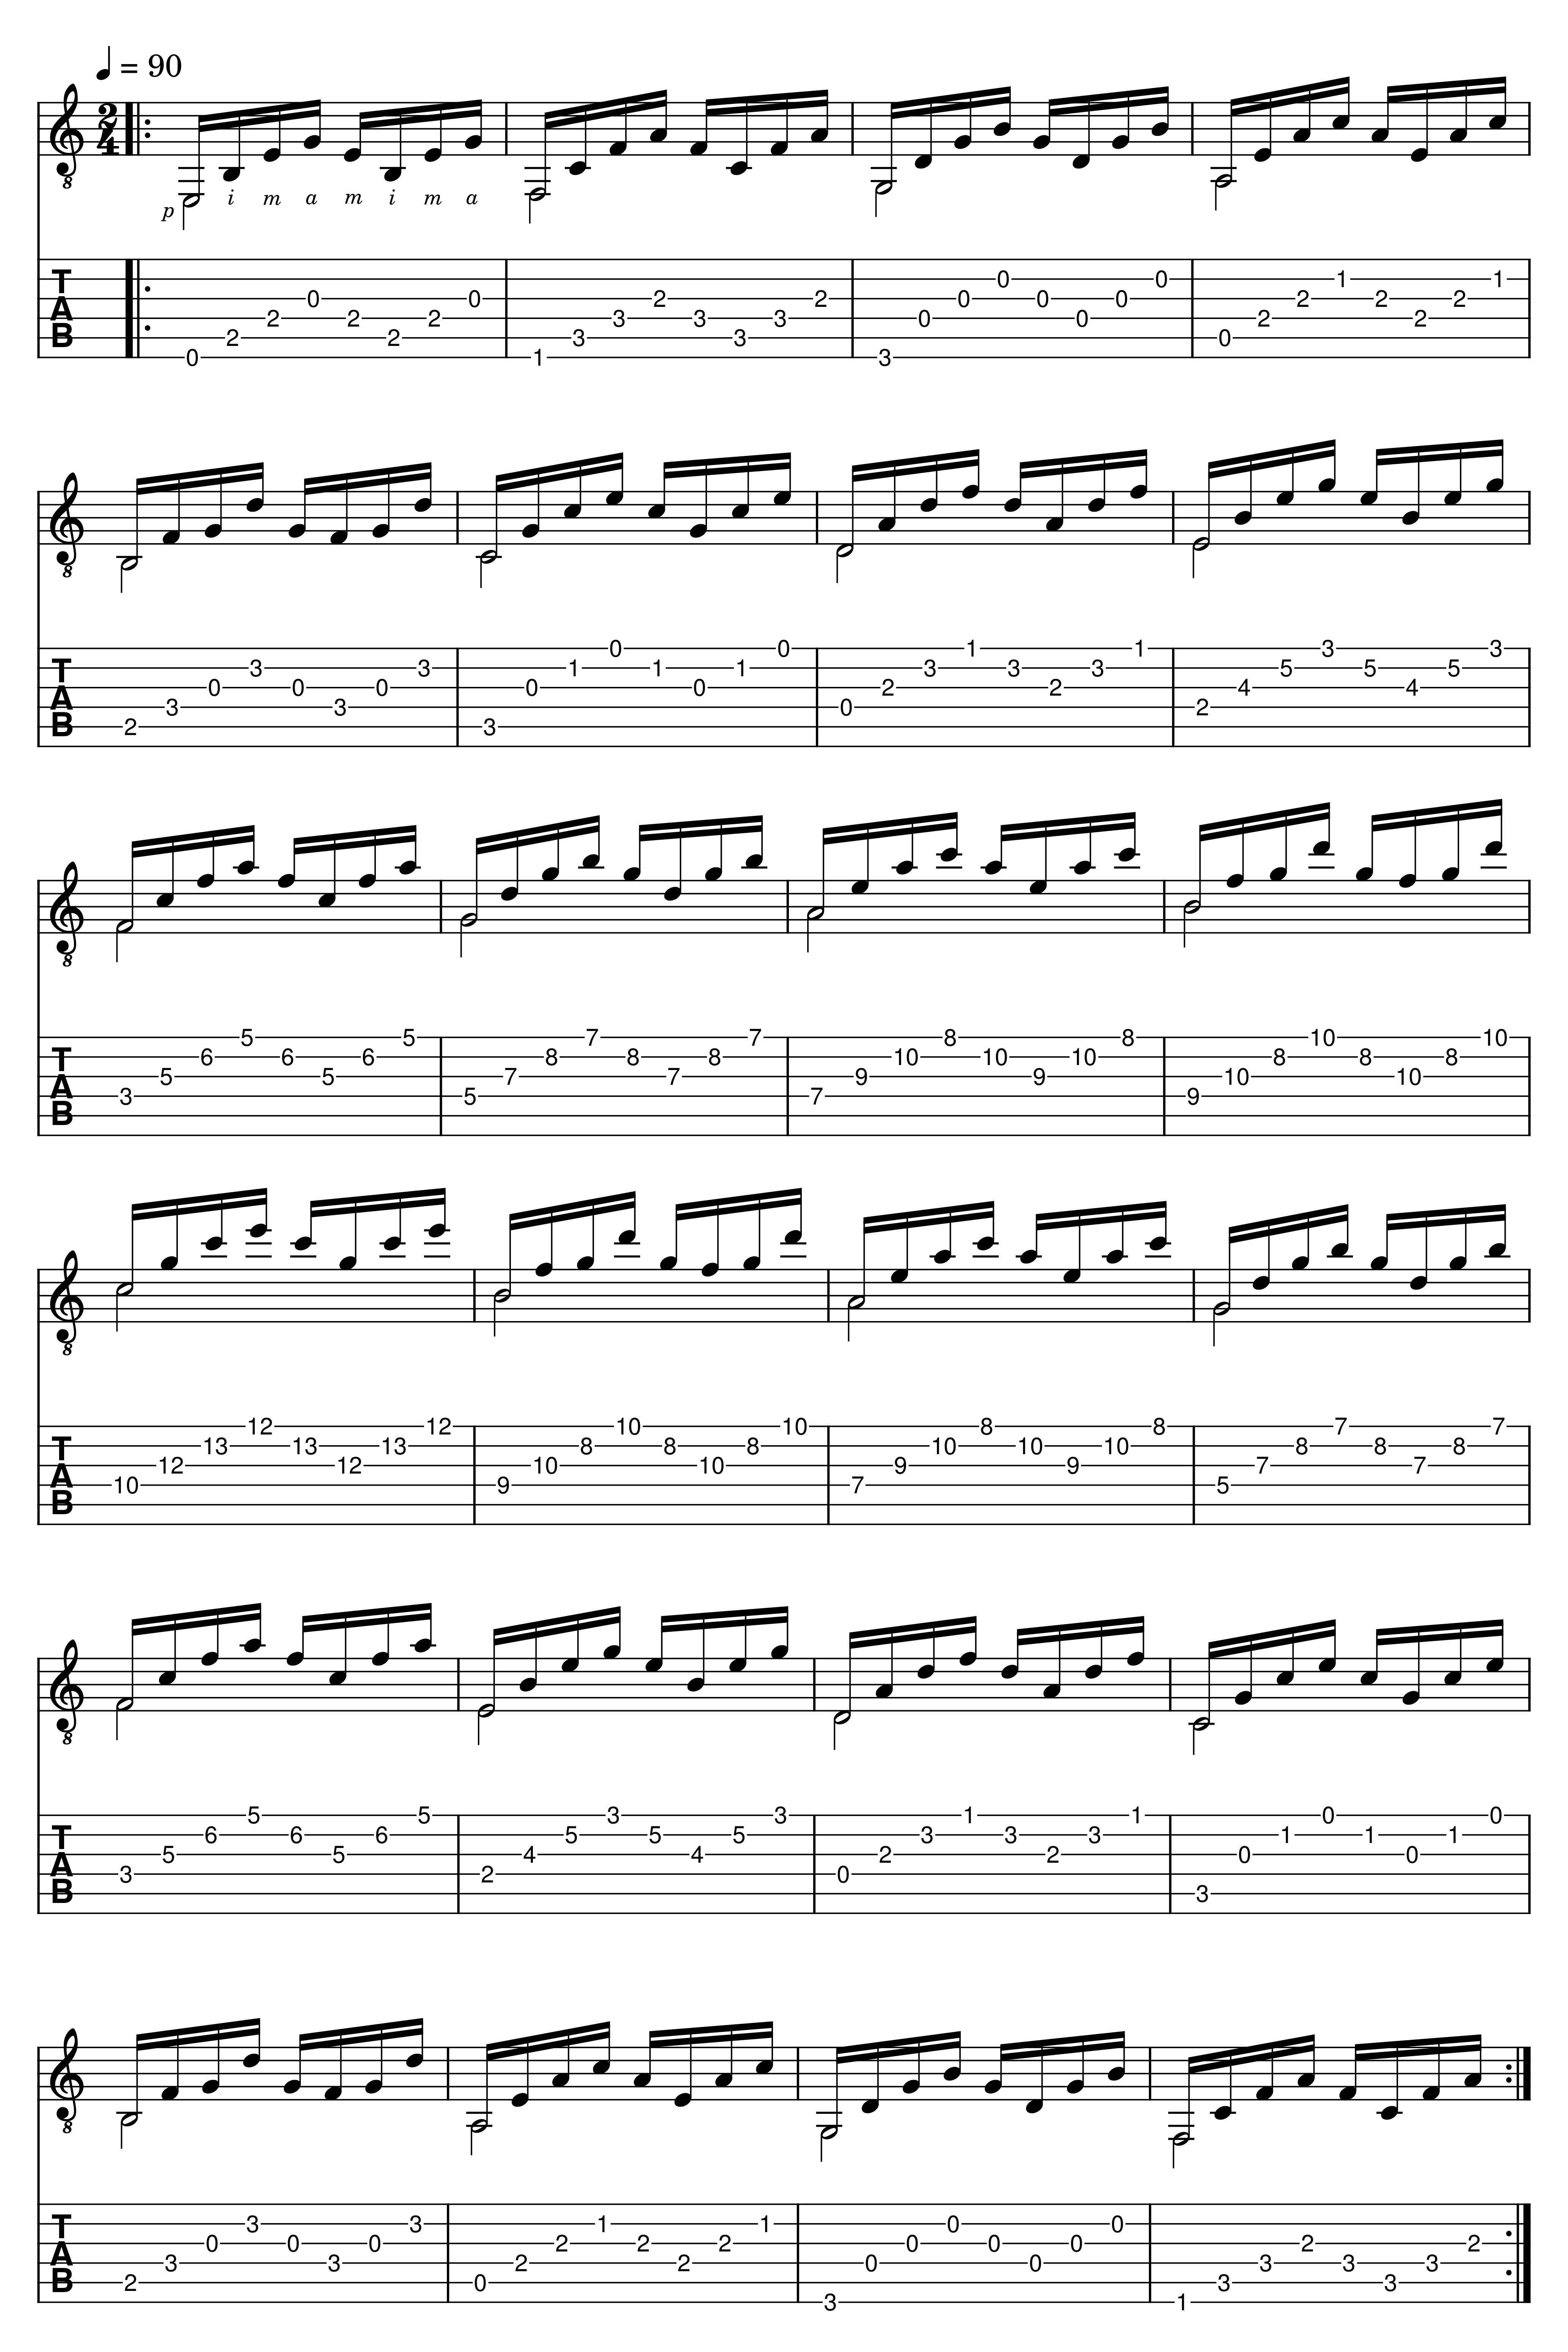
p-i-a-m-i. This is probably the most difficult exercise, and I've included it only for the benefit of the truly headstrong. It's not unreasonably difficult as far as flamenco tremolos go, but it will require some work (the challenge of this study is to make the exercises sound good), which I hope will benefit your strong head and make your hands even stronger. Notice that, unlike the other exercises, in the sixth measure, the bass notes of the C major chord are played on the fifth, fourth and third strings because it sounds better. For the same reason, in the eighth measure, the bass notes of the E minor are played on the fourth, third and second strings. Look carefully at the fingering in the 12th measure; the two barres should flow easily (I plant my fretting-hand thumb and use partial barres).
Now that you're familiar with diatonic chords in the key of C major, try transposing them to E major. The same chords (tonic-fifth-tonic-third) cover two octaves in 28 measures, and some of them are fretted differently in the first seven measures. The score below shows a simple arpeggio pattern (the reverse of pattern 1).